Supraman40
Well-Known Member
- First Name
- Eric
- Joined
- Mar 8, 2024
- Threads
- 4
- Messages
- 123
- Reaction score
- 70
- Location
- Savannah, Ga
- Car(s)
- Gr Supra
- Thread starter
- #1
This is only for the brave (and if you're like me the desperate and dumb  )
)
You don't have to remove the engine or subframe to install forged internals.
This all started with the oil cap breather I installed. It didn't cause the issue but it masked it.
The issue I had was a cracked valve cover that was allowing oil to enter the cylinders and slowly and gradually leaked oil onto the outside of the cylinder head. I assumed this oil residue was only due to the oil cap breather, so I ignored it. This was going on for maybe 6-8 months.
Near the end, I was getting misfires in cylinder 6 (it could have been and cylinder), I checked the spark plug and it was black and had lots of carbon. I replaced it and everything went back to normal.
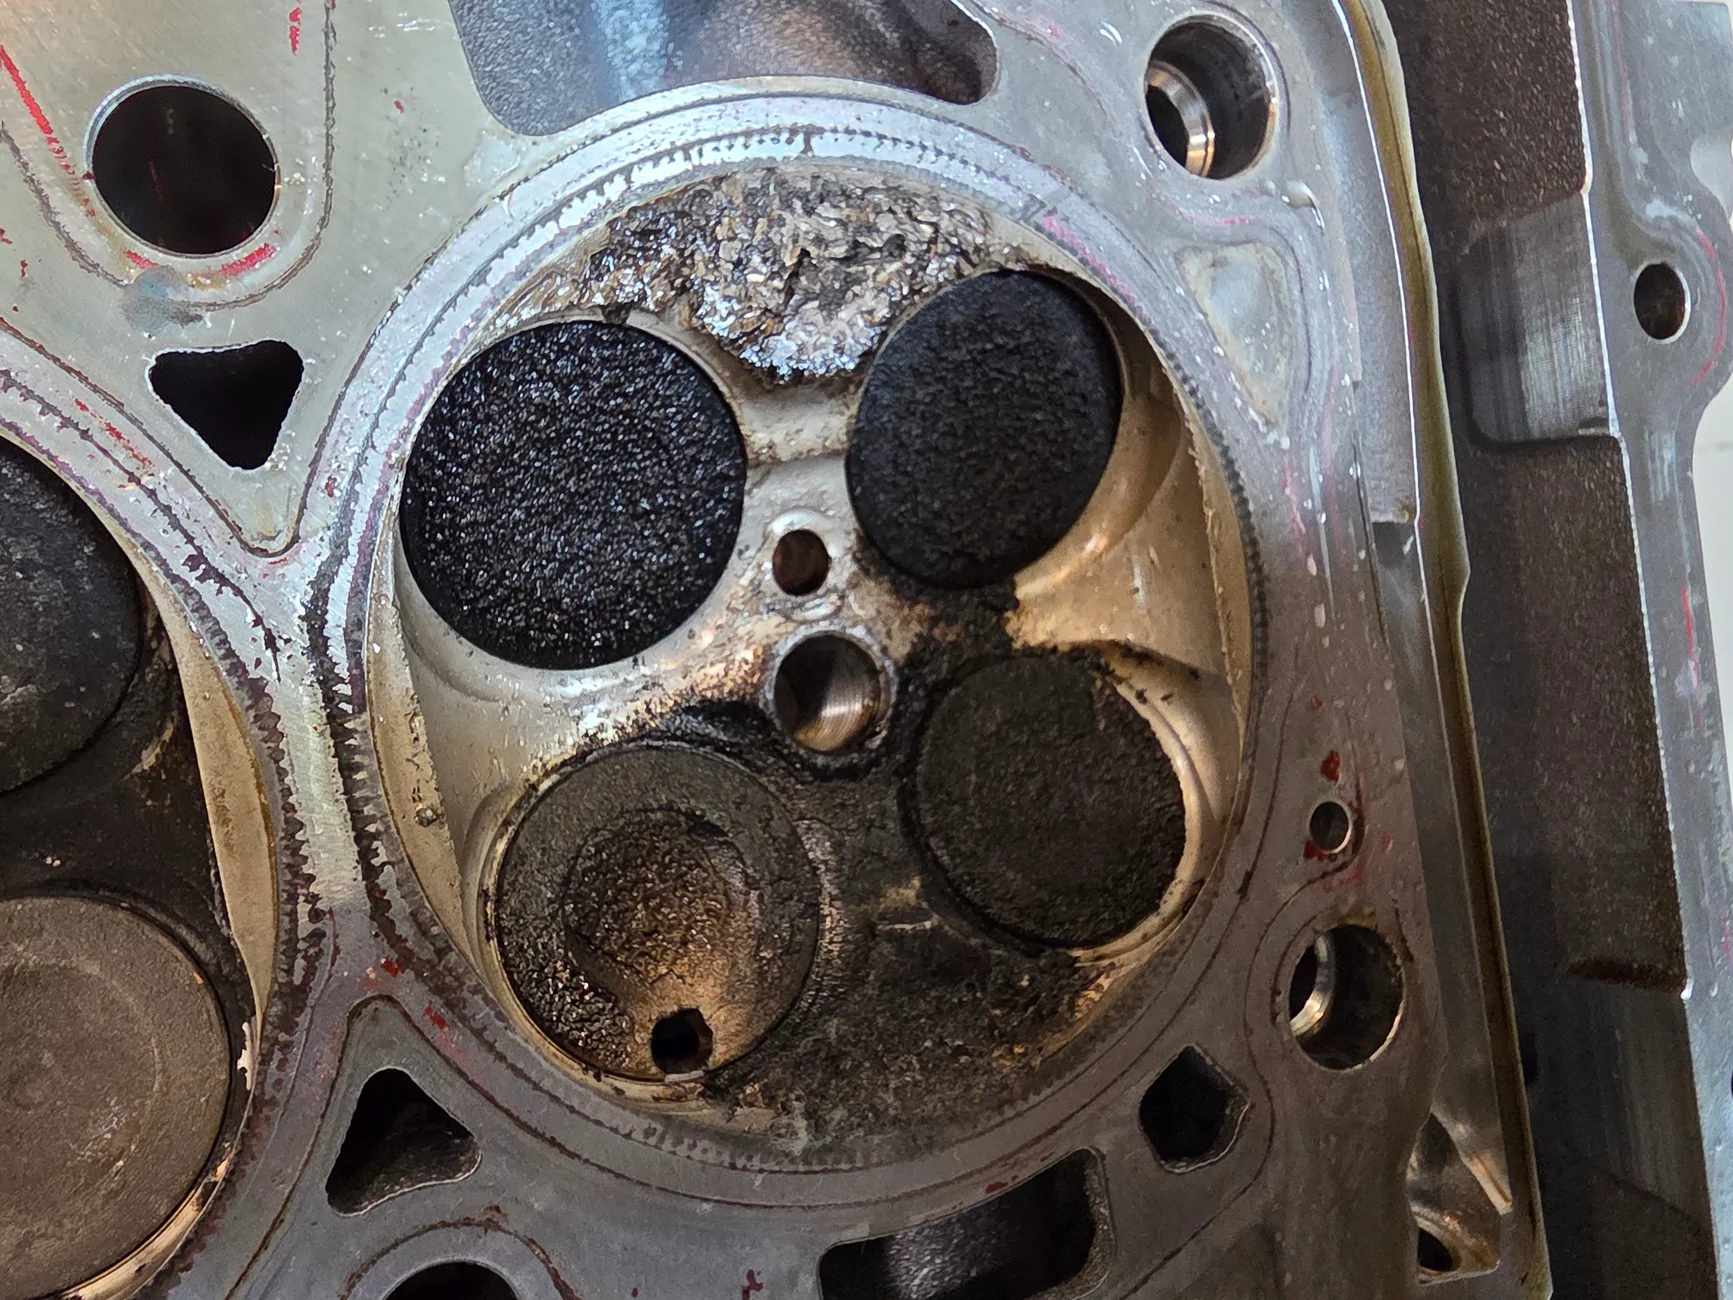
I did this multiple times until the check engine wouldn't go away and the supra sounded like it was cammed or had an exhaust leak. After much research I found another symptom, exhaust being sucked back into the cylinder, confirmed by holding a plastic bag at the end of the exhaust and it was getting suck in. I used a bore scope camera down the spark plug hole and found what looked like a hole the the exhaust valve.

So here's a write up generally describing the process.
1. Preparation, about $500 in special tools.
• B58 Timing tool from Amazon
• B58 cam spring removal tool from Amazon (comes with 16 point socket for cam gears, if upgrading cams)
• Digital scale
• 24 inch torque wrench 50- 150 lbs
• 1/2 inch T55 socket (short version) with 6 in and 12 in extension for cylinder head.
• Bolt stretch gauge
• Plastigauge
• Vice
• Head gasket
• Turbo: oil/ coolant seals, nuts, and gasket, v-band clamp
• Intake manifold gaskets
- Valve Cover Gasket
• Feeler gauges
• Piston install tool (ring compression tool)
• 12 point sockets
• E torx and torx sockets
• Pass through bit driver (for oil pump sprocket)
• Connecting rod balancing tool (to check weight)
• BMW oil pan gasket making
- injector seals and special tool to install them
- Boregauge and micrometer (to verify piston to cylinder clearance)
2. Forge internals
• pistons and rods (I went with CP Carillo Pro-Xtreme with heavy duty wrist pin by 5150Autosport)
• Manley Connecting Rods by 5150
• ACL Bearings (I assumed they are better than King bearing because they're more expensive)
• Kelford cams and springs
• ARP head bolts
• ARP girdle bolts and oil pump bolts
• ARP oil pump sprocket bolt
3. Disassembly Top Side
• Disconnect the battery to ensure safety
• Drain engine oil and coolant completely
• Remove downpipe, intake, charge pipes
• Remove turbo assembly
• Remove intake manifold
• Remove ignition coils, HPFP, injectors, and spark plugs
• Remove the plastic linding near the windshield and the aluminum brace
• Remove the valve cover
• Remove timing chain tensioner and guide
• Rotate engine to top dead center position
• Lock cams in place with timing tool
• Remove the cam gears with 16 point socket
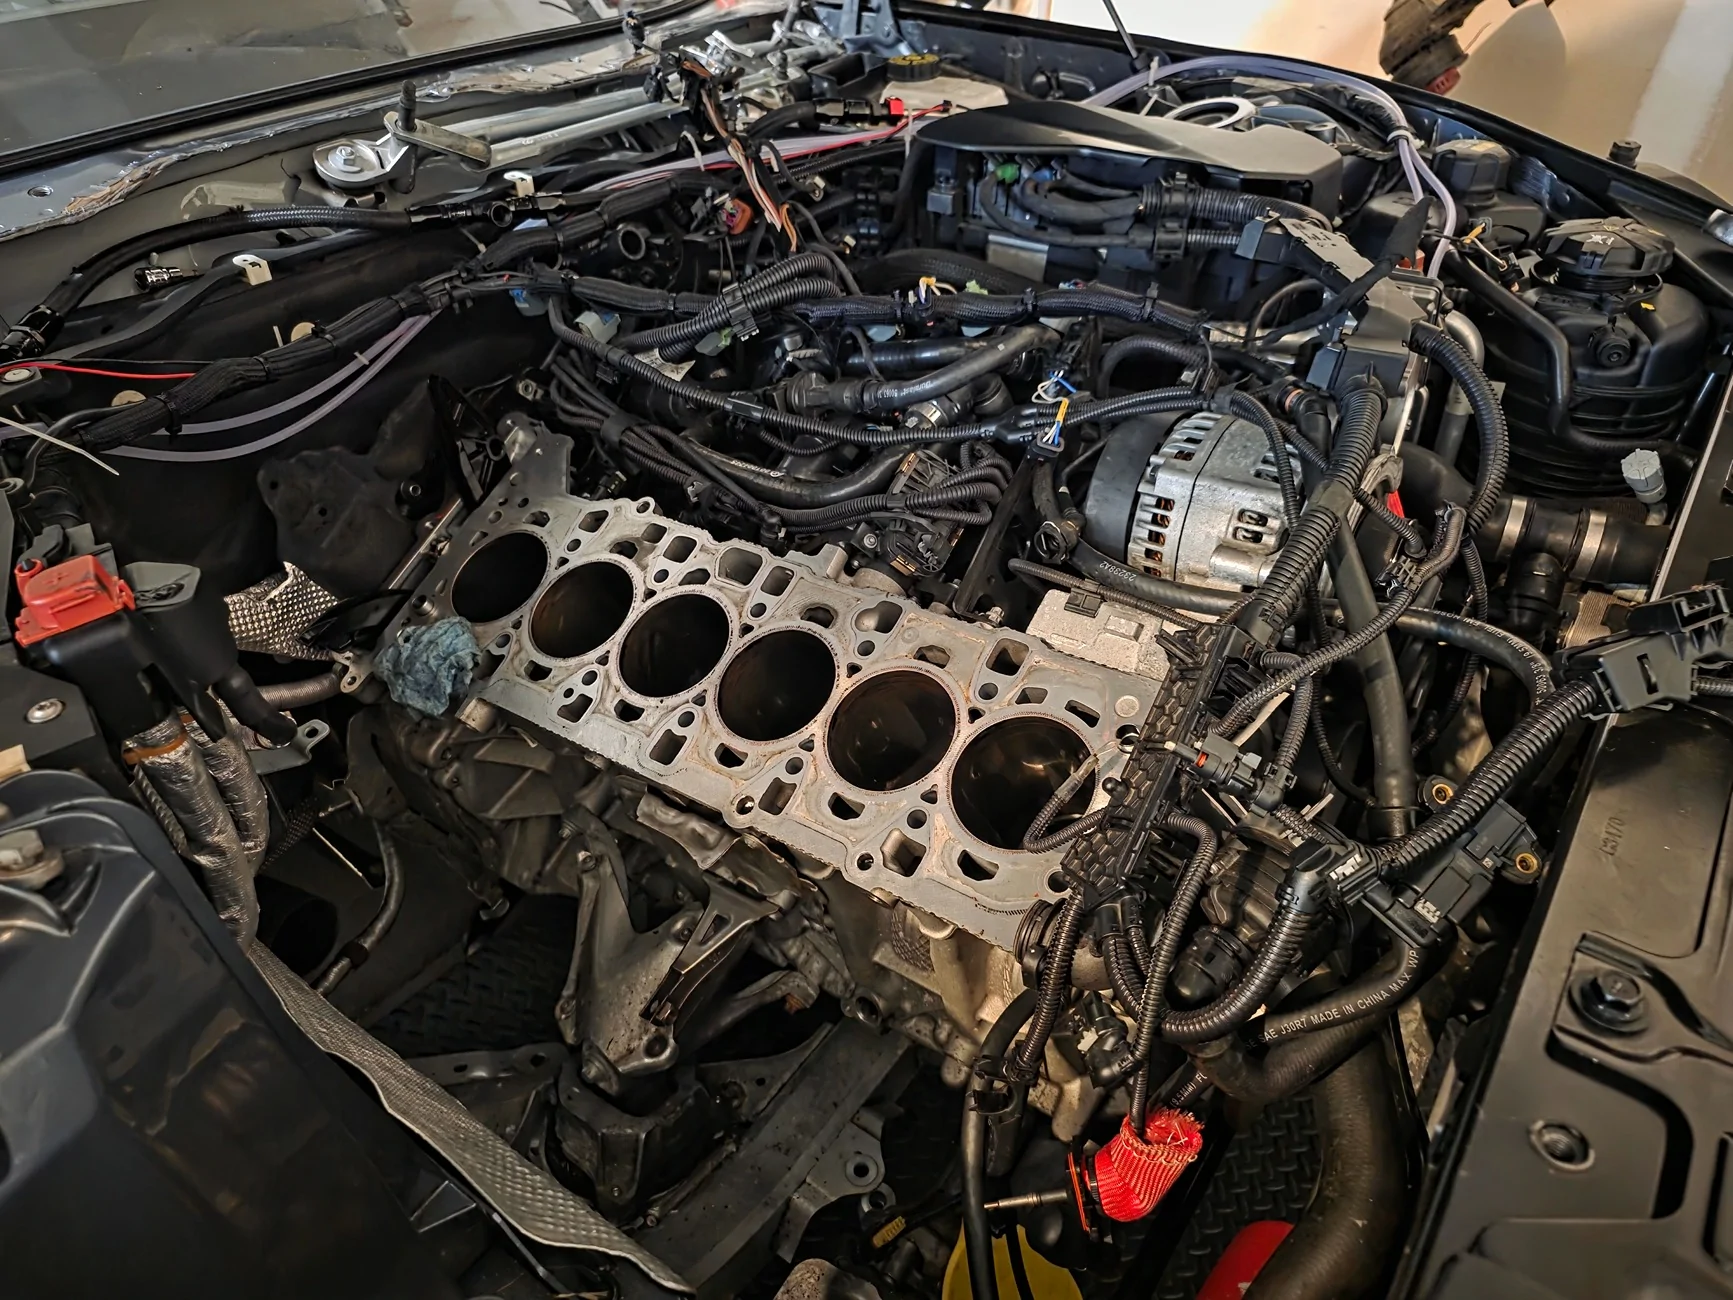
• Remove the cylinder head, following the correct bolt sequence
• Remove cams once the head is out
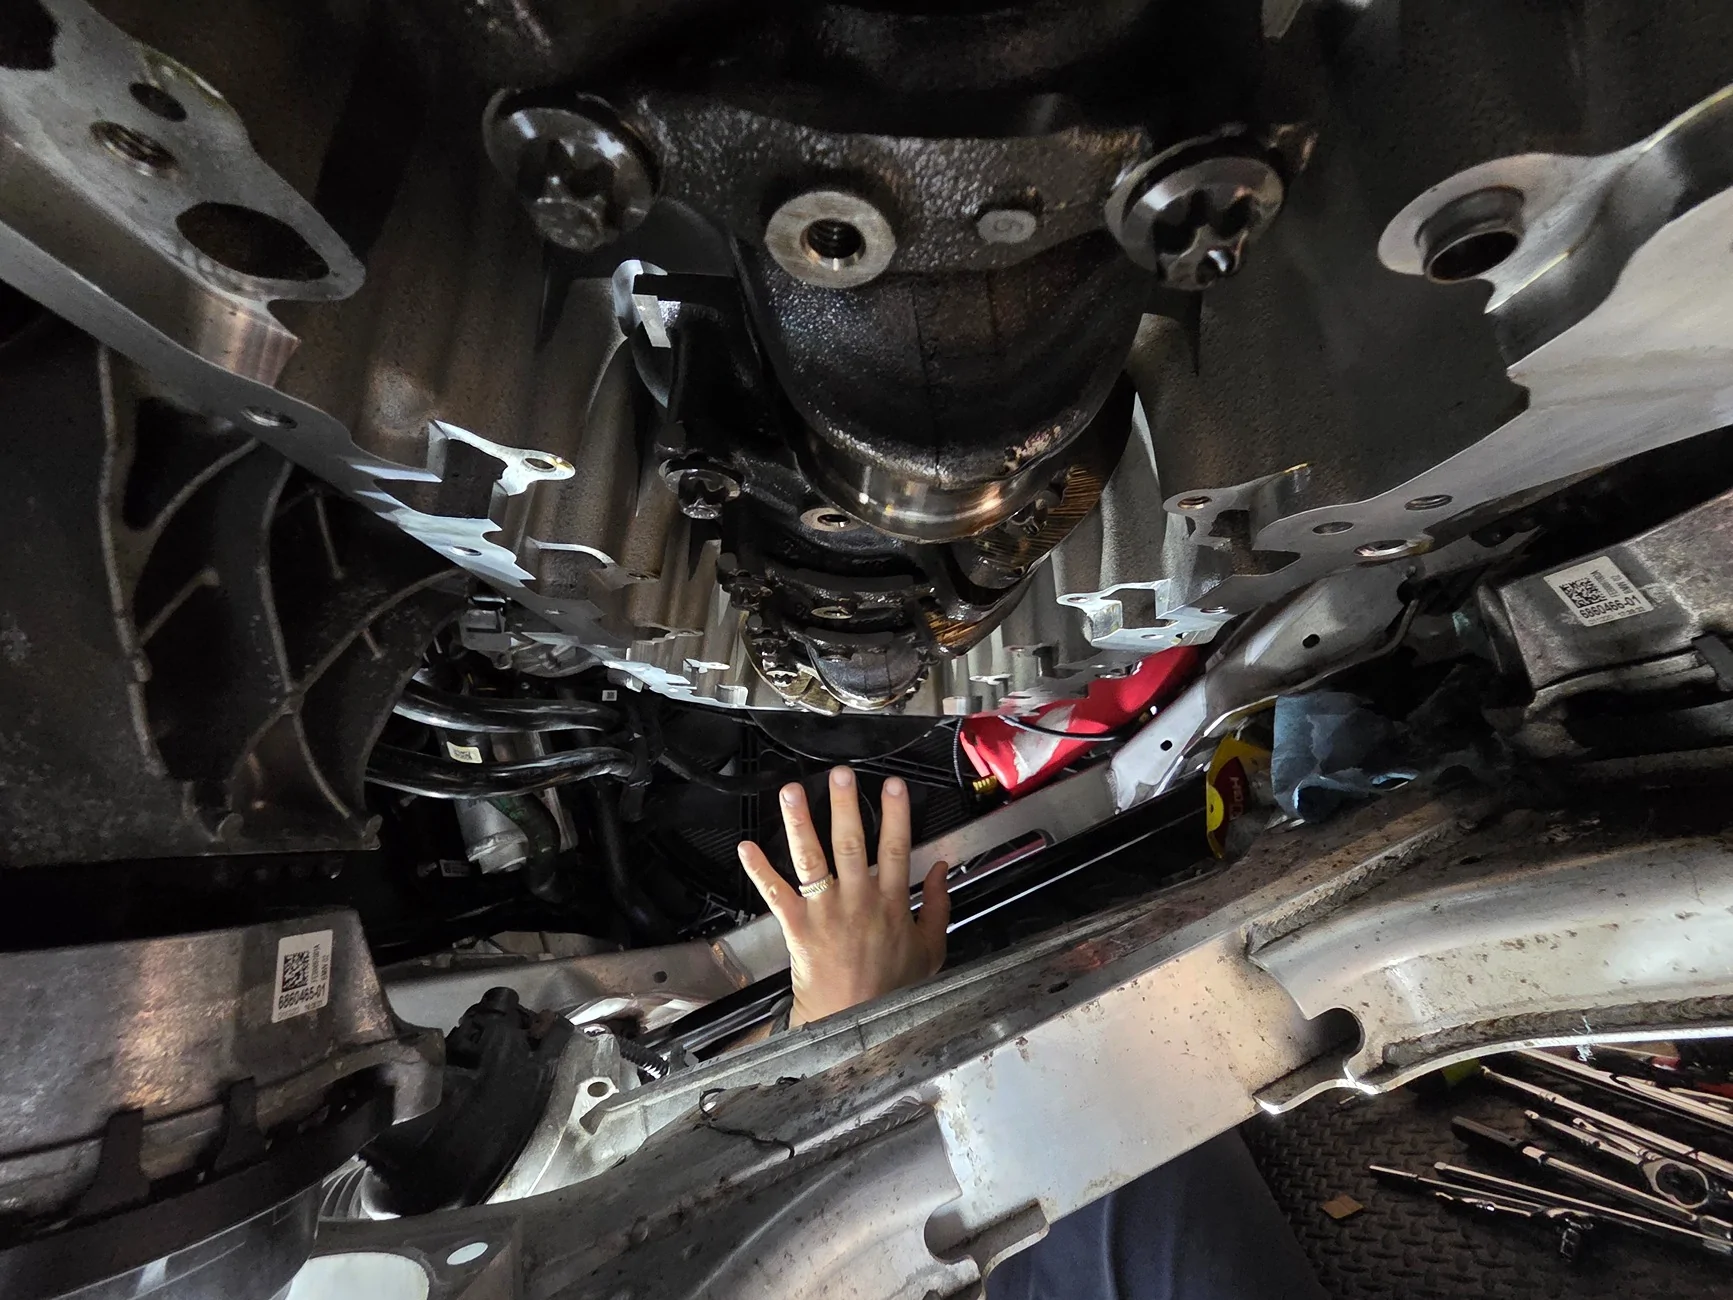
4. Disassembly Bottom Side (All these Torx bolts are fragile and will shred if you hit them at the wrong angle)
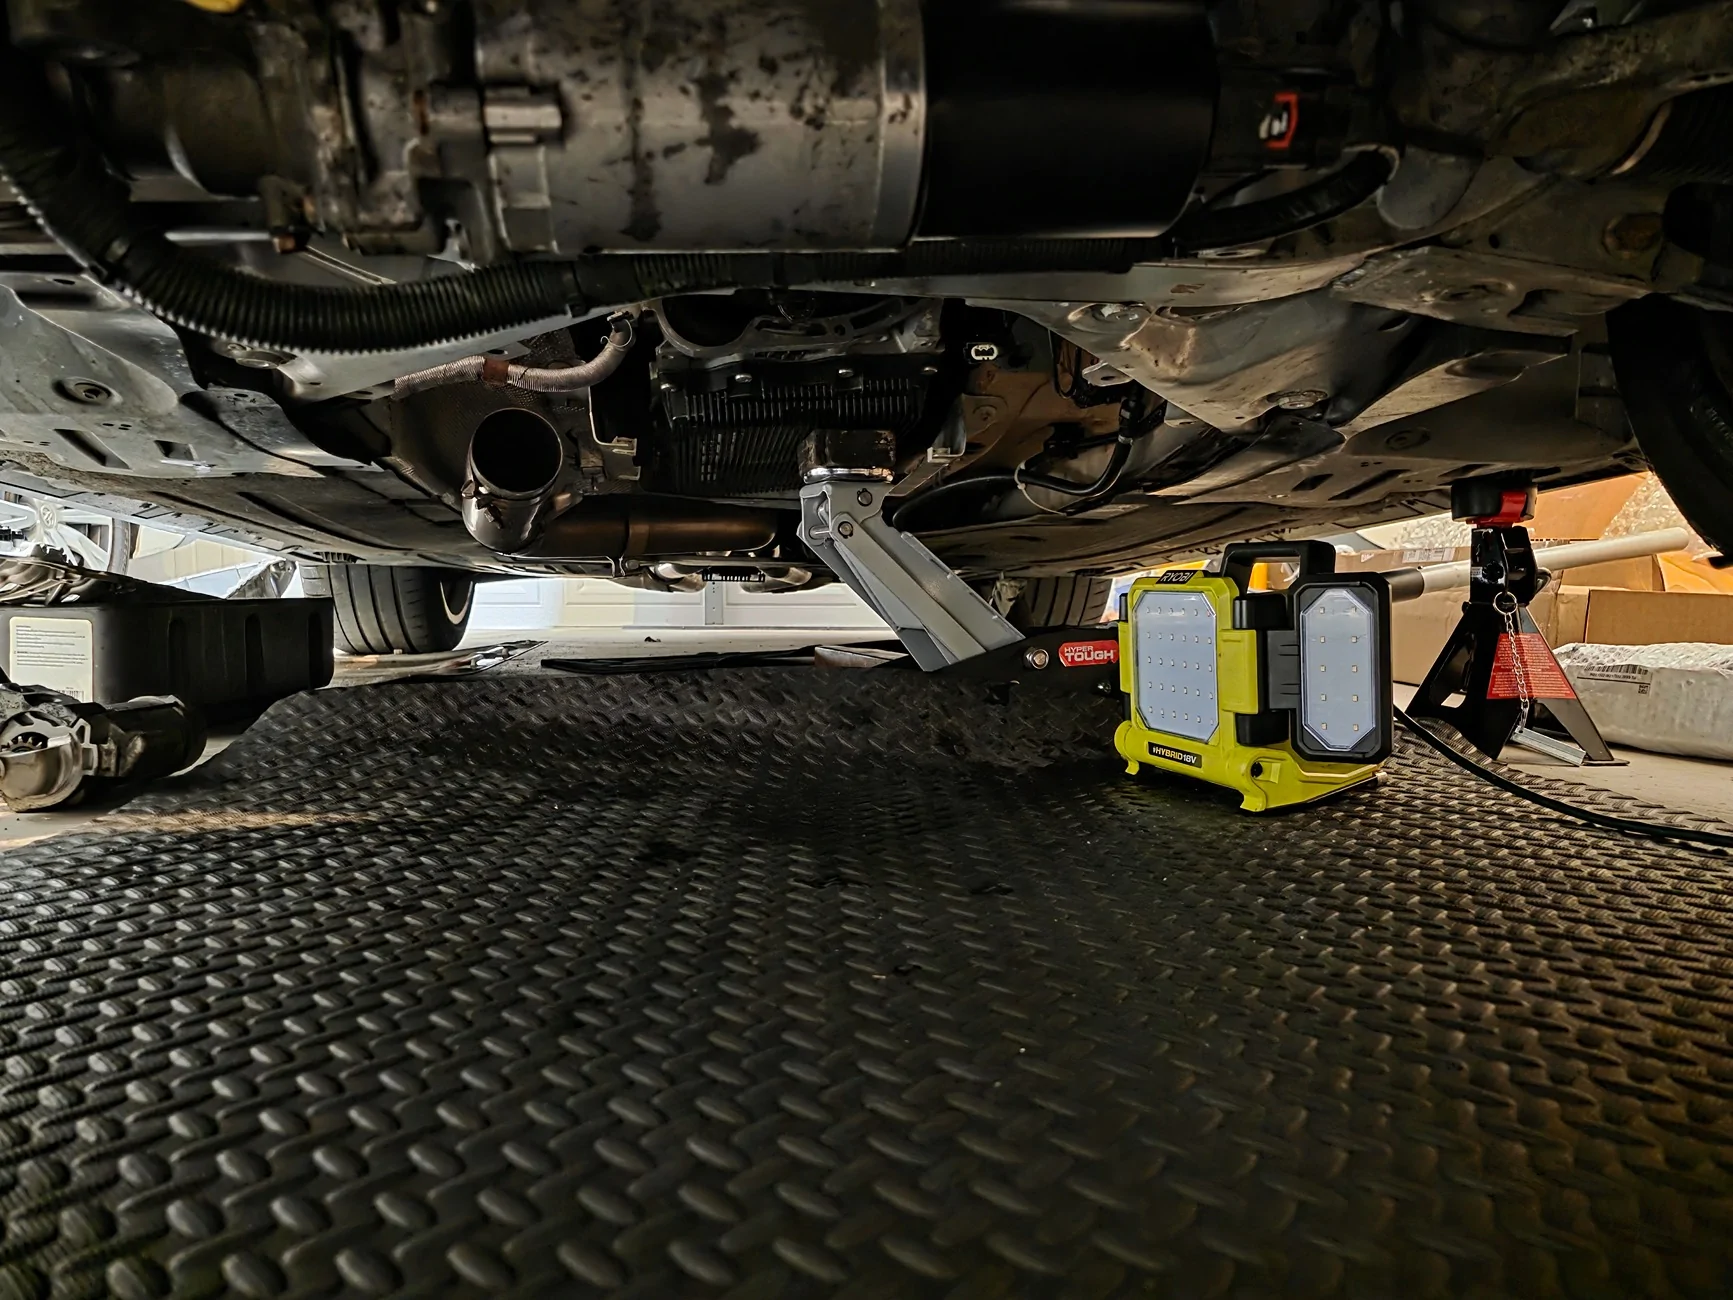
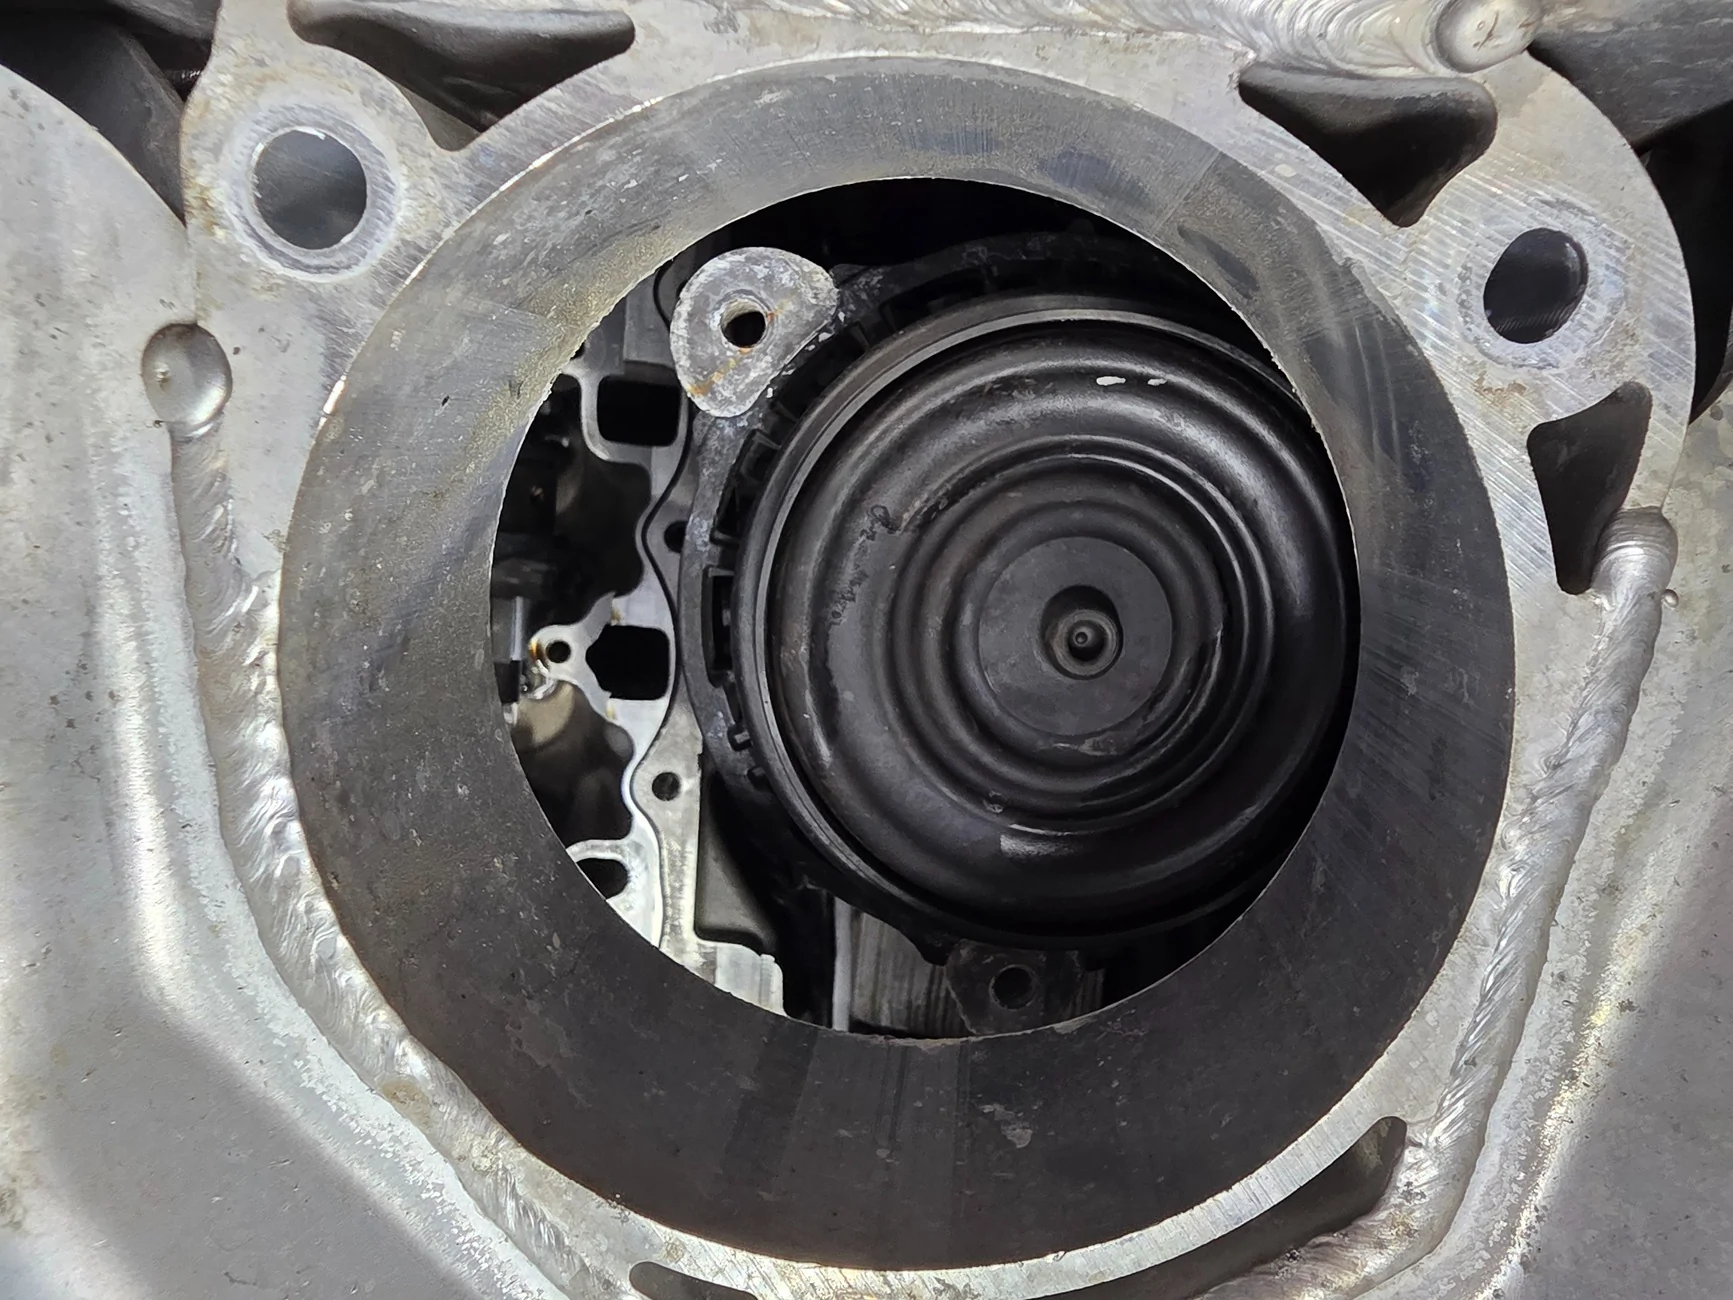
• Support the transmission and unbolt the circular engine mounts on one side, maybe both sides.
• Remove the steering assembly bolts and allow it to hang
• Jack the transmission the engine with go up to, this give you space required to remove the oil pan.
• Remove the oil pan, if you need more space jack the transmission higher
• Remove the oil pump sprocket bolt, you may have to hold the crank shaft with a special tool (IMPORTANT: ITS A REVERSE THREAD BOLT).
• Remove the 4 oil pump bolts
• Remove the girdle bolts
• Remove the connecting rod bolts and the caps
• From underneath, push the pistons out of the engine block through the top of the engine.
5. Cleaning and Inspect
6. Piston and Rod Assembly
• Weigh the entire rod, piston, rings, pins, bearings (The goal is less than 1.0 grams difference between each piston assembly)
- measure piston with digital caliper (piston manufacturer will specify where to measure)
- Measure bore with boregauge
- The difference in piston measurement and bore measurement is the clearance.
- Measure/verify ring fap in cylinder
• Install new piston rings, properly oriented per manufacturer spec (stagger ring gaps).
• Assemble rods and pistons
• Check bolt stretch with gauge with rod in a vice
• Drop pistons with caps removed into the cylinders using piston ring clamp install tool
• Install caps with plastigauge to verify clearance
• install bolts and caps
7. Reassemble in Reverse
• Use timing tool to set timing after head and cams are installed.
Helful videos: I couldn't find any videos of doing this job with the engine installed, so I had to piece together multiple videos to figure it out.
B58 Teardown videos
Weighing pistons and rods
Kern417 Cam Job 3 Part Series
Remving Oil Pan and Pump (don't remove subframe)
Papadakis Teardown and Build Guide
)You don't have to remove the engine or subframe to install forged internals.
This all started with the oil cap breather I installed. It didn't cause the issue but it masked it.
The issue I had was a cracked valve cover that was allowing oil to enter the cylinders and slowly and gradually leaked oil onto the outside of the cylinder head. I assumed this oil residue was only due to the oil cap breather, so I ignored it. This was going on for maybe 6-8 months.
Near the end, I was getting misfires in cylinder 6 (it could have been and cylinder), I checked the spark plug and it was black and had lots of carbon. I replaced it and everything went back to normal.
I did this multiple times until the check engine wouldn't go away and the supra sounded like it was cammed or had an exhaust leak. After much research I found another symptom, exhaust being sucked back into the cylinder, confirmed by holding a plastic bag at the end of the exhaust and it was getting suck in. I used a bore scope camera down the spark plug hole and found what looked like a hole the the exhaust valve.

So here's a write up generally describing the process.
1. Preparation, about $500 in special tools.
• B58 Timing tool from Amazon
• B58 cam spring removal tool from Amazon (comes with 16 point socket for cam gears, if upgrading cams)
• Digital scale
• 24 inch torque wrench 50- 150 lbs
• 1/2 inch T55 socket (short version) with 6 in and 12 in extension for cylinder head.
• Bolt stretch gauge
• Plastigauge
• Vice
• Head gasket
• Turbo: oil/ coolant seals, nuts, and gasket, v-band clamp
• Intake manifold gaskets
- Valve Cover Gasket
• Feeler gauges
• Piston install tool (ring compression tool)
• 12 point sockets
• E torx and torx sockets
• Pass through bit driver (for oil pump sprocket)
• Connecting rod balancing tool (to check weight)
• BMW oil pan gasket making
- injector seals and special tool to install them
- Boregauge and micrometer (to verify piston to cylinder clearance)
2. Forge internals
• pistons and rods (I went with CP Carillo Pro-Xtreme with heavy duty wrist pin by 5150Autosport)
• Manley Connecting Rods by 5150
• ACL Bearings (I assumed they are better than King bearing because they're more expensive)
• Kelford cams and springs
• ARP head bolts
• ARP girdle bolts and oil pump bolts
• ARP oil pump sprocket bolt
3. Disassembly Top Side
• Disconnect the battery to ensure safety
• Drain engine oil and coolant completely
• Remove downpipe, intake, charge pipes
• Remove turbo assembly
• Remove intake manifold
• Remove ignition coils, HPFP, injectors, and spark plugs
• Remove the plastic linding near the windshield and the aluminum brace
• Remove the valve cover
• Remove timing chain tensioner and guide
• Rotate engine to top dead center position
• Lock cams in place with timing tool
• Remove the cam gears with 16 point socket
• Remove the cylinder head, following the correct bolt sequence
• Remove cams once the head is out
4. Disassembly Bottom Side (All these Torx bolts are fragile and will shred if you hit them at the wrong angle)
• Support the transmission and unbolt the circular engine mounts on one side, maybe both sides.
• Remove the steering assembly bolts and allow it to hang
• Jack the transmission the engine with go up to, this give you space required to remove the oil pan.
• Remove the oil pan, if you need more space jack the transmission higher
• Remove the oil pump sprocket bolt, you may have to hold the crank shaft with a special tool (IMPORTANT: ITS A REVERSE THREAD BOLT).
• Remove the 4 oil pump bolts
• Remove the girdle bolts
• Remove the connecting rod bolts and the caps
• From underneath, push the pistons out of the engine block through the top of the engine.
5. Cleaning and Inspect
6. Piston and Rod Assembly
• Weigh the entire rod, piston, rings, pins, bearings (The goal is less than 1.0 grams difference between each piston assembly)
- measure piston with digital caliper (piston manufacturer will specify where to measure)
- Measure bore with boregauge
- The difference in piston measurement and bore measurement is the clearance.
- Measure/verify ring fap in cylinder
• Install new piston rings, properly oriented per manufacturer spec (stagger ring gaps).
• Assemble rods and pistons
• Check bolt stretch with gauge with rod in a vice
• Drop pistons with caps removed into the cylinders using piston ring clamp install tool
• Install caps with plastigauge to verify clearance
• install bolts and caps
7. Reassemble in Reverse
• Use timing tool to set timing after head and cams are installed.
Helful videos: I couldn't find any videos of doing this job with the engine installed, so I had to piece together multiple videos to figure it out.
B58 Teardown videos
Weighing pistons and rods
Kern417 Cam Job 3 Part Series
Remving Oil Pan and Pump (don't remove subframe)
Papadakis Teardown and Build Guide
Sponsored
Last edited: