oreobbq
Well-Known Member
- Thread starter
- #1
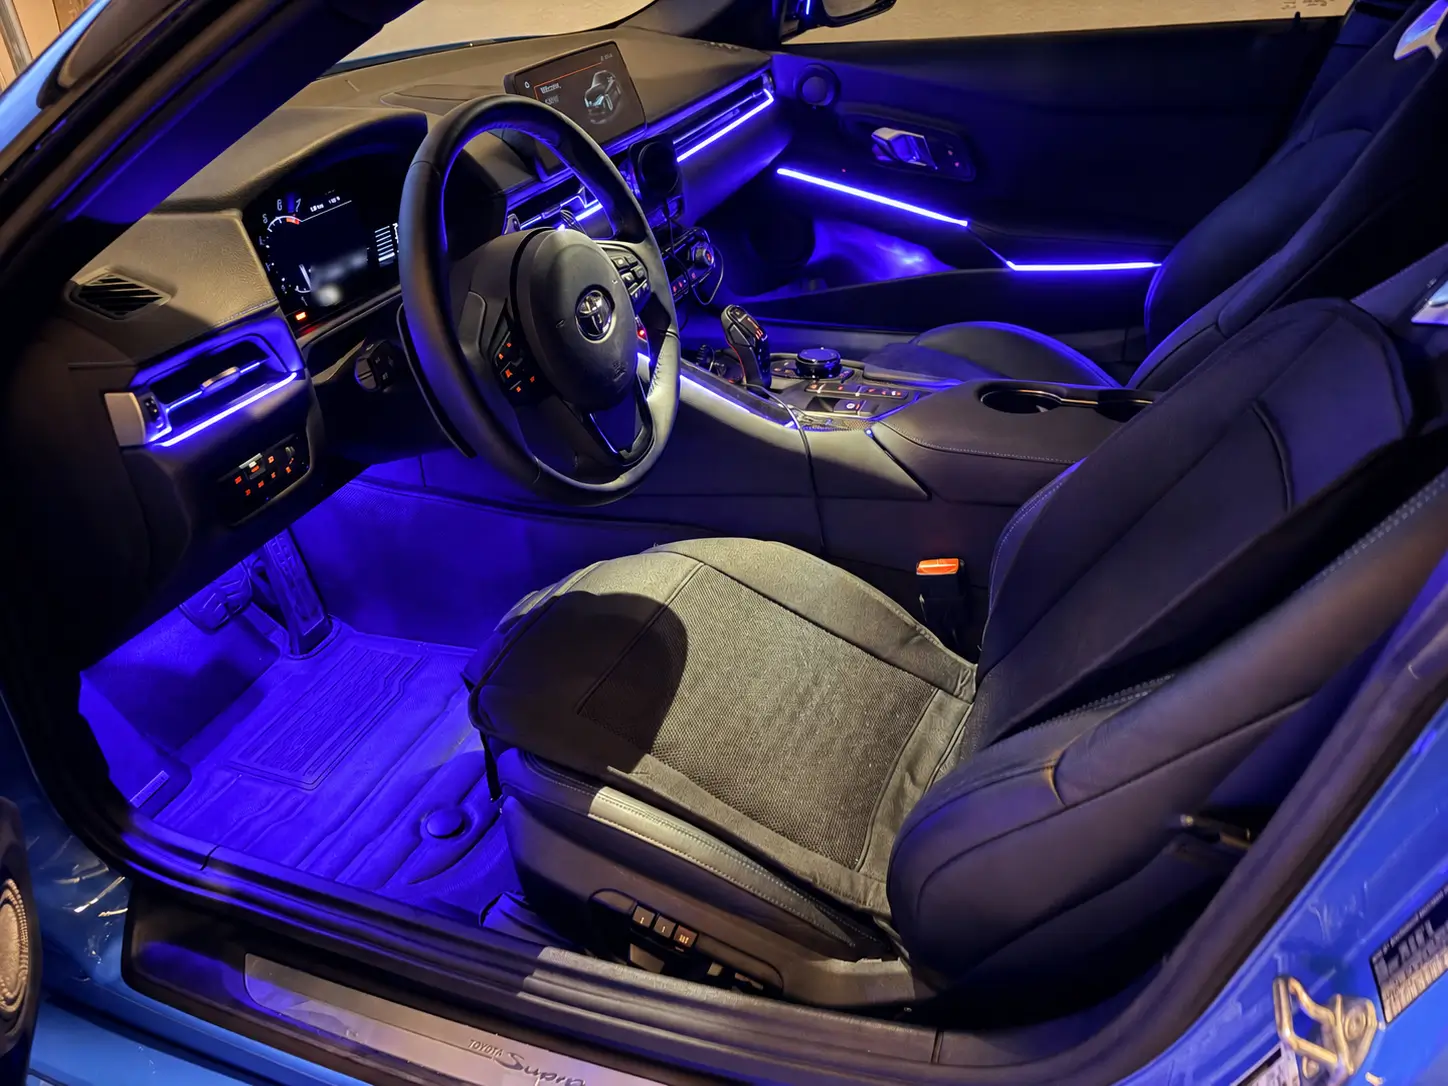
Well, I never thought I needed an ambient light nor a starlight kit, but I have since seen the light. The result is pretty nice (or rice haha). The main reason I decided to add some ambient light is to have a bit of illumination in the supra, which is a bat cave from factory. Both the LEDs and the starlight power on/off with the car’s accessory power, and I have some hidden switches to turn them on/off manually as desired. The stars alone actually add enough light at night to be able to see around the cabin while preserving your night vision. So it’s quite functional. You want to be able to see, right? It's amusing at the very least and I like it more than anticipated.
This is not a comprehensive guide, but just some tips and details that may be helpful if you’re installing these yourself.


Ambient Light
This is one of those Dreamcolor light kits that you can find online. Lots of similar kits are repackaged and sold. Dreamcolor has more transition effects compared to kits that are advertised as just RGB. There are pretty much no directions hah. Some of the videos people have shared have some incorrect info or steps that just overcomplicate things. Here’s what you’ll want to know.
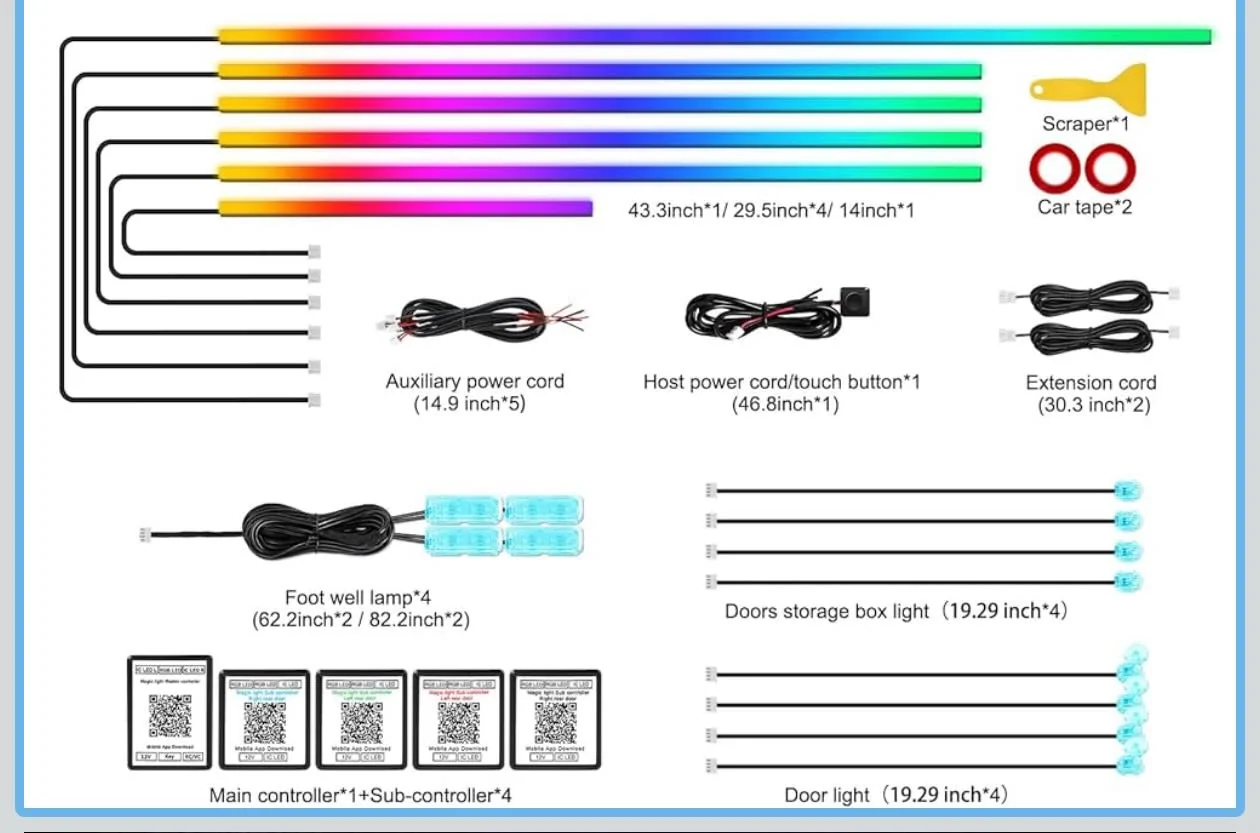
First things first, you’ll want to find a kit that has a main control box and separate subcontroller boxes if you want to add lights to the doors. Reason being the supra’s wiring harness at the door is a plug and not something you can feed a wire through. If you unplug the harness out of curiosity like I did, there will be a persistent safety restraint alerts (if the car had power) that can only be cleared with something like Bimmerlink. Also get a kit with a physical control button. Controlling everything through an app each time is a bit of a hassle.
Equipment
-13mm wrench for the passenger side ground bolt.
-10mm wrench for a couple of door bolts.
-Multimeter. Get some smaller leads. Test the connections you’re tapping. You trust people on the internet?
-Butt connectors optional.
-Heat shrink tubing & electrical tape.
-Wiring to extend power and ground as needed. I used a spool of 16AWG I had laying around.
-STANDARD size fuse tap and a 5A fuse.
-On my ’21, the Torx sizes you’ll need are 20mm and 30mm.
-Pliers, crimp, trim & pick tools.
-Drill if you want to install smaller door handle and bottom cubby lights.

Layout
Plan out where you want to install the lights, the controllers, and how much wiring is needed.
Main controller box receives 12v power from the fuse tap. A few connections plug in here depending on the kit you got. Mine has the main dashboard light strip, the driver side strip, and a couple of spots for Footwell lights or other RGB lights.
Subcontroller slave boxes need a power source and can be placed anywhere in the car. They control the LED strips and the smaller RGB lights. My controllers can control 2 light strips and 2 RGB lights. Once synced with the main controller, the door lights turn off if the main controller lights are off. On my car, a good power wire is in the chunky plug for the window regulator. Red for power, brown for ground. Always better to find a good ground bolt but that’s up to you.
Power
Hardwire this kit. Cigarette lighter and USB connections are for Z4 owners. Lol just joking, but hardwiring is much simpler than you may think.
Fuse tapping. Use a standard size tap. I’ve seen some misinformation on fuse tapping stating the cigarette lighter stops working after you tap that location. That only happens if you don’t tap it correctly.
-When the tap is plugged in, the original fuse goes on the bottom slot, while the 5A fuse you got goes in the top slot.
-The wire on the tap faces the load (0v) side. On my car that happens to be the side towards the rest of the fuses. To verify, use a multimeter to test or try pulling the accessory fuse to ensure the kit stops working.
Wire the tap to the red power cable of the main controller. The ground bolt (13mm socket) that’s commonly used is located behind the side dashboard panel on the passenger side.
For the doors and the sub controllers, I spent some time testing every wire and plug I could find. I didn’t look at the plug harness between the car and the door. I settled on the chunky regulator plug behind the door insulation because that seems to have the most reliable power. With my kit, the subcontrollers turn off the lights when the main controller doesn’t have power. So tapping into a constant power source works fine. There’s a lot of parasitic drain happening in these cars. The window switch plug can work but seemed to have more fluctuations in voltage than the regulator plug when the car entered different states. Make sure you’re actually using a good ground to test things. Some of the Torx bolts seem to work okay.
Wiring Lengths and Locations
I installed the main box on the left side of the passenger footwell, wedged in near the center console area. My kit came with two extension cables for the LED strips so I used one for the long dashboard strip and one for the driver side strip. Both connect to the main controller.
From the fuse tap, I had power splitting to the main controller and to a subcontroller. I spliced the wires together and secured them by winding the copper wires and securing with butt connectors. A dab of solder can help. Also use something like Tesa tape to secure the insulation of the wires into place so there’s no chance of movement or rattling and no tension on the connection. T-tap style connectors are one of the least reliable options, so don’t use those.
I used additional wiring of my own to extend the power cable of the main controller and used additional wiring so the subcontroller on the driver side has power as well. If your kit doesn’t come with a couple of extensions for the LED strips, get another kit or buy some extras to save yourself some frustration during install. I used two included light strip extensions on the main controller to have enough slack for the center dash light and the driver side light.
Driver Side
I fed the following through the center console to the driver side.
-Driver side light strip (connected to the main controller)
-Footwell lights
-Power and ground line for the Subcontroller that sits on the driver side and powers the center console strip.
Keep in mind you can have the main control box on the driver side if you have extensions, or just run all of the driver side lights off the subcontroller box. Only really matters if you’re trying to configure certain lighting effects and the lights need to be oriented a certain way.
In my kit I had some extra RGB lights. I used one to bring a bit of illumination to the OBD port area. You could also light up the center cupholder, the phone charging area, etc.
Additional Details
Door Cards - While removing the door cards, there’s a stubborn square rivet next to where the lock bar is. Don’t pull on this part like a gorilla and bend that metal lock bar. Lift the trim a little from the side so you can see the rivet. Then use a set of needle nose pliers to squeeze the white rivet out. Comes out like butter. In the photo, the rivet goes in the square hole above the tape.

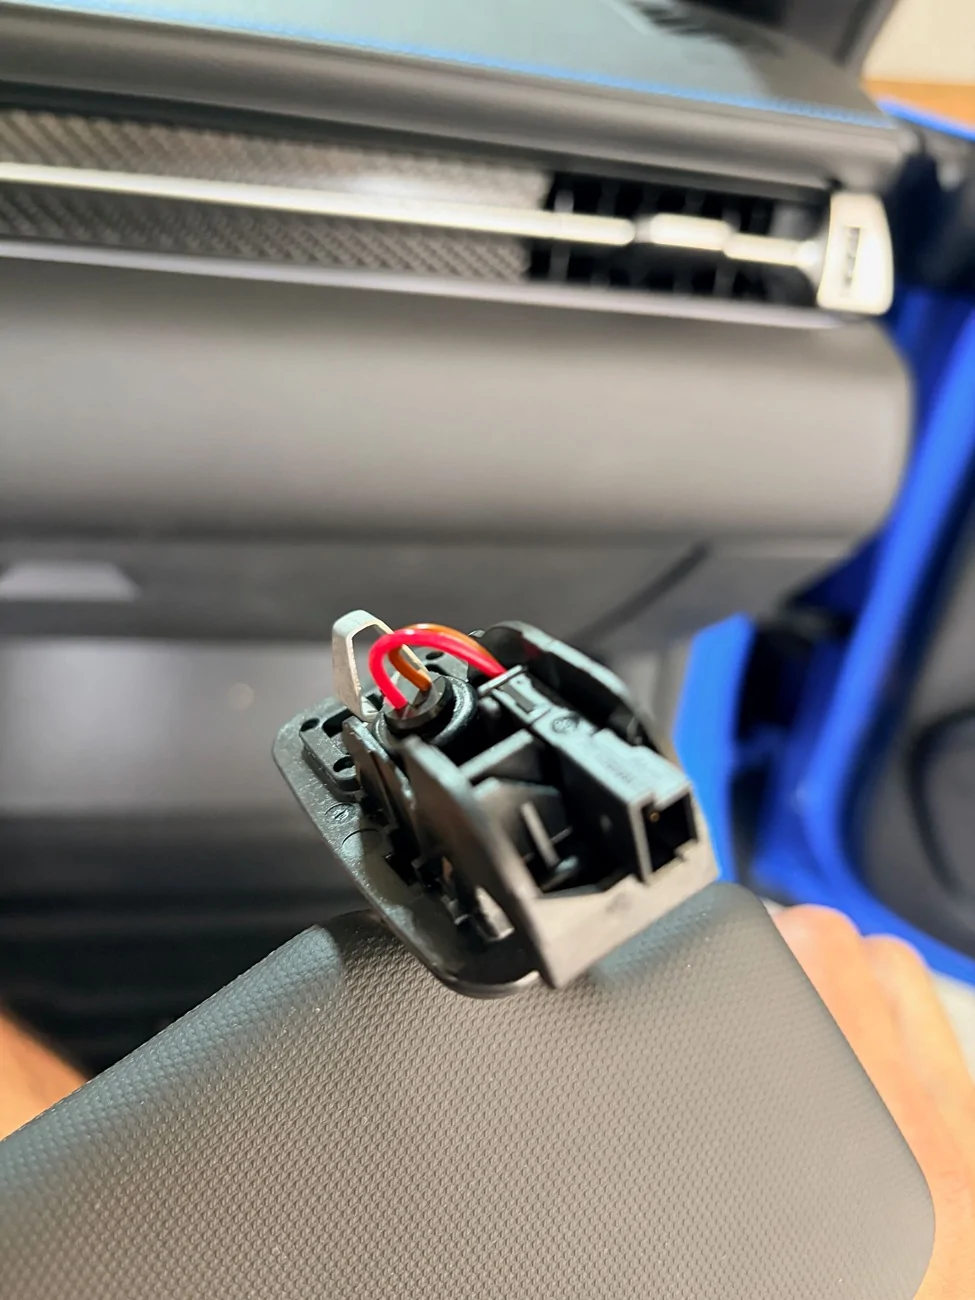
Driver Side Connector - In the videos I saw on this install, it seemed like people had a really difficult time with the larger white and grey connector on the door card of the driver side door. All you do is press on the white ridged portion of this plug to release the grey lever. The lever pivots 90 degrees, releasing the entire plug. Quite a clever design and it actually comes out easier than the other plugs.
On the door cards, people most commonly install a light strip between the plastic trim where the buttons are and the armrest. In the videos I’ve seen, people are prying the hell out of this area in the front, messing up tools and even shorting out their LED strips. On the backside of the panel there are actually three short, silver 20mm Torx screws that can come out where the plastic trim piece meets the armrest (on the driver side, there are only two that you have easy access to). Undo those and pry at the gap (from the back) with a flat head screwdriver to create a bit of space to place the light strip. Pry tools are still needed on some areas from the front to wedge in the light strip. I decided to run my LED strips along the full length of the doors. This means leaving a small section in the middle slightly more exposed or more embedded. Worth it in my opinion.
Here a photo of one of the silver Torx screws to unfasten. You'll want to create a bit of space between the pieces that the screw is holding together.
Photo of the front side where you can use trim tools to assist the wedge action.
I started the light strip from this side.
Center Console - You don’t need to disassemble the plastic piece that’s next to your right thigh on the driver side that’s secured by Torx screws. Just pop out the soft touch trim piece and you can run the light strip from the top or the bottom. The cupholders don’t need to be removed unless you’re fitting lights there. My center console light strip runs from the top down and in front of the cupholders. You can wedge in the strip without removing the cupholders.
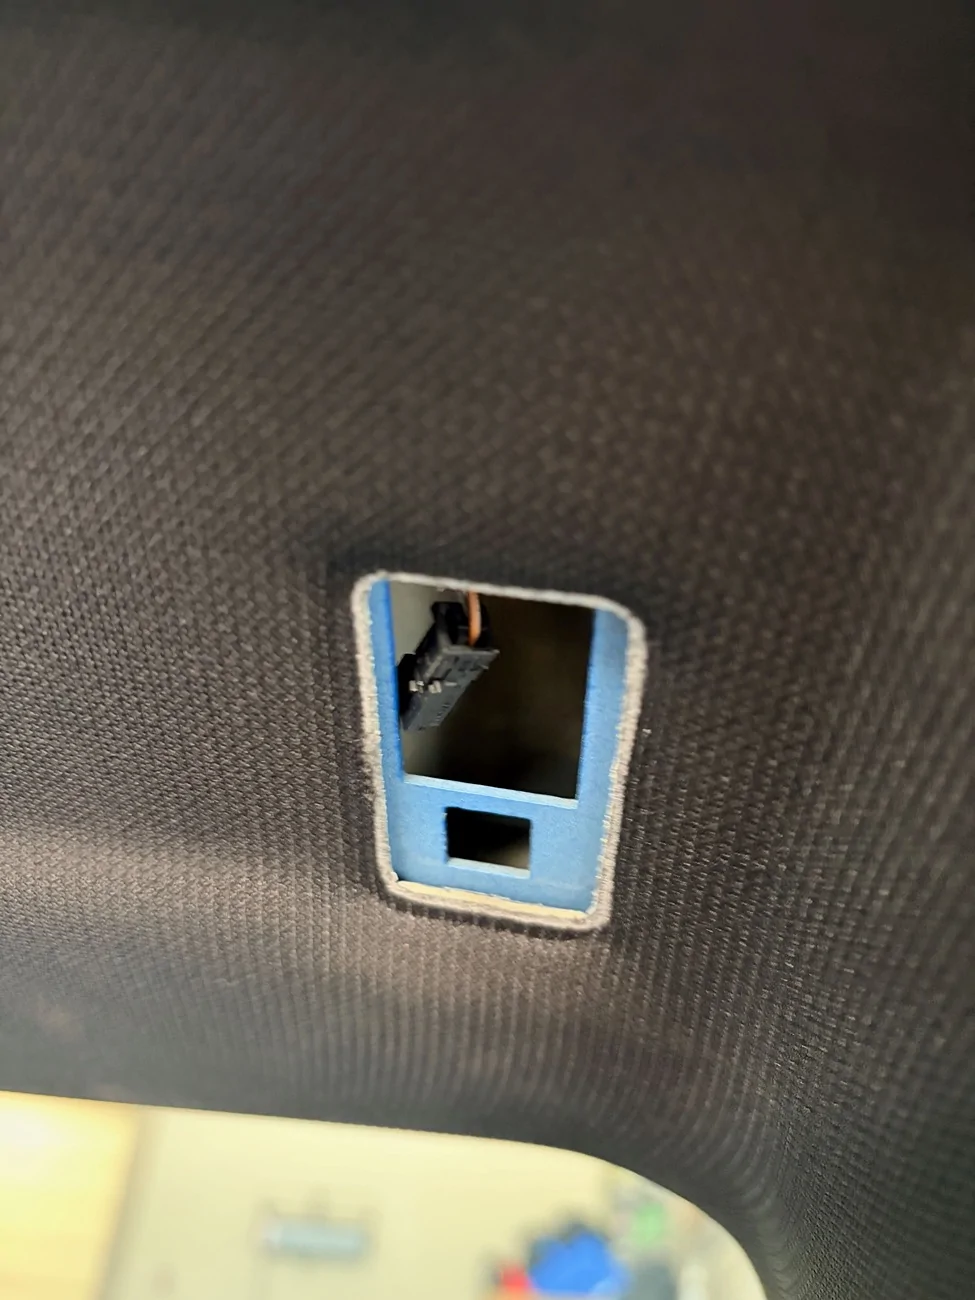
To feed wires and connectors from the passenger side to the driver side, you don’t need to disassemble anything besides lowering the plastic covers in the footwells. The spot you’re looking for is next to the white AC vent tube. You can shine a light on one side to see where the gap is. Big brain time. Instead of trying to fish flimsy wires and chunky footwell lights through the tight clearance, attach the wires to a pen with masking tape to feed it through. Use a smooth pen or extension bar so it doesn’t get snagged on anything. Done.
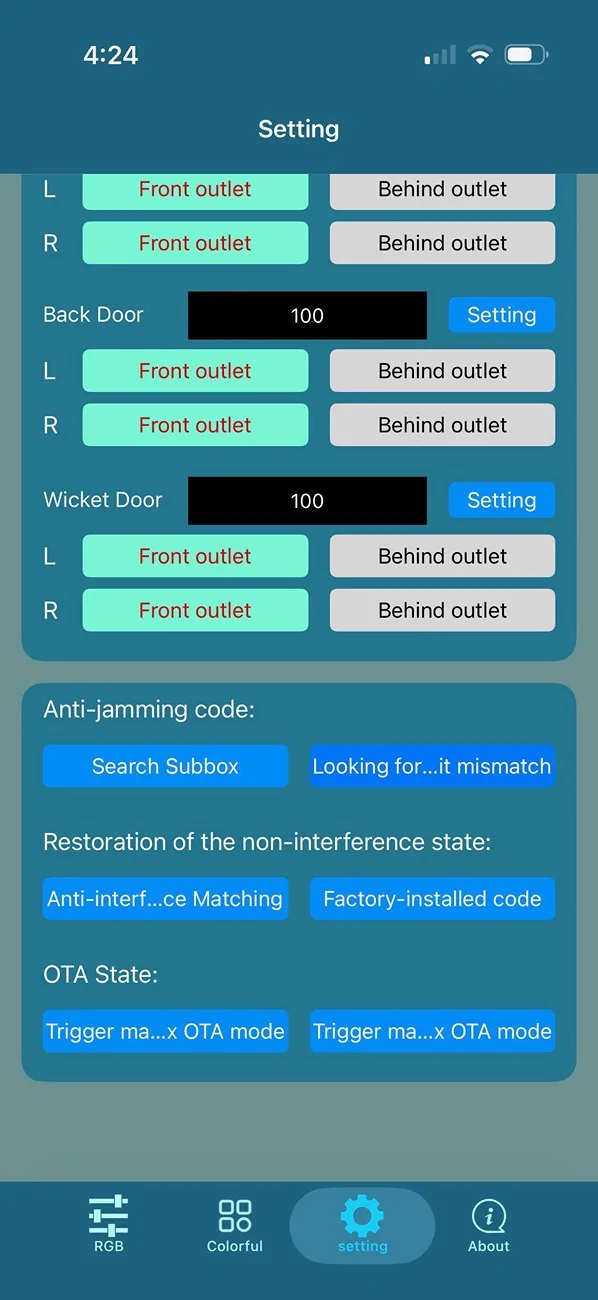
Test the light strips to make sure they have proper power and ground. Also, my subcontroller didn’t actually turn on all of the lights until I synced it with the app. Basically just hit the "Search Subbox" button, wait for the lights to flash red and blue, then tap the "Looking for..." button to complete the process.

The light strips only bend a certain way. On the doors and center console, I wanted to use the entire strip so part of the strip is obscured by bend areas. So a single light strip on the door looks like two sections. The cleanest approach is to use more than 1 light strip. I went with the 18-in-1 kit, and you may want to just get two kits if you’re doing a larger vehicle.
There are a ton of effects, such as rainbow puke, music mode, etc through the app. I find them distracting so I just set the color and dim it to my liking.
--------------------------------------------------------------------------------
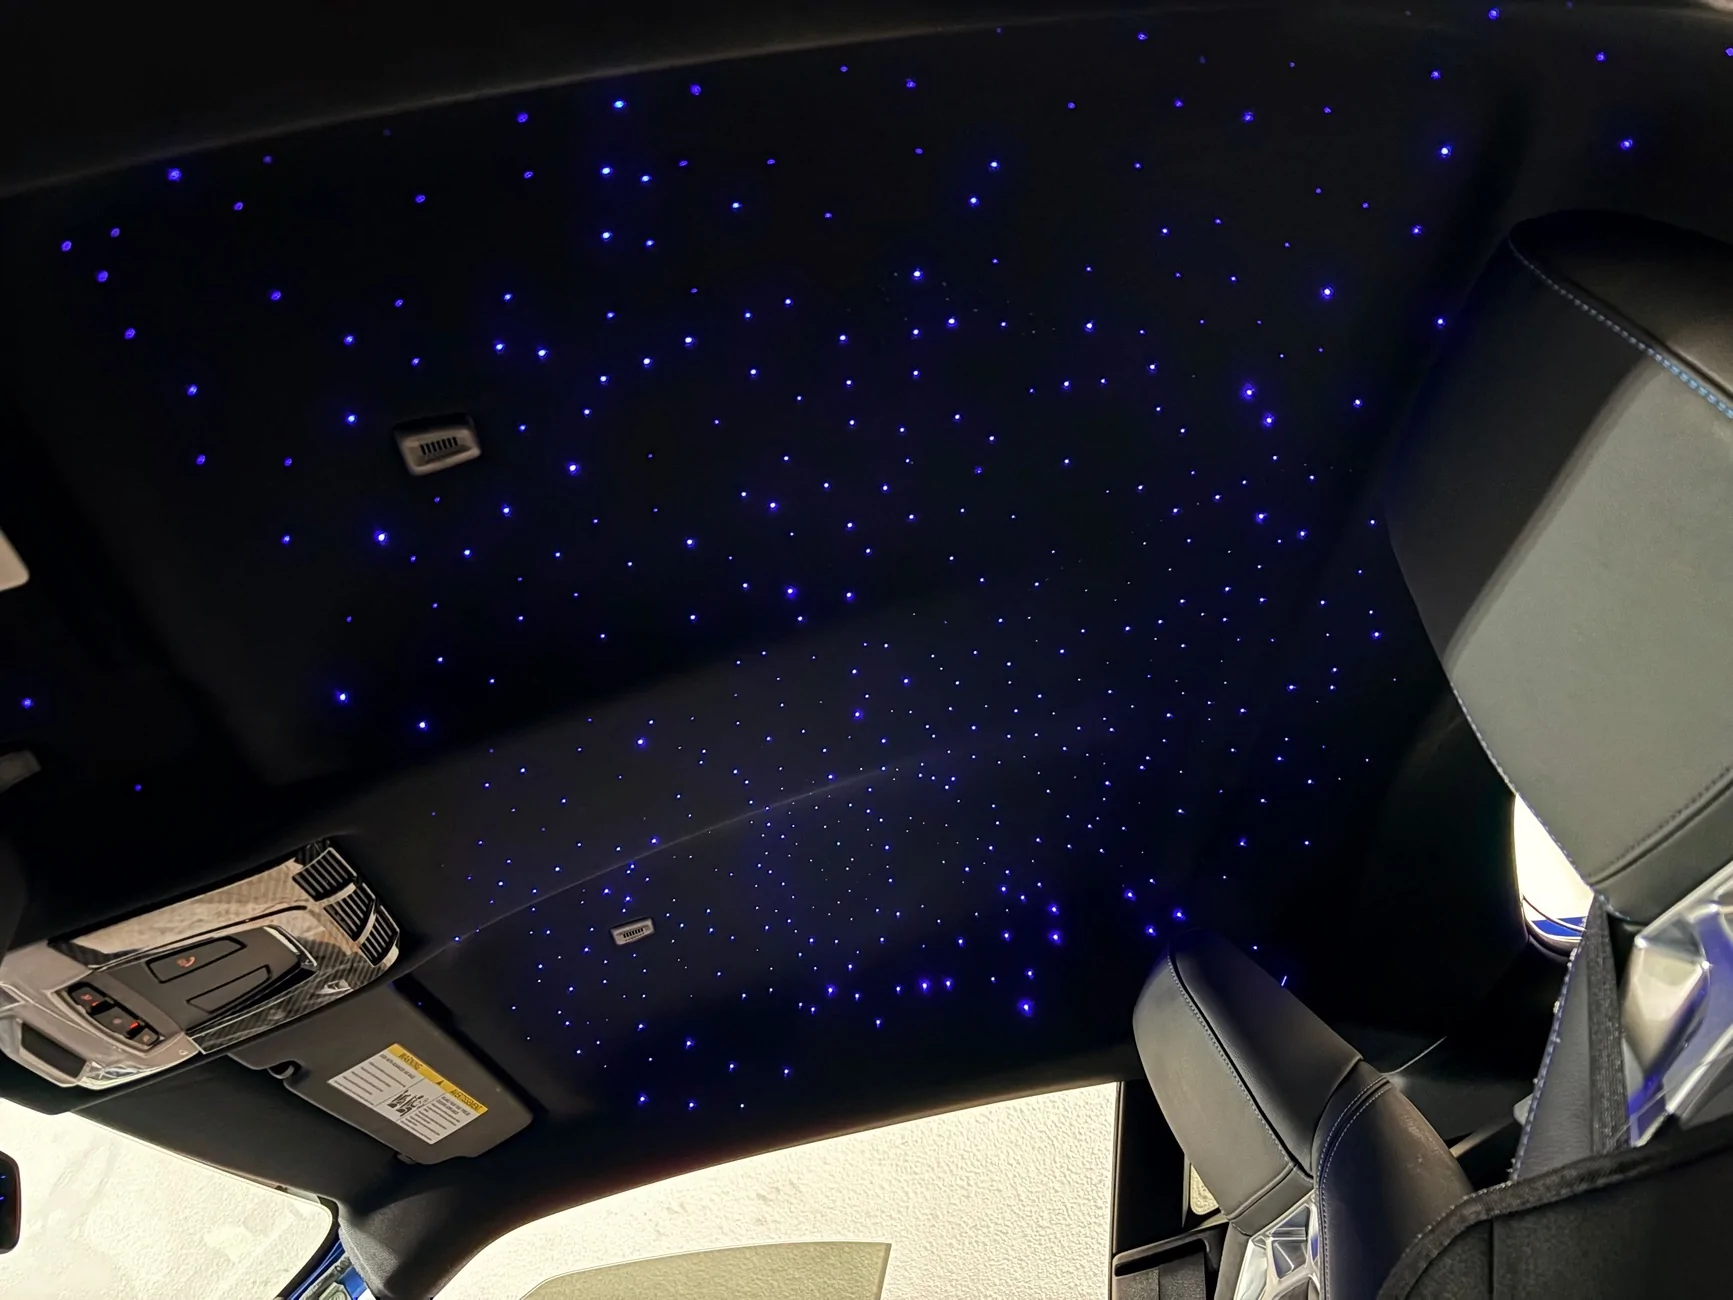
Starlight
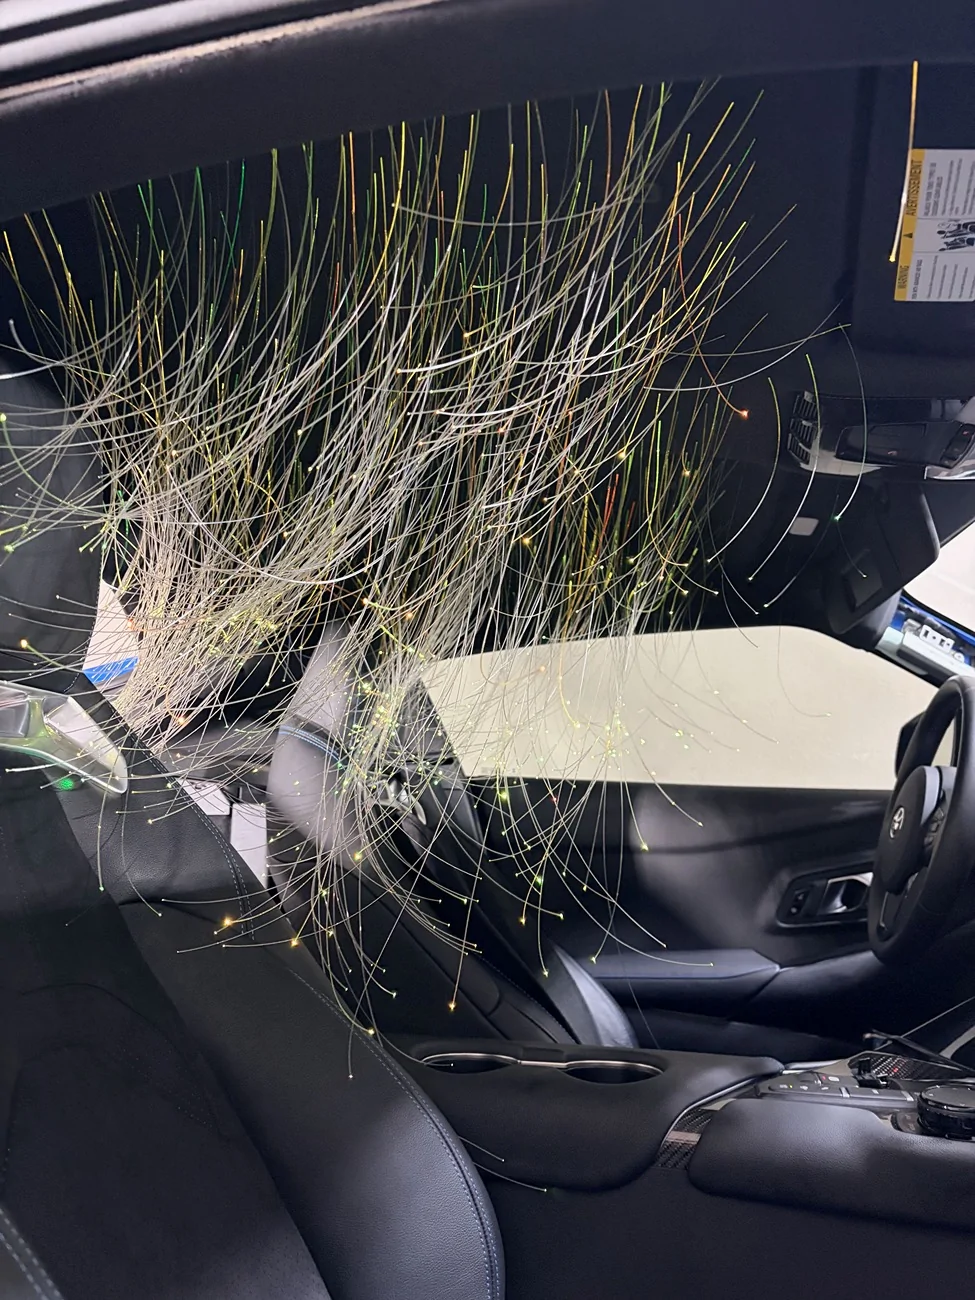
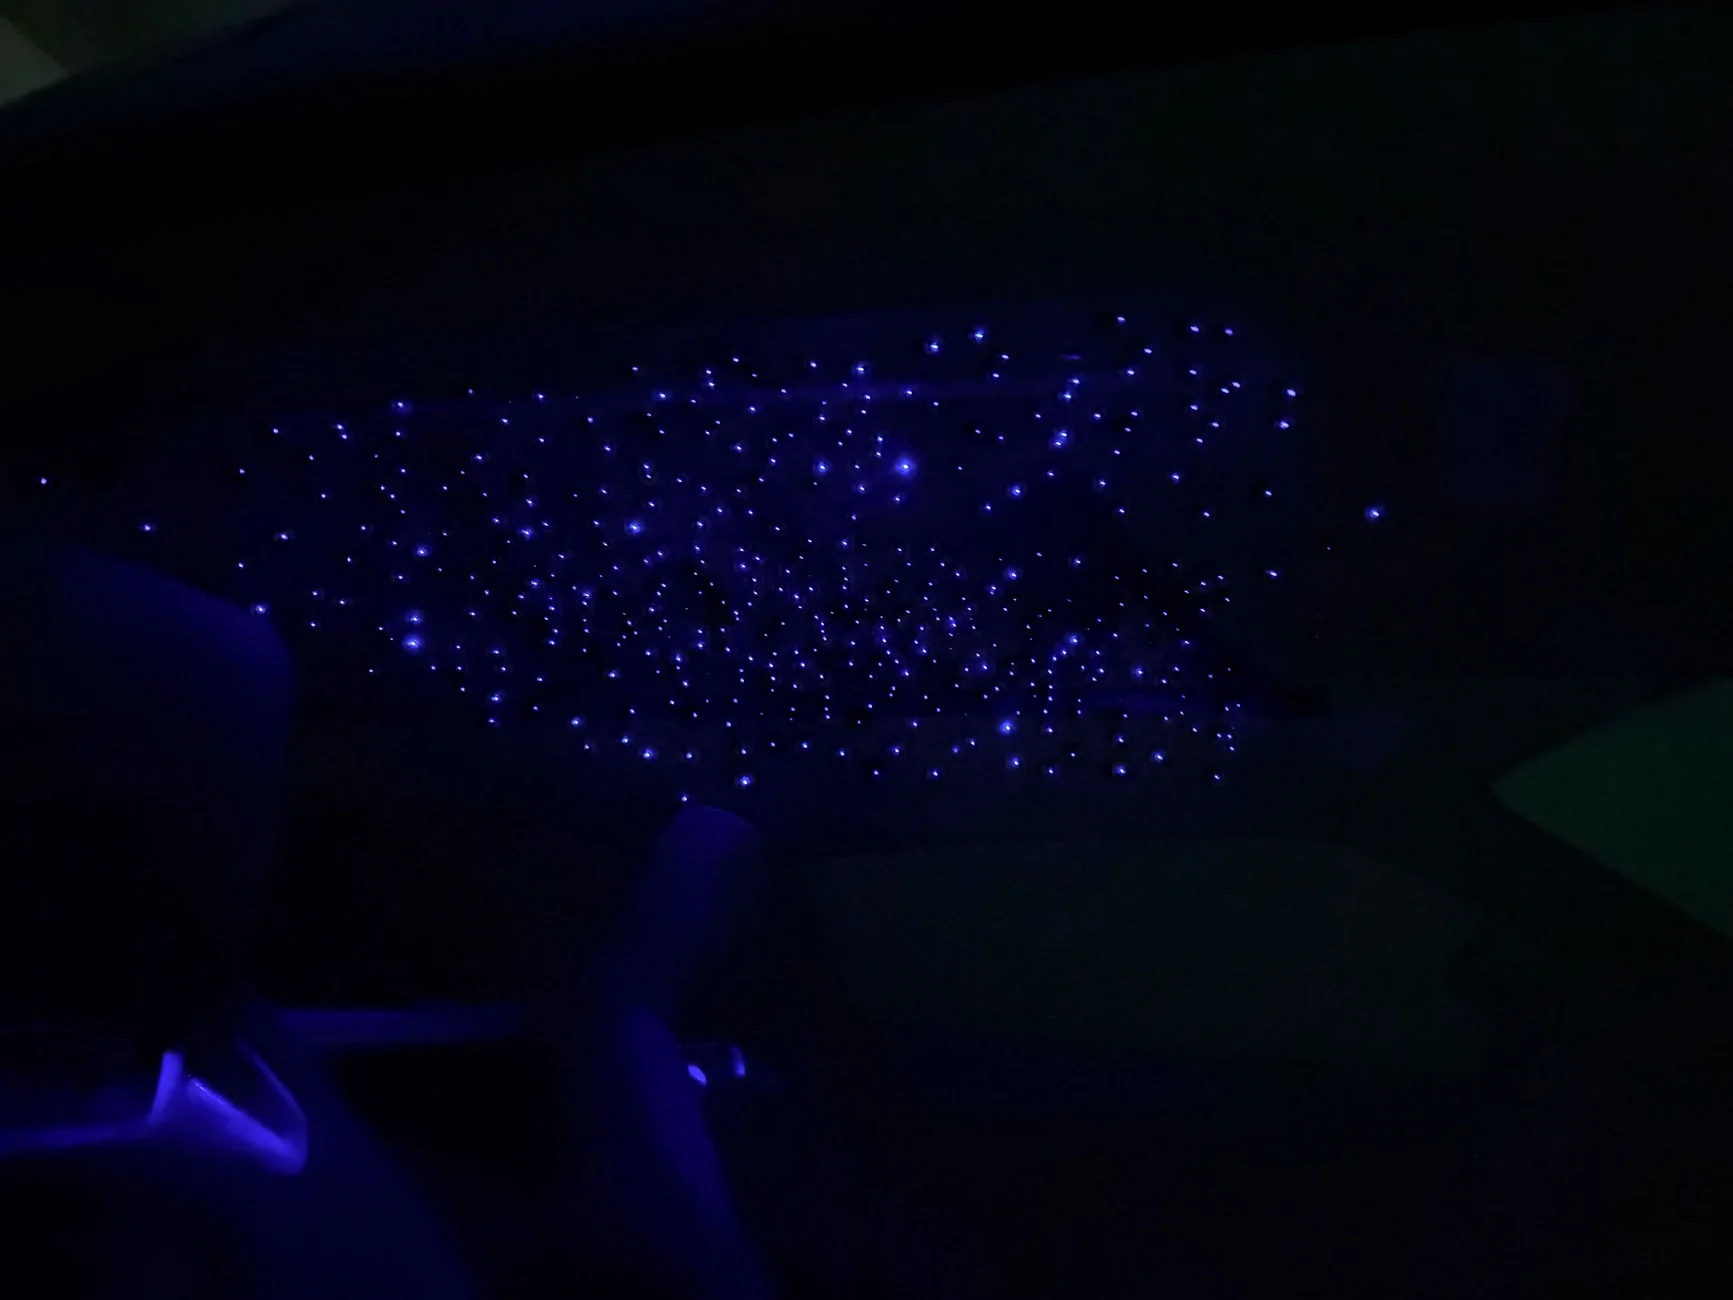
The main challenge if you want to install a starlight kit is getting the headliner out and back in. I opted for a 600 star kit, which only requires 1 projector. I’m happy with the number of stars for the smaller size of the supra cabin. If you want more stars, your layout may need to change a bit. Compared to a sedan with double the amount of stars, the density of a 600 star kit in this car is pretty much equivalent.
Equipment
-Hot glue gun with a pack of refills.
-Xuron style clippers
-Rotary drill
-Micro drill bits (if the kit doesn’t come with them)
-Electrical, Tesa, duct tapes.
-Trim and Pick Tools
-Torx bits - T20, T25
Headliner Removal
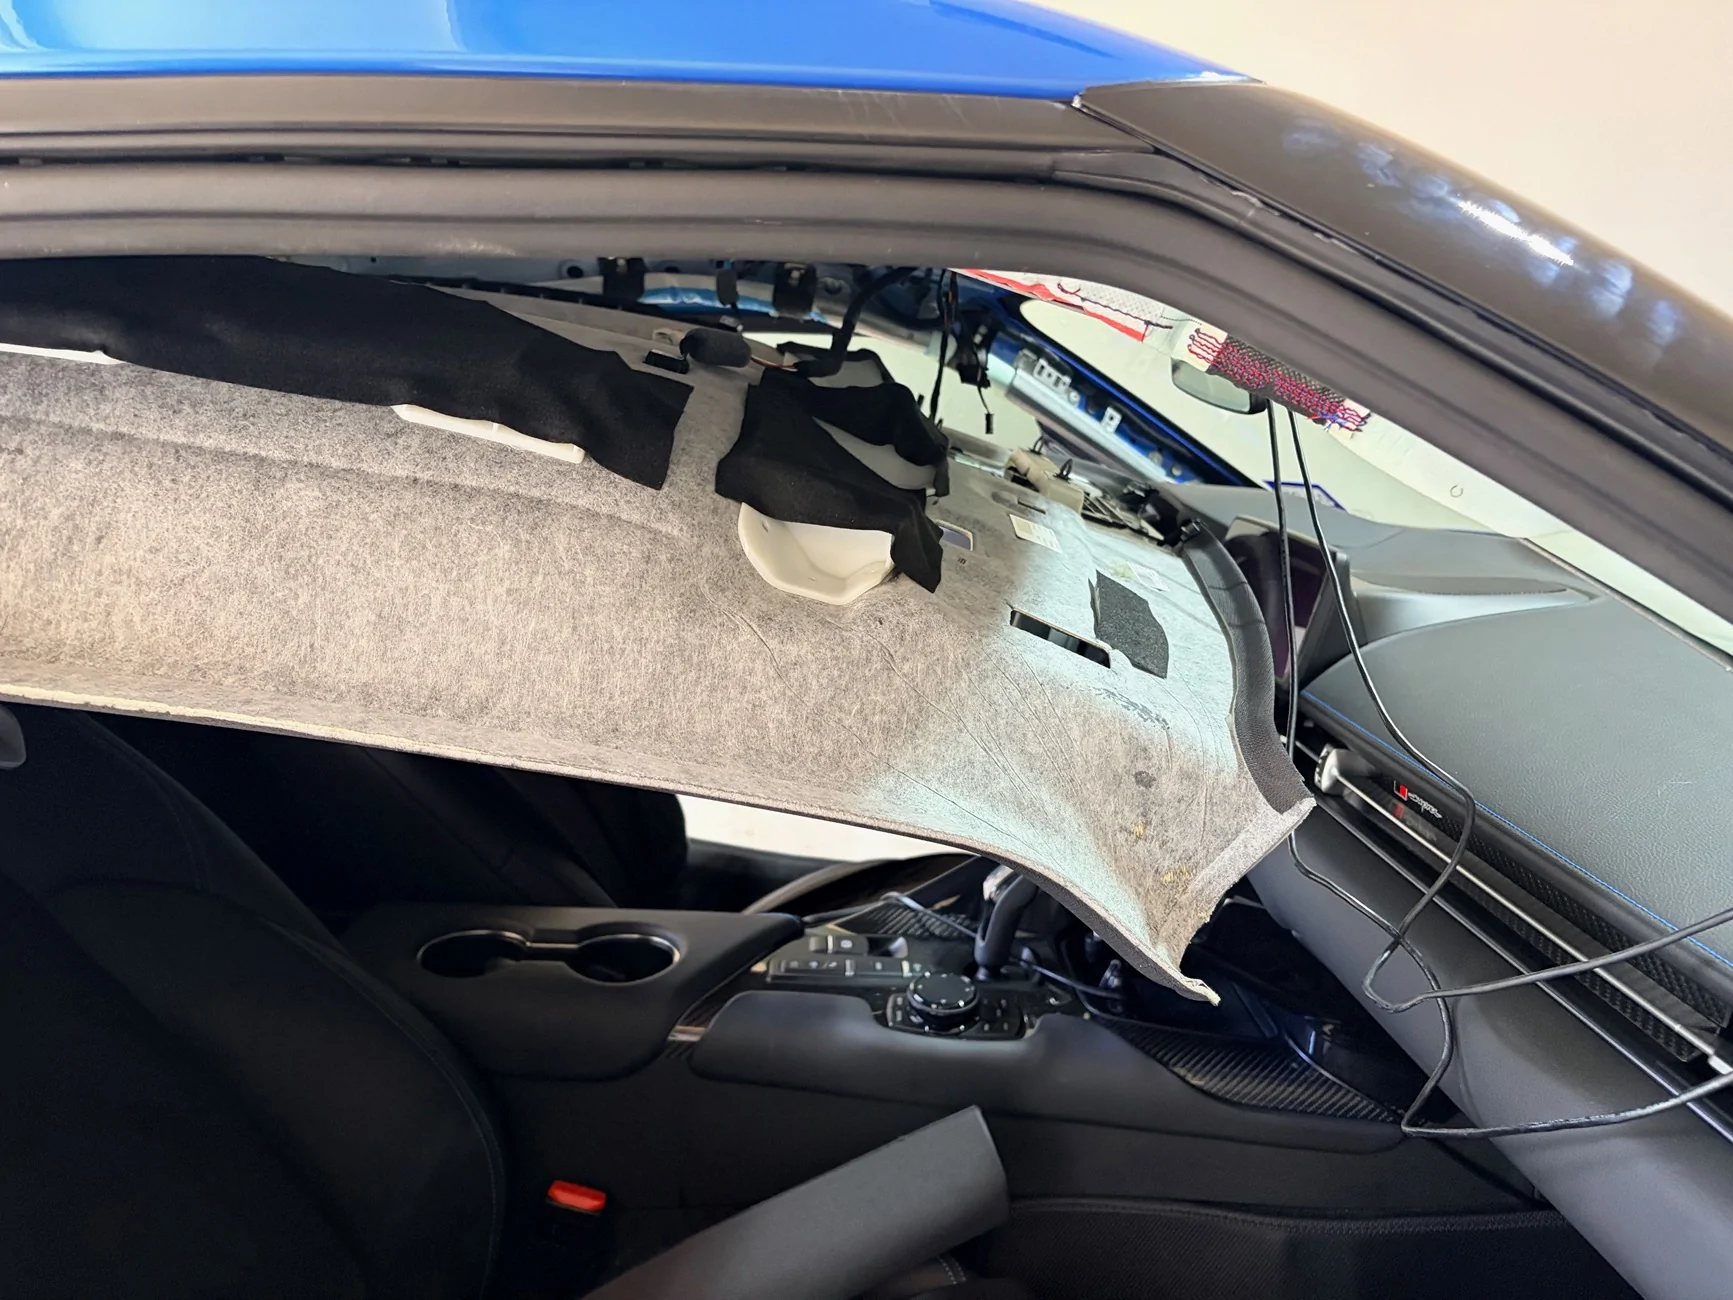
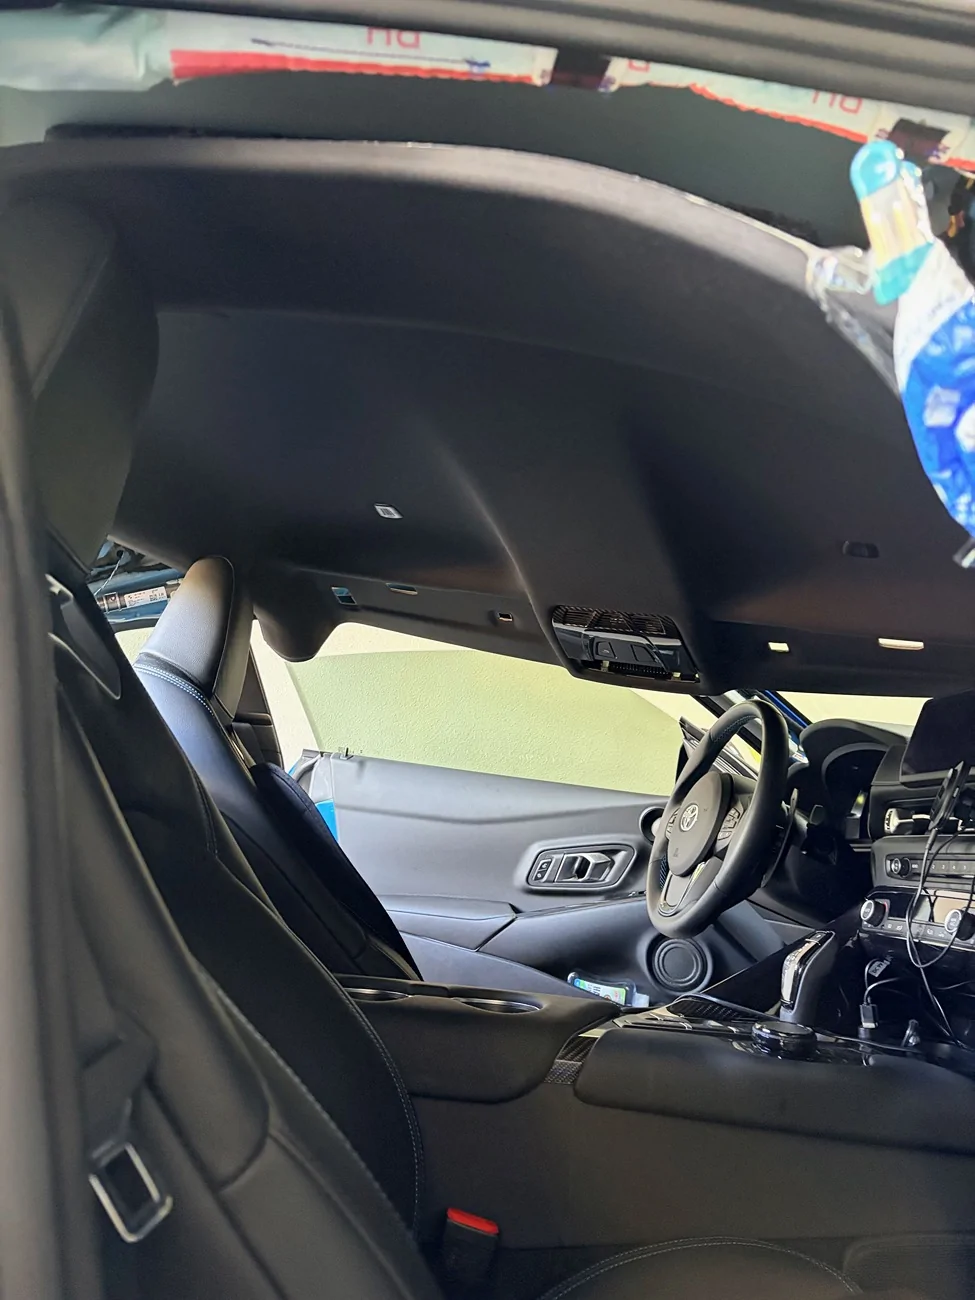
To drop the headliner, you’ll remove two trim pieces in the rear where the headliner meets the car. Remove the Torx screws underneath. At the front of the car you’ll pop off A pillar Airbag labels to reveal the Torx screws underneath. Remove the visors. Each visor is held on by two different styles of retaining clips. The center map light can be partially removed with trim tools. To lower the center, you’ll need to use two trim tools to push against two areas of the housing. This is the most time consuming part. There are push pin clips that can be popped loose from the center to give you more clearance. There’s an assortment of wires that need to be disconnected. 2-3 from the center map, one from each visor, and another set for the microphone. When it’s time to reinstall the liner, there are white plastic brackets that help keep the visor clips in place; I found they interfere with reinstall more than anything and are not essential.
You can see the two center push pins that need to be released to lower the center.
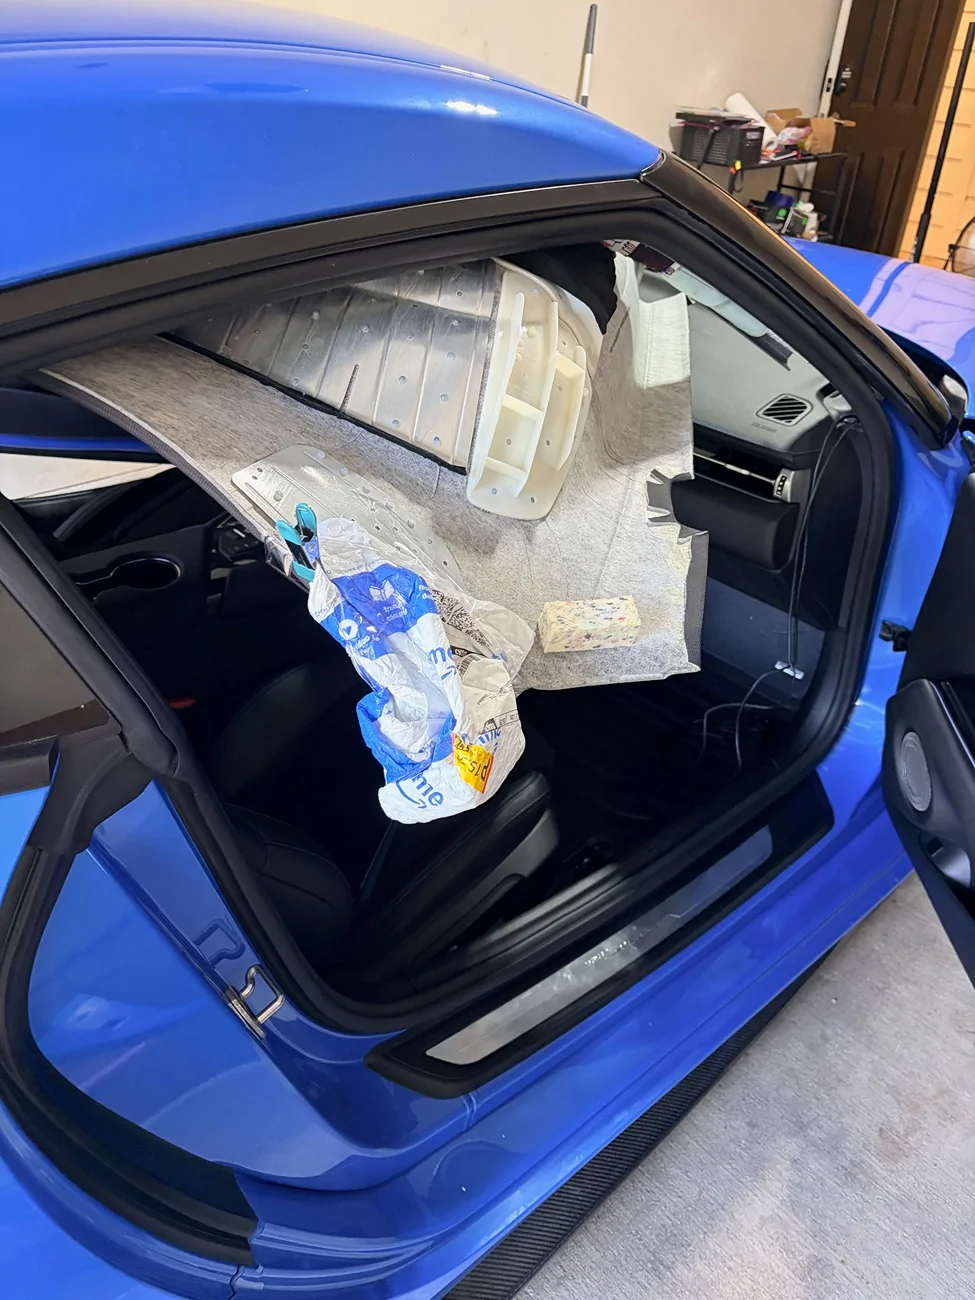
If you look at any instructions for headliner removal on this car, they instruct you to remove seats to have enough clearance. I didn’t want to do that, so I folded the headliner like a hot dog and removed it from the passenger side. Regarding the folding, since is not really explained anywhere, you’re folding the headliner so that the black cloth side is the EXTERIOR of the hot dog. So you drop the headliner, rotate it counter-clockwise (or clockwise, up to you) a bit towards the passenger side, then push the center of the liner down to fold. There will be two folds in the center around the map light plastic housing instead of perfectly down the center. When I removed the headliner, it popped back into shape with zero creases. Getting the liner back in was slightly more difficult. An important tip. Wrap the rear metal corners of the headliner and protect the rearview mirror to avoid scratching anything. Those bubble lined Amazon bags are what I used.
This is the passenger side corner of the headliner after a bit o' rotation.
Taco time. Do not be afraid.
Fiber Install
Use a rotary drill. The headliner on the supra is a bit more forgiving than others in that the cloth side is flexible. I’d still use a drill with a micro bit to avoid any chance of dimpling. You’ll need a drill to get through some of the plastic and metal support pieces of the headliner.
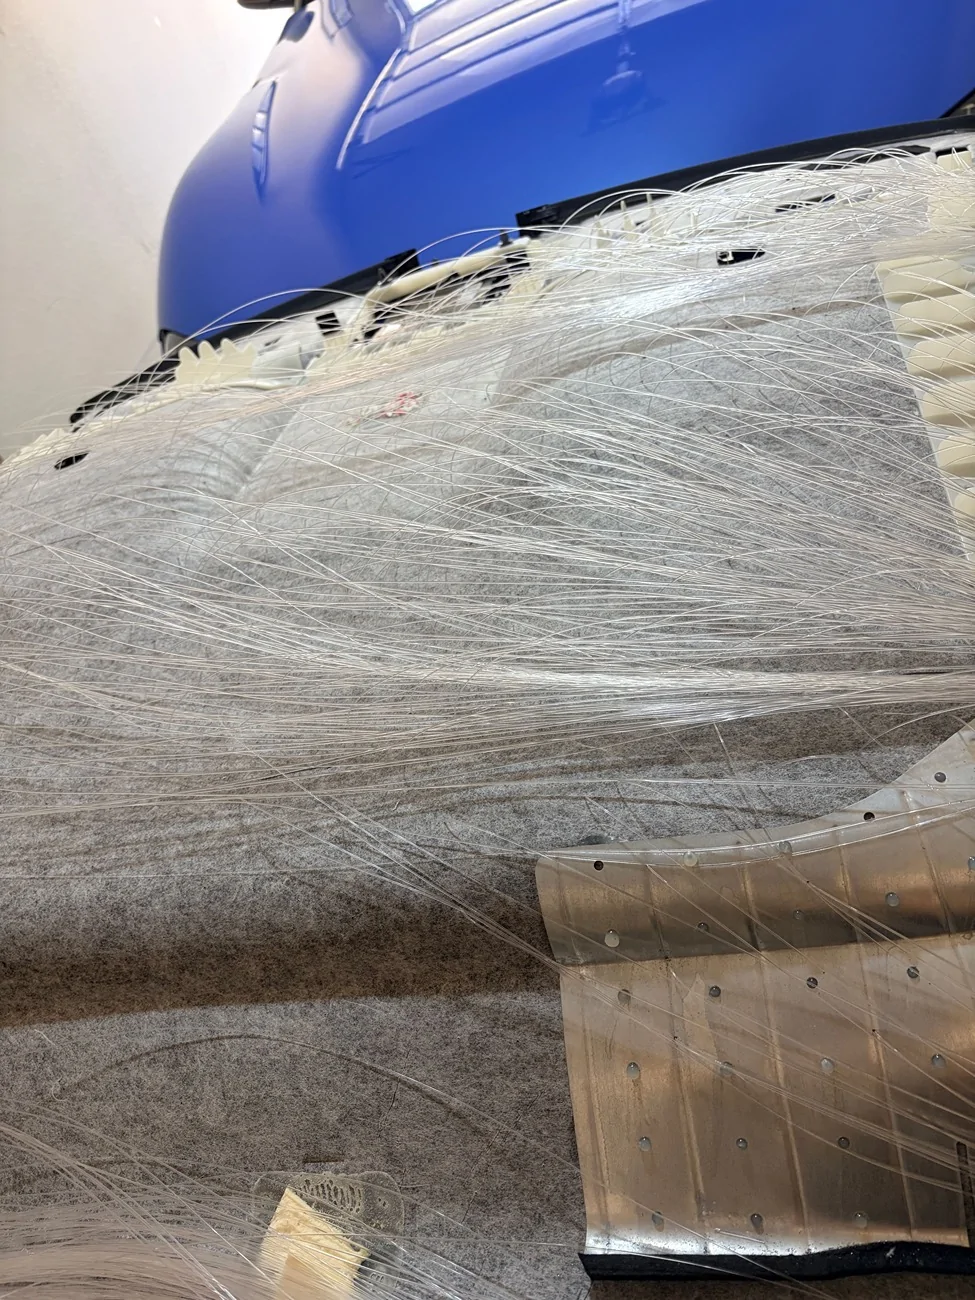
Hot glue is your friend. You have a good amount of clearance with the passenger side rear corner. I had about 600 vermicelli fibers to route and they fit fine through the passenger c pillar once flattened.
You’ll also want to organize things a bit to make sure you have enough length from the furthest point (vanity mirror area) to the projector location. Begin installing stars from the furthest point. I tucked the projector in the C pillar on the passenger side. Avoid routing anything in front of the air bags. Oh yeah, disconnect the power before unplugging anything. If you’re the organized type, you can mark where you plan to drill holes with a sharpie. I didn’t feel like doing that and just drilled a few holes at a time and fed the fibers through.
You may want to refrain from cutting the fibers flush until the liner is back in the car in case anything shifts or gets snagged. With enough hot glue anything can be secured and I didn’t have any snagging issues, so this is a minor suggestion. You need to get some dedicated snippers for these fibers for a flush cut.
Power & Wiring
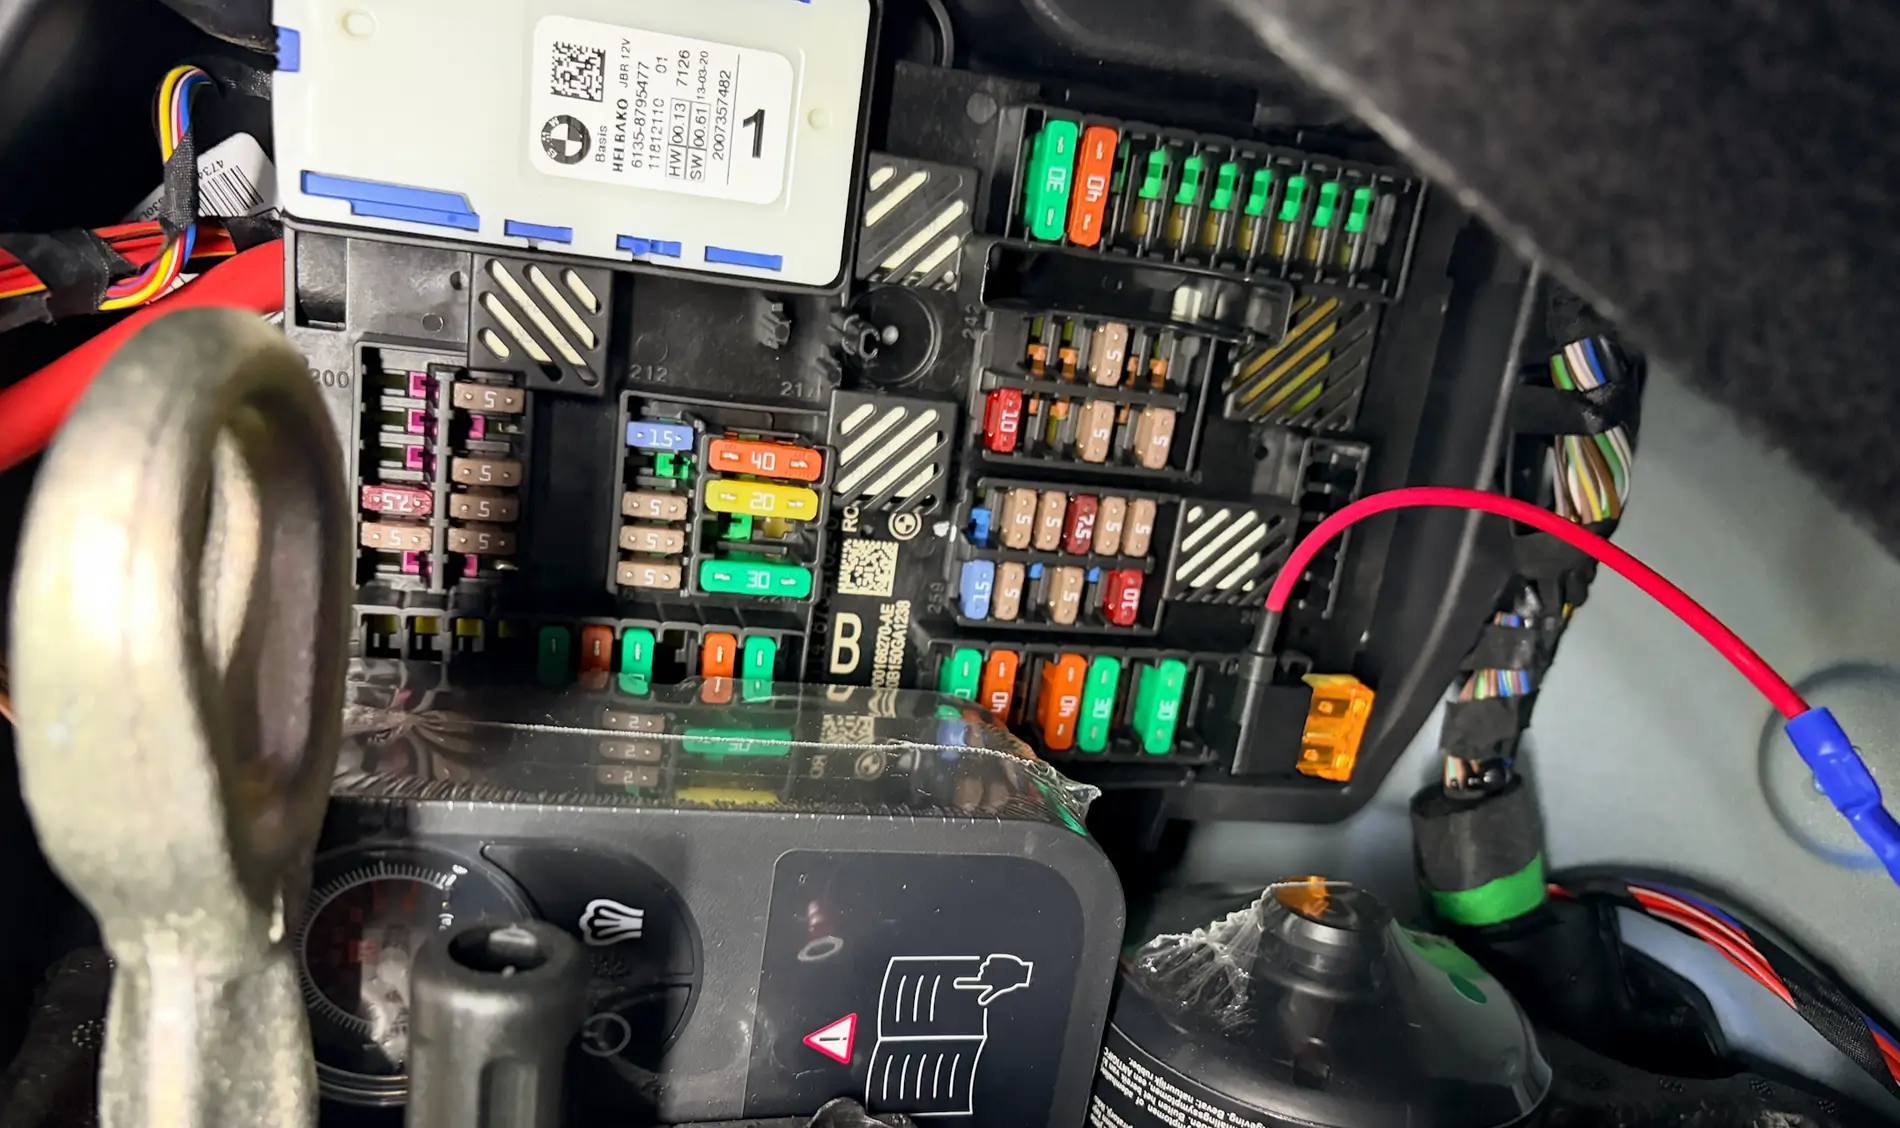
You’ll want to use the rear fuse box for power. The accessory fuse you’ll likely want to use is on the last row and is a yellow 20A fuse. For the ground, there are two nearby bolts but I’ve found they are not the most consistent. I ran a ground wire to the ground bolt that the battery uses. You’ll want to secure any wiring with some cloth tape to avoid rattles.

I suppose you could route the fibers to the front but there’s a lot less clearance going that route. The supra’s rear trim area seems tailor made for this install. Pad the projector and wedge it in so there are no rattles. You should also securely tape the power plug so there’s no play and no chance of it wiggling out. If you get a more robust starlight kit with more stars, the projector will likely be a bit too chunky to fit without removing more trim. Near the passenger side trunk light, there are two cutouts in the liner that you can use to help fish the power line through to the fuse box area.
For the meteor effect, you can organize the smaller bundles of fibers however you like. I used them for some shooting stars and the supra S logo on a whim. It was really an afterthought though so I’m sure you can do much better. I have them off most of the time.
If you’re pretty good with disassembly, the ambient light kit can be done in less than a day. The starlight kit will take at least 2 days unless you have some help. It’s more tedious than the ambient light kit. If you’re solo and less confident, I’d double the install times. You can definitely get these installs done. Also, you can take this opportunity to add butyl mats to exposed panels like I did.
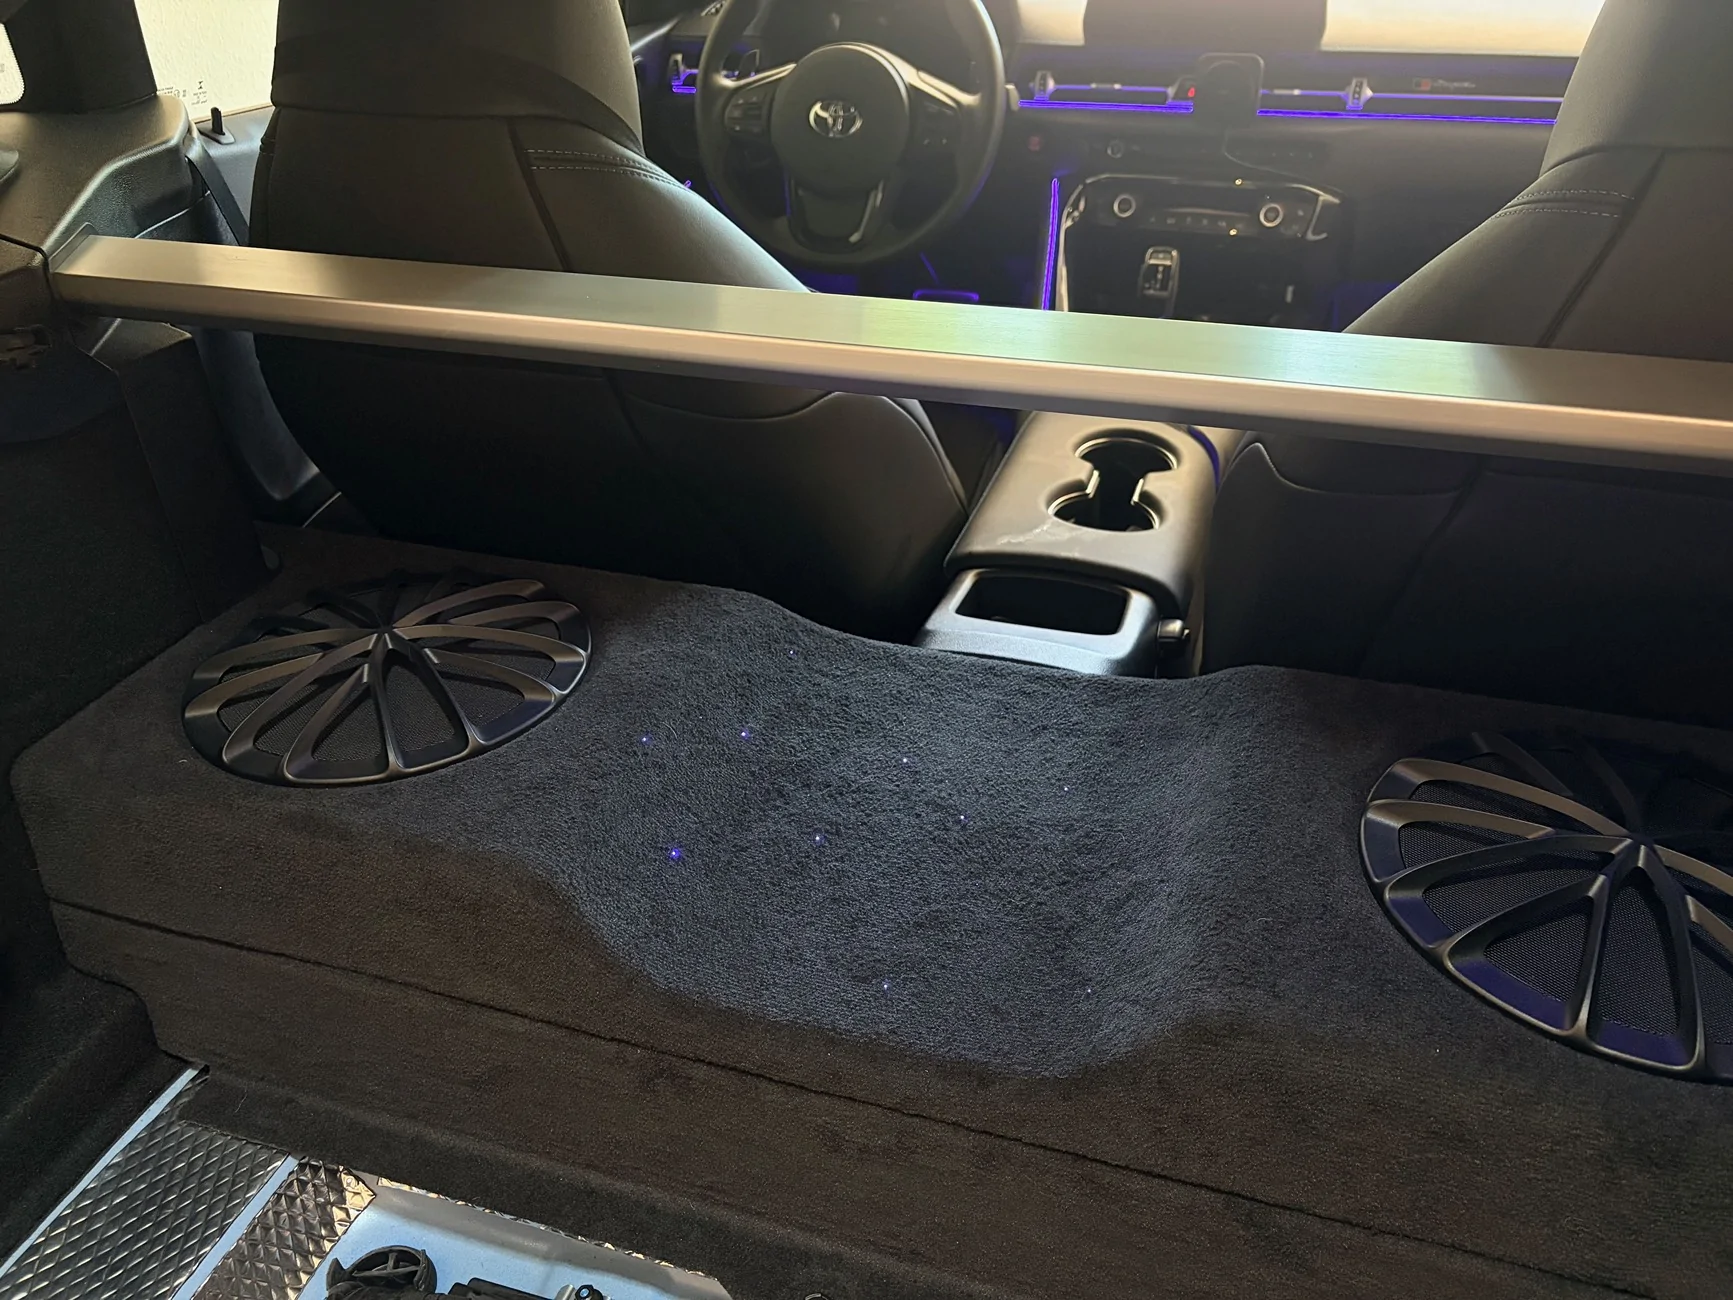
I threw some stars on the subwoofer box as well.
This is not a comprehensive guide, but just some tips and details that may be helpful if you’re installing these yourself.
Ambient Light
This is one of those Dreamcolor light kits that you can find online. Lots of similar kits are repackaged and sold. Dreamcolor has more transition effects compared to kits that are advertised as just RGB. There are pretty much no directions hah. Some of the videos people have shared have some incorrect info or steps that just overcomplicate things. Here’s what you’ll want to know.
First things first, you’ll want to find a kit that has a main control box and separate subcontroller boxes if you want to add lights to the doors. Reason being the supra’s wiring harness at the door is a plug and not something you can feed a wire through. If you unplug the harness out of curiosity like I did, there will be a persistent safety restraint alerts (if the car had power) that can only be cleared with something like Bimmerlink. Also get a kit with a physical control button. Controlling everything through an app each time is a bit of a hassle.
Equipment
-13mm wrench for the passenger side ground bolt.
-10mm wrench for a couple of door bolts.
-Multimeter. Get some smaller leads. Test the connections you’re tapping. You trust people on the internet?
-Butt connectors optional.
-Heat shrink tubing & electrical tape.
-Wiring to extend power and ground as needed. I used a spool of 16AWG I had laying around.
-STANDARD size fuse tap and a 5A fuse.
-On my ’21, the Torx sizes you’ll need are 20mm and 30mm.
-Pliers, crimp, trim & pick tools.
-Drill if you want to install smaller door handle and bottom cubby lights.
Layout
Plan out where you want to install the lights, the controllers, and how much wiring is needed.
Main controller box receives 12v power from the fuse tap. A few connections plug in here depending on the kit you got. Mine has the main dashboard light strip, the driver side strip, and a couple of spots for Footwell lights or other RGB lights.
Subcontroller slave boxes need a power source and can be placed anywhere in the car. They control the LED strips and the smaller RGB lights. My controllers can control 2 light strips and 2 RGB lights. Once synced with the main controller, the door lights turn off if the main controller lights are off. On my car, a good power wire is in the chunky plug for the window regulator. Red for power, brown for ground. Always better to find a good ground bolt but that’s up to you.
Power
Hardwire this kit. Cigarette lighter and USB connections are for Z4 owners. Lol just joking, but hardwiring is much simpler than you may think.
Fuse tapping. Use a standard size tap. I’ve seen some misinformation on fuse tapping stating the cigarette lighter stops working after you tap that location. That only happens if you don’t tap it correctly.
-When the tap is plugged in, the original fuse goes on the bottom slot, while the 5A fuse you got goes in the top slot.
-The wire on the tap faces the load (0v) side. On my car that happens to be the side towards the rest of the fuses. To verify, use a multimeter to test or try pulling the accessory fuse to ensure the kit stops working.
Wire the tap to the red power cable of the main controller. The ground bolt (13mm socket) that’s commonly used is located behind the side dashboard panel on the passenger side.
For the doors and the sub controllers, I spent some time testing every wire and plug I could find. I didn’t look at the plug harness between the car and the door. I settled on the chunky regulator plug behind the door insulation because that seems to have the most reliable power. With my kit, the subcontrollers turn off the lights when the main controller doesn’t have power. So tapping into a constant power source works fine. There’s a lot of parasitic drain happening in these cars. The window switch plug can work but seemed to have more fluctuations in voltage than the regulator plug when the car entered different states. Make sure you’re actually using a good ground to test things. Some of the Torx bolts seem to work okay.
Wiring Lengths and Locations
I installed the main box on the left side of the passenger footwell, wedged in near the center console area. My kit came with two extension cables for the LED strips so I used one for the long dashboard strip and one for the driver side strip. Both connect to the main controller.
From the fuse tap, I had power splitting to the main controller and to a subcontroller. I spliced the wires together and secured them by winding the copper wires and securing with butt connectors. A dab of solder can help. Also use something like Tesa tape to secure the insulation of the wires into place so there’s no chance of movement or rattling and no tension on the connection. T-tap style connectors are one of the least reliable options, so don’t use those.
I used additional wiring of my own to extend the power cable of the main controller and used additional wiring so the subcontroller on the driver side has power as well. If your kit doesn’t come with a couple of extensions for the LED strips, get another kit or buy some extras to save yourself some frustration during install. I used two included light strip extensions on the main controller to have enough slack for the center dash light and the driver side light.
Driver Side
I fed the following through the center console to the driver side.
-Driver side light strip (connected to the main controller)
-Footwell lights
-Power and ground line for the Subcontroller that sits on the driver side and powers the center console strip.
Keep in mind you can have the main control box on the driver side if you have extensions, or just run all of the driver side lights off the subcontroller box. Only really matters if you’re trying to configure certain lighting effects and the lights need to be oriented a certain way.
In my kit I had some extra RGB lights. I used one to bring a bit of illumination to the OBD port area. You could also light up the center cupholder, the phone charging area, etc.
Additional Details
Door Cards - While removing the door cards, there’s a stubborn square rivet next to where the lock bar is. Don’t pull on this part like a gorilla and bend that metal lock bar. Lift the trim a little from the side so you can see the rivet. Then use a set of needle nose pliers to squeeze the white rivet out. Comes out like butter. In the photo, the rivet goes in the square hole above the tape.

Driver Side Connector - In the videos I saw on this install, it seemed like people had a really difficult time with the larger white and grey connector on the door card of the driver side door. All you do is press on the white ridged portion of this plug to release the grey lever. The lever pivots 90 degrees, releasing the entire plug. Quite a clever design and it actually comes out easier than the other plugs.
On the door cards, people most commonly install a light strip between the plastic trim where the buttons are and the armrest. In the videos I’ve seen, people are prying the hell out of this area in the front, messing up tools and even shorting out their LED strips. On the backside of the panel there are actually three short, silver 20mm Torx screws that can come out where the plastic trim piece meets the armrest (on the driver side, there are only two that you have easy access to). Undo those and pry at the gap (from the back) with a flat head screwdriver to create a bit of space to place the light strip. Pry tools are still needed on some areas from the front to wedge in the light strip. I decided to run my LED strips along the full length of the doors. This means leaving a small section in the middle slightly more exposed or more embedded. Worth it in my opinion.
Here a photo of one of the silver Torx screws to unfasten. You'll want to create a bit of space between the pieces that the screw is holding together.
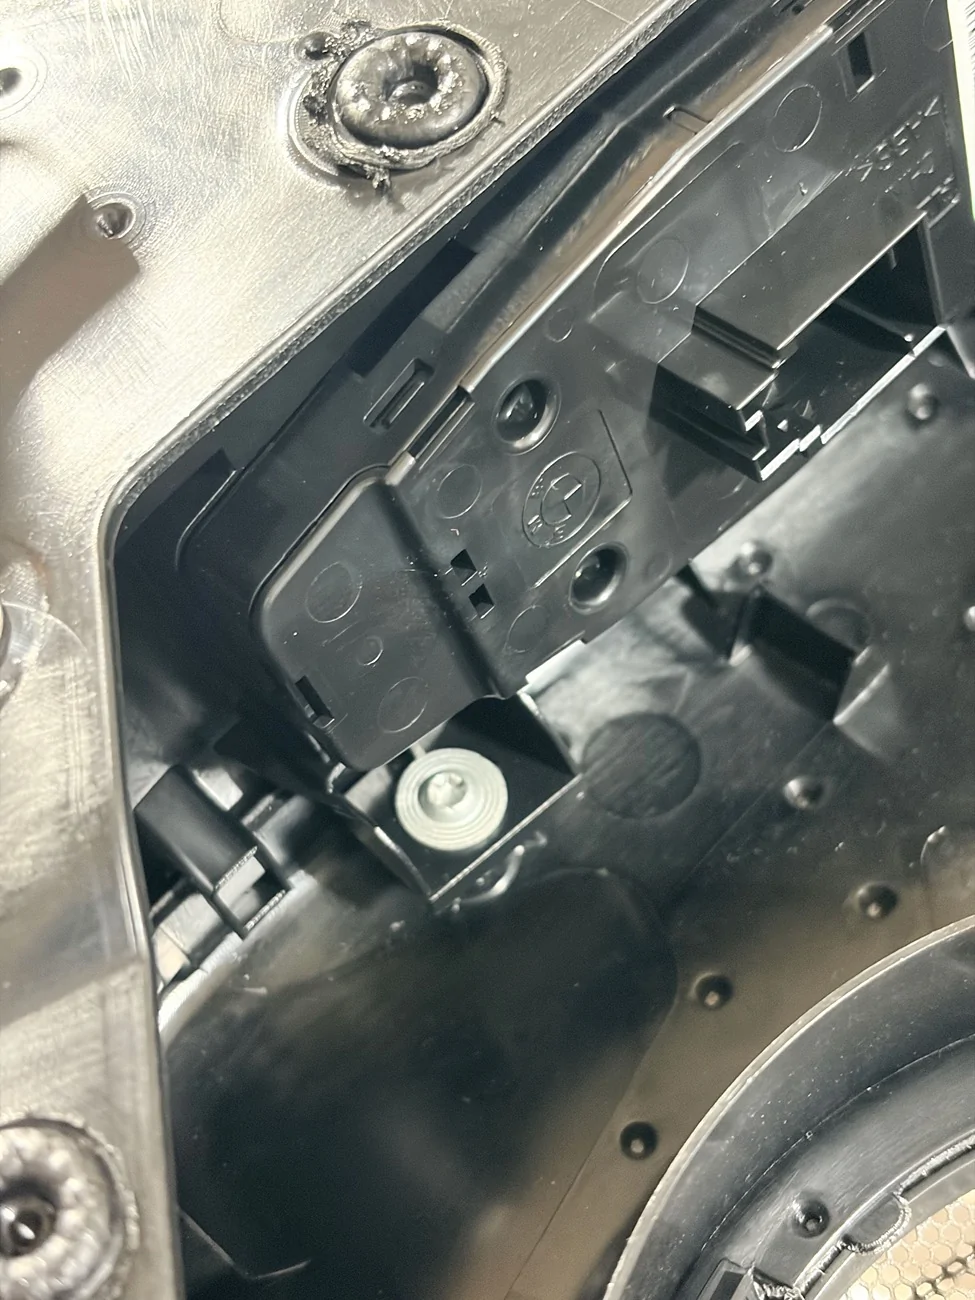
Photo of the front side where you can use trim tools to assist the wedge action.
I started the light strip from this side.

Center Console - You don’t need to disassemble the plastic piece that’s next to your right thigh on the driver side that’s secured by Torx screws. Just pop out the soft touch trim piece and you can run the light strip from the top or the bottom. The cupholders don’t need to be removed unless you’re fitting lights there. My center console light strip runs from the top down and in front of the cupholders. You can wedge in the strip without removing the cupholders.
To feed wires and connectors from the passenger side to the driver side, you don’t need to disassemble anything besides lowering the plastic covers in the footwells. The spot you’re looking for is next to the white AC vent tube. You can shine a light on one side to see where the gap is. Big brain time. Instead of trying to fish flimsy wires and chunky footwell lights through the tight clearance, attach the wires to a pen with masking tape to feed it through. Use a smooth pen or extension bar so it doesn’t get snagged on anything. Done.
Test the light strips to make sure they have proper power and ground. Also, my subcontroller didn’t actually turn on all of the lights until I synced it with the app. Basically just hit the "Search Subbox" button, wait for the lights to flash red and blue, then tap the "Looking for..." button to complete the process.

The light strips only bend a certain way. On the doors and center console, I wanted to use the entire strip so part of the strip is obscured by bend areas. So a single light strip on the door looks like two sections. The cleanest approach is to use more than 1 light strip. I went with the 18-in-1 kit, and you may want to just get two kits if you’re doing a larger vehicle.
There are a ton of effects, such as rainbow puke, music mode, etc through the app. I find them distracting so I just set the color and dim it to my liking.
--------------------------------------------------------------------------------
Starlight
The main challenge if you want to install a starlight kit is getting the headliner out and back in. I opted for a 600 star kit, which only requires 1 projector. I’m happy with the number of stars for the smaller size of the supra cabin. If you want more stars, your layout may need to change a bit. Compared to a sedan with double the amount of stars, the density of a 600 star kit in this car is pretty much equivalent.
Equipment
-Hot glue gun with a pack of refills.
-Xuron style clippers
-Rotary drill
-Micro drill bits (if the kit doesn’t come with them)
-Electrical, Tesa, duct tapes.
-Trim and Pick Tools
-Torx bits - T20, T25
Headliner Removal
To drop the headliner, you’ll remove two trim pieces in the rear where the headliner meets the car. Remove the Torx screws underneath. At the front of the car you’ll pop off A pillar Airbag labels to reveal the Torx screws underneath. Remove the visors. Each visor is held on by two different styles of retaining clips. The center map light can be partially removed with trim tools. To lower the center, you’ll need to use two trim tools to push against two areas of the housing. This is the most time consuming part. There are push pin clips that can be popped loose from the center to give you more clearance. There’s an assortment of wires that need to be disconnected. 2-3 from the center map, one from each visor, and another set for the microphone. When it’s time to reinstall the liner, there are white plastic brackets that help keep the visor clips in place; I found they interfere with reinstall more than anything and are not essential.

You can see the two center push pins that need to be released to lower the center.
If you look at any instructions for headliner removal on this car, they instruct you to remove seats to have enough clearance. I didn’t want to do that, so I folded the headliner like a hot dog and removed it from the passenger side. Regarding the folding, since is not really explained anywhere, you’re folding the headliner so that the black cloth side is the EXTERIOR of the hot dog. So you drop the headliner, rotate it counter-clockwise (or clockwise, up to you) a bit towards the passenger side, then push the center of the liner down to fold. There will be two folds in the center around the map light plastic housing instead of perfectly down the center. When I removed the headliner, it popped back into shape with zero creases. Getting the liner back in was slightly more difficult. An important tip. Wrap the rear metal corners of the headliner and protect the rearview mirror to avoid scratching anything. Those bubble lined Amazon bags are what I used.
This is the passenger side corner of the headliner after a bit o' rotation.
Taco time. Do not be afraid.
Fiber Install
Use a rotary drill. The headliner on the supra is a bit more forgiving than others in that the cloth side is flexible. I’d still use a drill with a micro bit to avoid any chance of dimpling. You’ll need a drill to get through some of the plastic and metal support pieces of the headliner.
Hot glue is your friend. You have a good amount of clearance with the passenger side rear corner. I had about 600 vermicelli fibers to route and they fit fine through the passenger c pillar once flattened.
You’ll also want to organize things a bit to make sure you have enough length from the furthest point (vanity mirror area) to the projector location. Begin installing stars from the furthest point. I tucked the projector in the C pillar on the passenger side. Avoid routing anything in front of the air bags. Oh yeah, disconnect the power before unplugging anything. If you’re the organized type, you can mark where you plan to drill holes with a sharpie. I didn’t feel like doing that and just drilled a few holes at a time and fed the fibers through.
You may want to refrain from cutting the fibers flush until the liner is back in the car in case anything shifts or gets snagged. With enough hot glue anything can be secured and I didn’t have any snagging issues, so this is a minor suggestion. You need to get some dedicated snippers for these fibers for a flush cut.
Power & Wiring
You’ll want to use the rear fuse box for power. The accessory fuse you’ll likely want to use is on the last row and is a yellow 20A fuse. For the ground, there are two nearby bolts but I’ve found they are not the most consistent. I ran a ground wire to the ground bolt that the battery uses. You’ll want to secure any wiring with some cloth tape to avoid rattles.
I suppose you could route the fibers to the front but there’s a lot less clearance going that route. The supra’s rear trim area seems tailor made for this install. Pad the projector and wedge it in so there are no rattles. You should also securely tape the power plug so there’s no play and no chance of it wiggling out. If you get a more robust starlight kit with more stars, the projector will likely be a bit too chunky to fit without removing more trim. Near the passenger side trunk light, there are two cutouts in the liner that you can use to help fish the power line through to the fuse box area.
For the meteor effect, you can organize the smaller bundles of fibers however you like. I used them for some shooting stars and the supra S logo on a whim. It was really an afterthought though so I’m sure you can do much better. I have them off most of the time.
If you’re pretty good with disassembly, the ambient light kit can be done in less than a day. The starlight kit will take at least 2 days unless you have some help. It’s more tedious than the ambient light kit. If you’re solo and less confident, I’d double the install times. You can definitely get these installs done. Also, you can take this opportunity to add butyl mats to exposed panels like I did.
I threw some stars on the subwoofer box as well.
Sponsored