tadda
Well-Known Member
- Thread starter
- #1
I spent a fair amount of time over the past few weeks thinking about how to improve the Supra's subwoofers, which we all know by now, were not designed properly and as a result have issues when it comes to both vibrational noise and lower bass quality...What I discovered after implementing the improvements outlined below is that surprisingly, the OE Harmon Kardon 8" Subwoofers in the Supra are actually very good speakers once you correct some very basic design issues that were overlooked by Toyota...
---------------------------------------------------------------
To start with, some incremental improvements to bass response can be made by first removing the Active Sound Design (faux engine / exhaust noise) which is electrically overlayed onto the audio channels when sport mode is selected ...I found that the ASD feature actually "muddies" the bass and audio response and increases distortion and noise...
In addition, many of us have played with EQ settings in an attempt to optimize sound quality but the OE system still fell somewhat short...I also found that selecting the "Surround" enhancement feature added to the phase distortion which resulted in reduced sound clarity...This is one of the first things I turned off and the system clarity was noticeably improved...Also note that "Speed Volume" is turned all the way down as this will change the EQ curve as speed increases resulting in an undesirable response at hwy speeds...
Here are my current audio settings:
How to Setup and Optimize Sound Quality using OE Equalizer

=============================
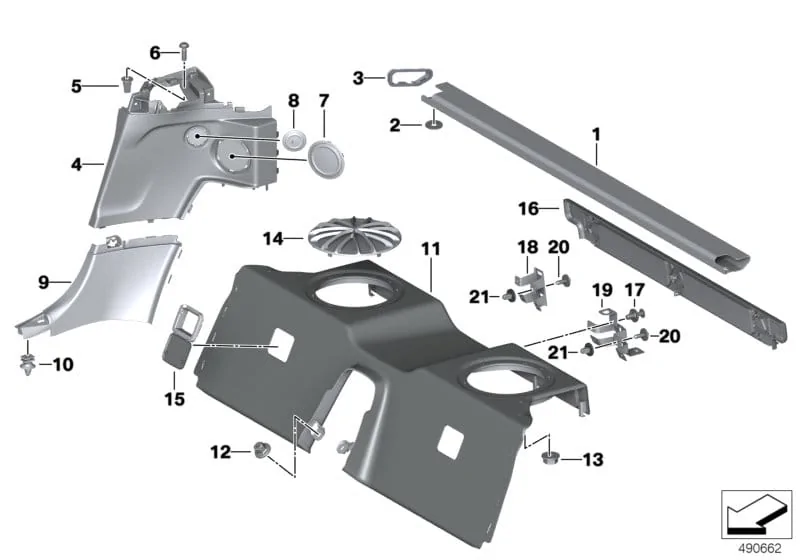
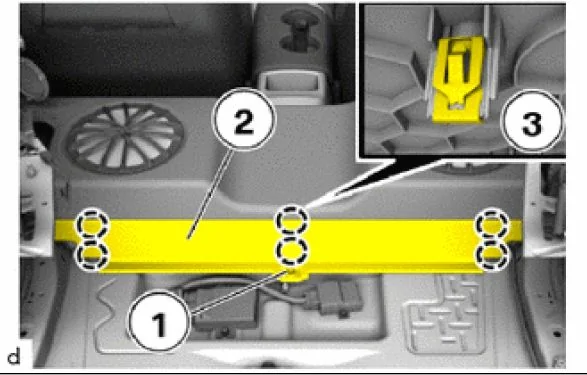
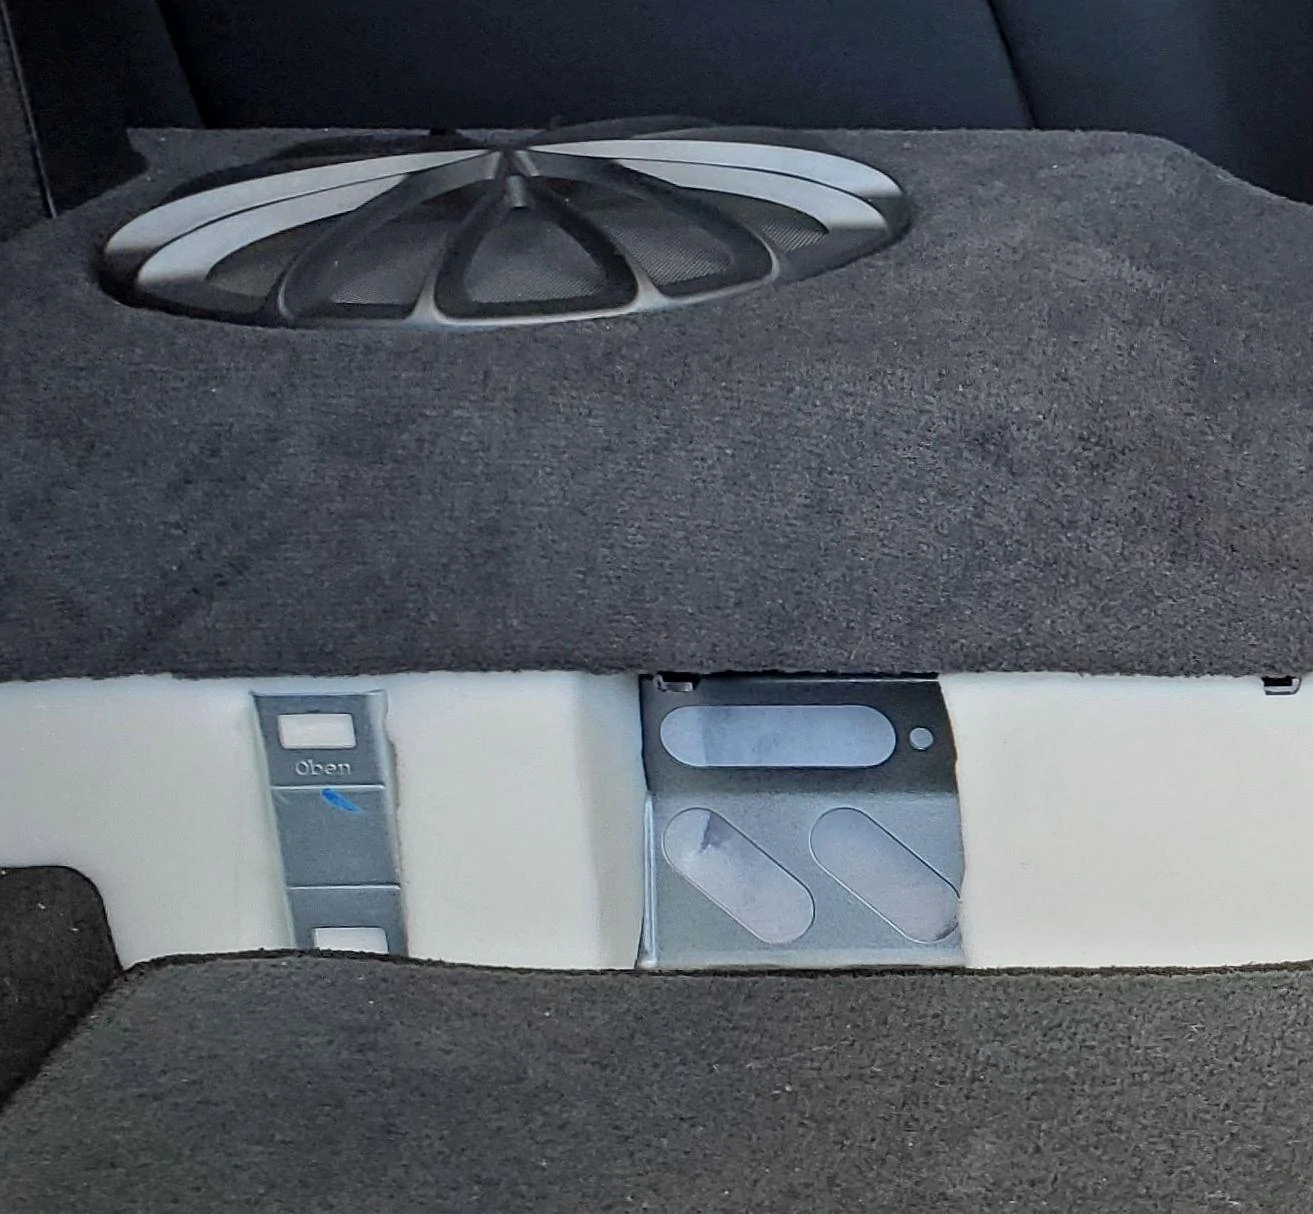
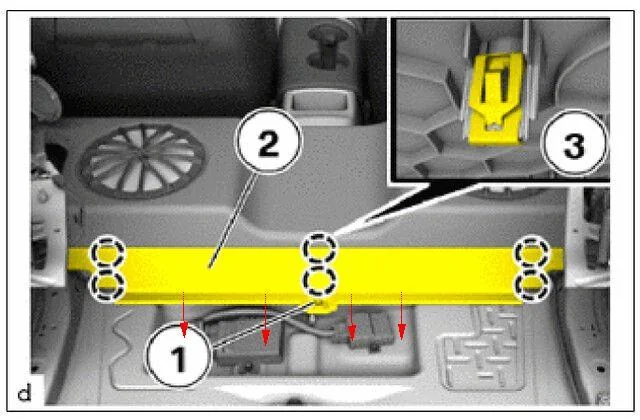
Now with respect to the OE subwoofer enclosure itself what I outline below is where most of the major improvements to bass response and elimination of vibrations were made... I've identified a few notable areas for improvement after observing a few pics posted of the cargo area stripped down and began to get to work...It should be noted that the only panel that needs to be removed in order to make the following changes is the narrow rear subwoofer panel (shown below)...

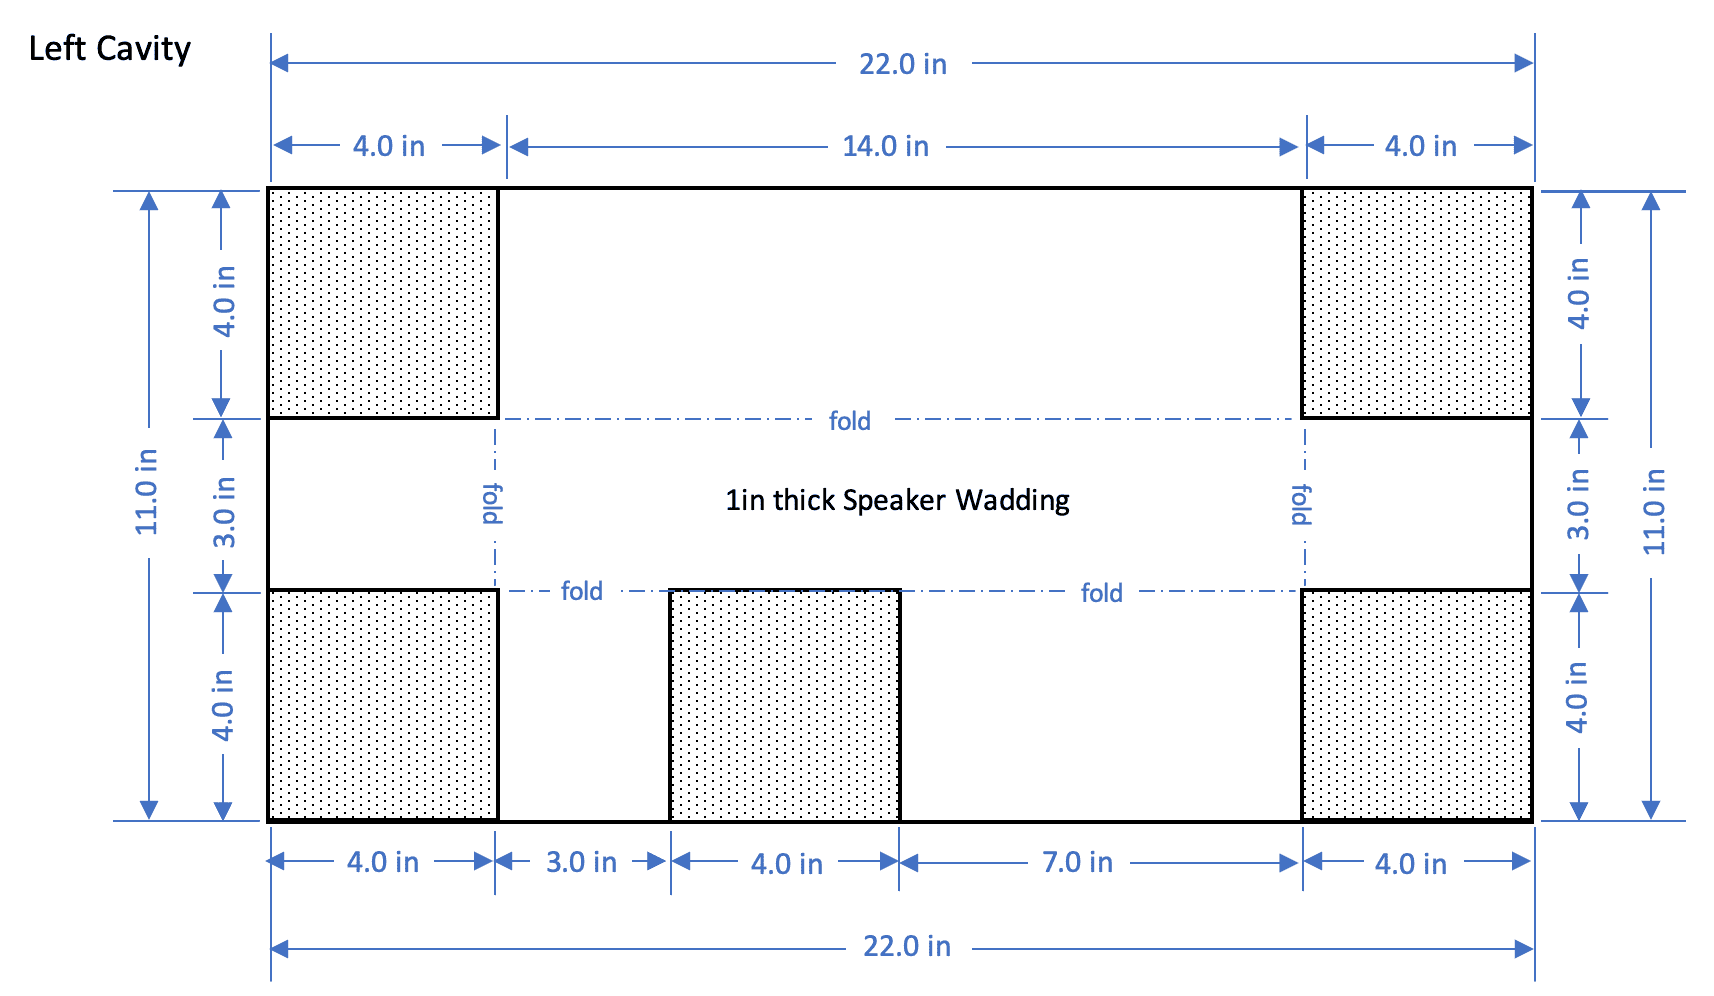
First, lining the walls of both metal sub enclosures (which are indeed separated) with 1" speaker wadding improved lower bass response and bass quality by reducing distortions created by destructive waves within the metal enclosure..The wadding also serves to increase it's "effective" volume...
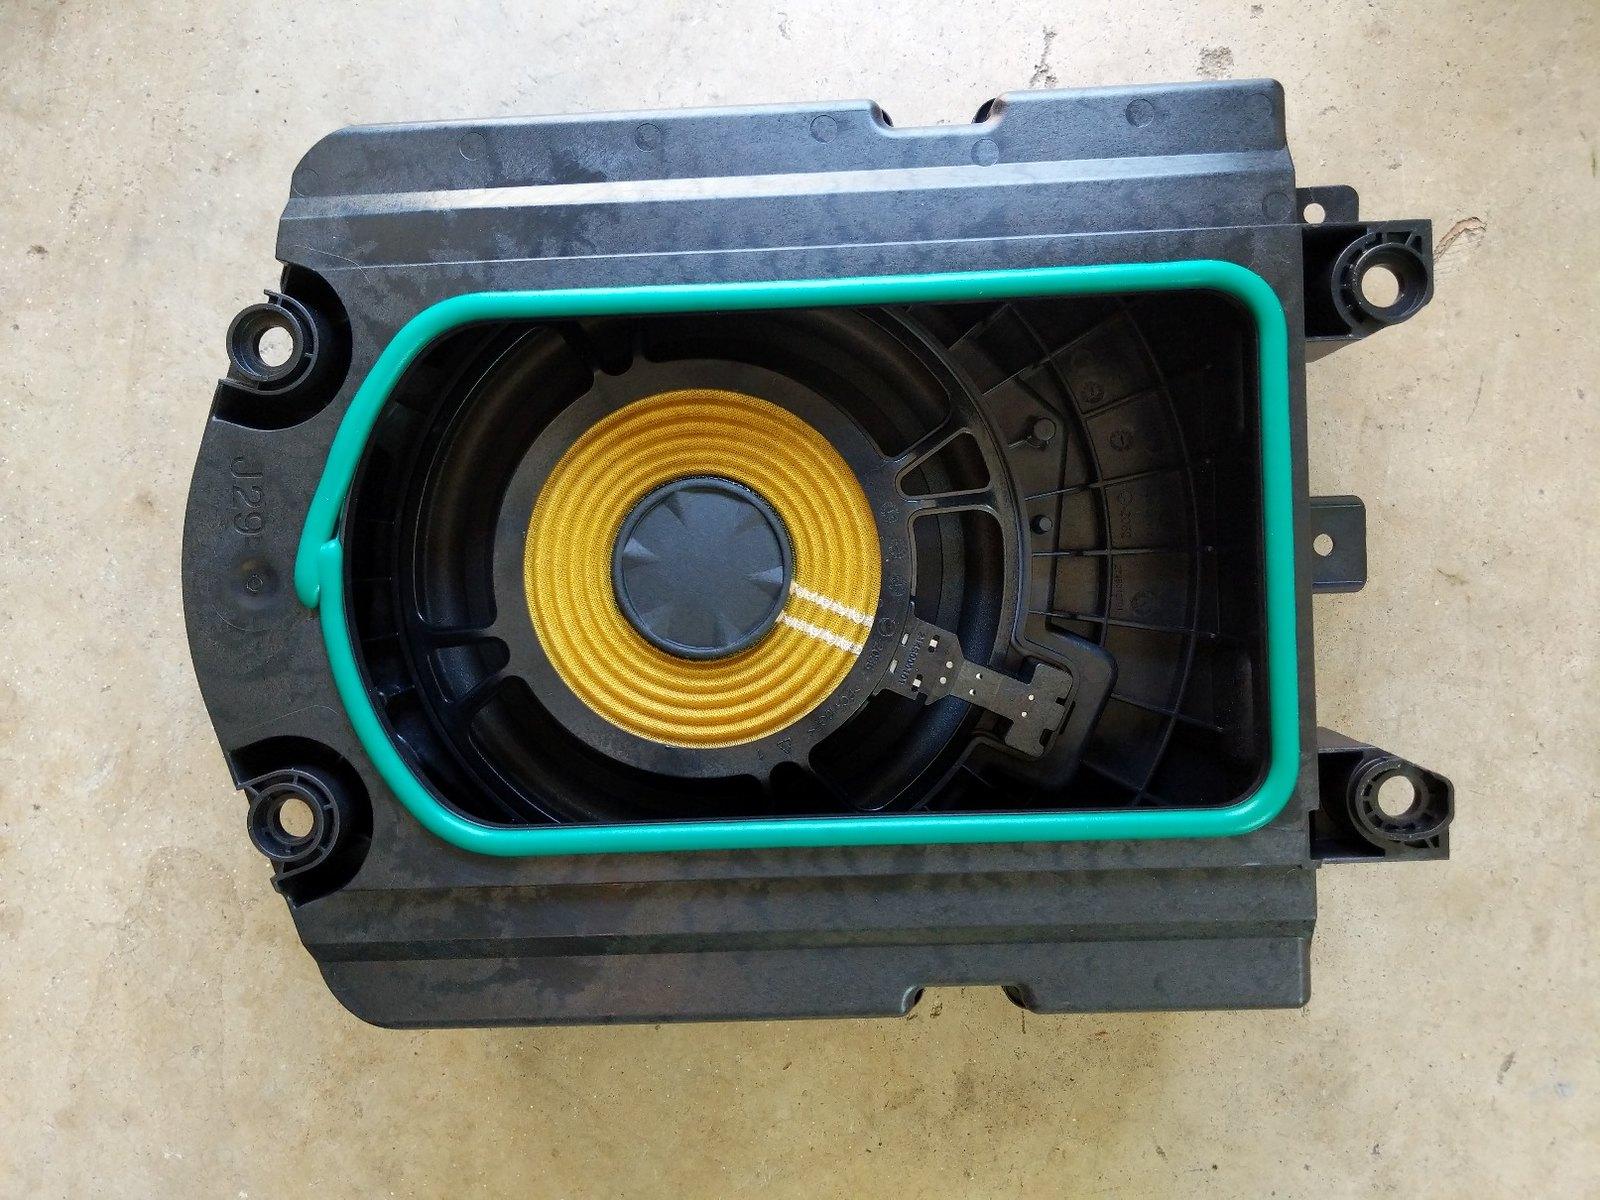
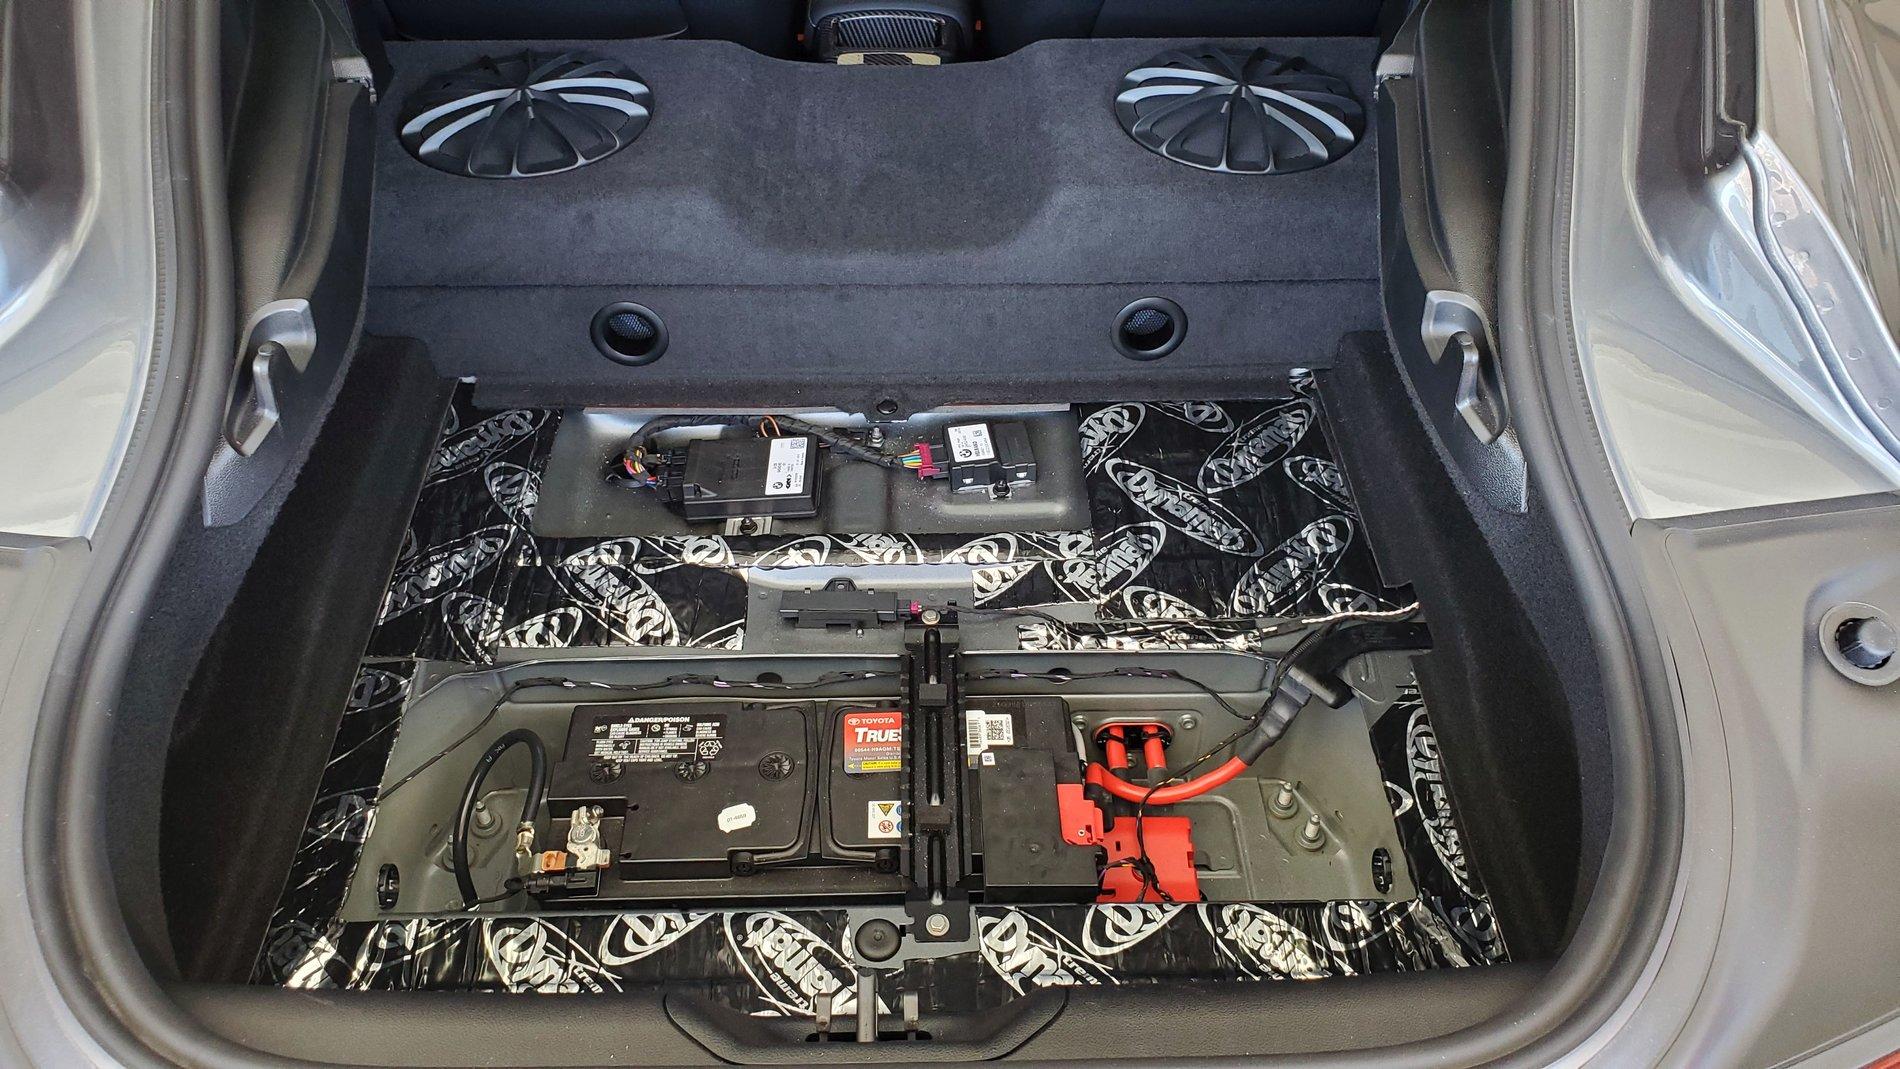
Pic below is posted just to show what enclosure looks like totally exposed....Again, the only panel you need to remove to line the walls with wadding is the narrow rear panel

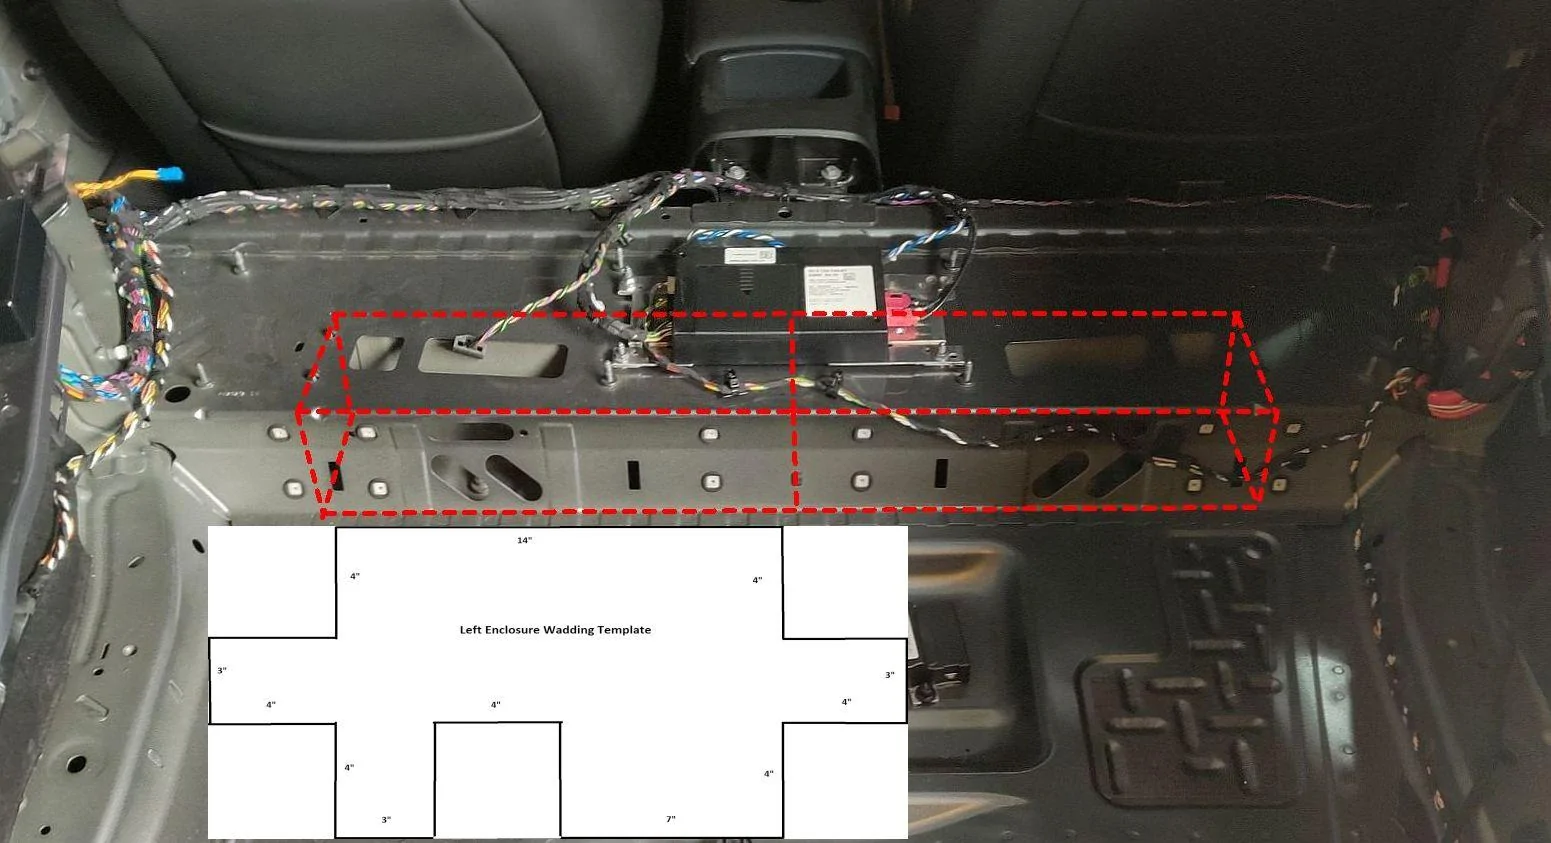
Enclosure Lining / Wadding Template: I was actually able to roll up the speaker batting cut from a template (shown below) and slip it through one of the elongated exhaust ports and then use a long screw driver to manipulate the cut batting to line the walls of the metal enclosure shown below:


Secondly, and most importantly is that the majority of the lower bass vibrational noise and bass distortion is actually caused by the narrow rear cover panel blocking the subwoofer exhaust energy...The solution here was to 1) Insulate the area within the narrow rear panel with 2" foam leaving the exhaust port open and 2) Adding 2" exhaust ports to the narrow rear panel...

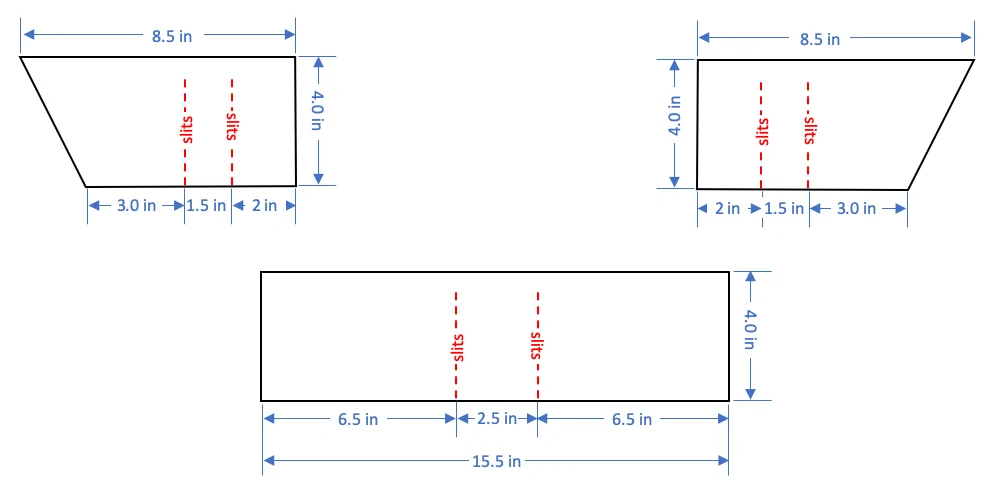
Foam Cutout Dimensions (below):
Note: I didn't need to remove the narrow rear panel mounting brackets...I actually used a 4"h length of 2" foam and cut slits into the foam such that the foam could be worked in from the top behind each of the brackets...


Installing Rear Panel Exhaust Ports...


I've also identified another area that needed to be addressed...I discovered this after implementing all these other improvements, thus allowing me to significantly increase volume along with raising bass EQ settings...What I found was that there was some exhaust port energy escaping from under the long narrow rear panel (which as I show in a few pics below) causing the rear floor panel to vibrate...Keep in mind that this is yet another design problem which causes the floor panel to vibrate where in-turn this vibrational energy is transferred to the cargo areas' side and back panels causing them to vibrate as well...
The solution here was to apply some adhesive back foam to the areas show below which eliminated any energy transfer under the rear cargo floor panel...
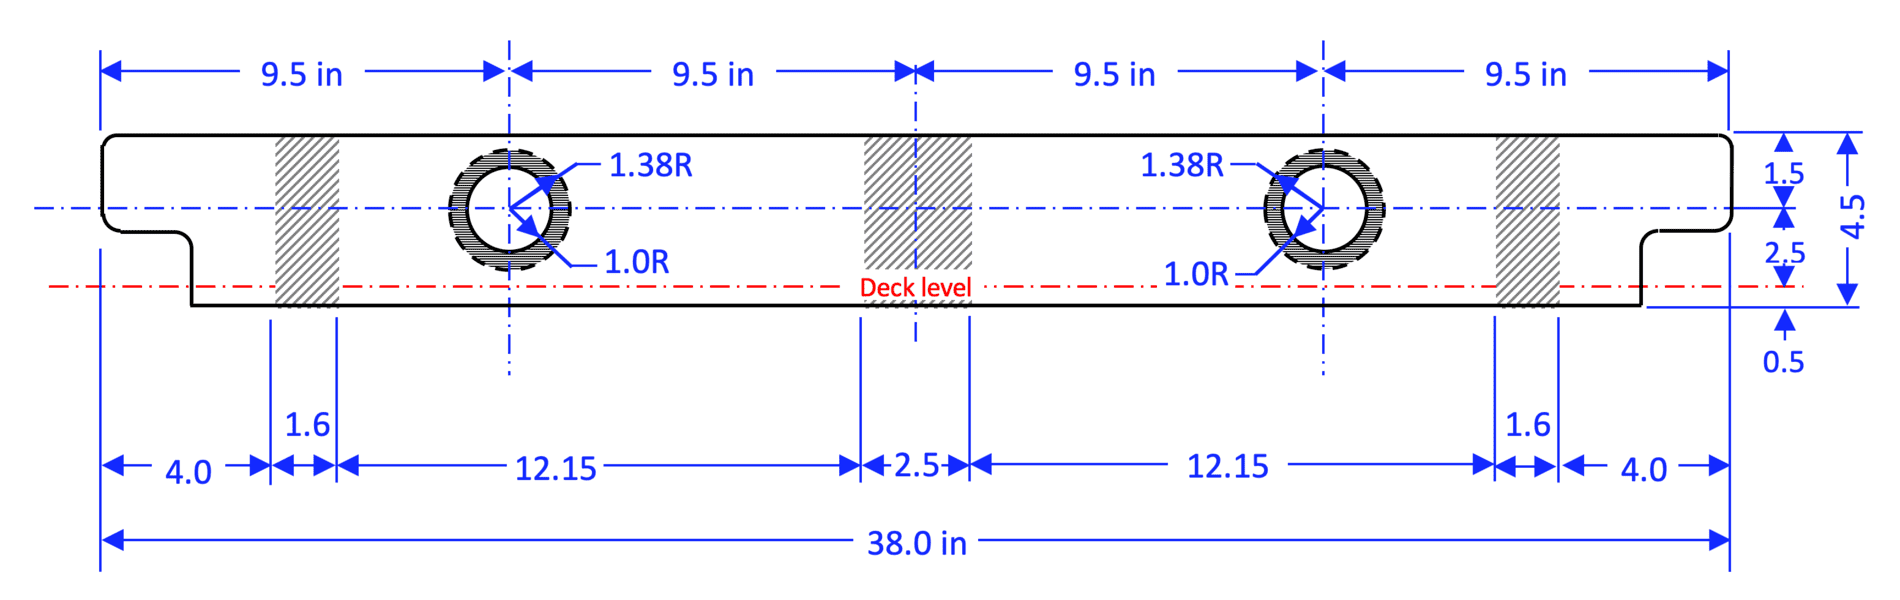
Shown below, I first applied 1.5"d x 4" L x 0.25" h adhesive backed foam strips above and below both exhaust ports to isolate them further from the top cover and floor....
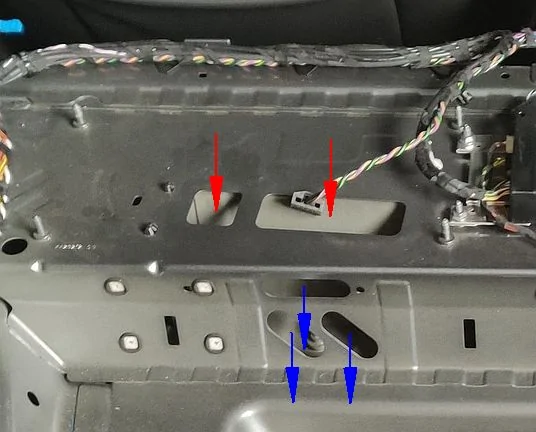
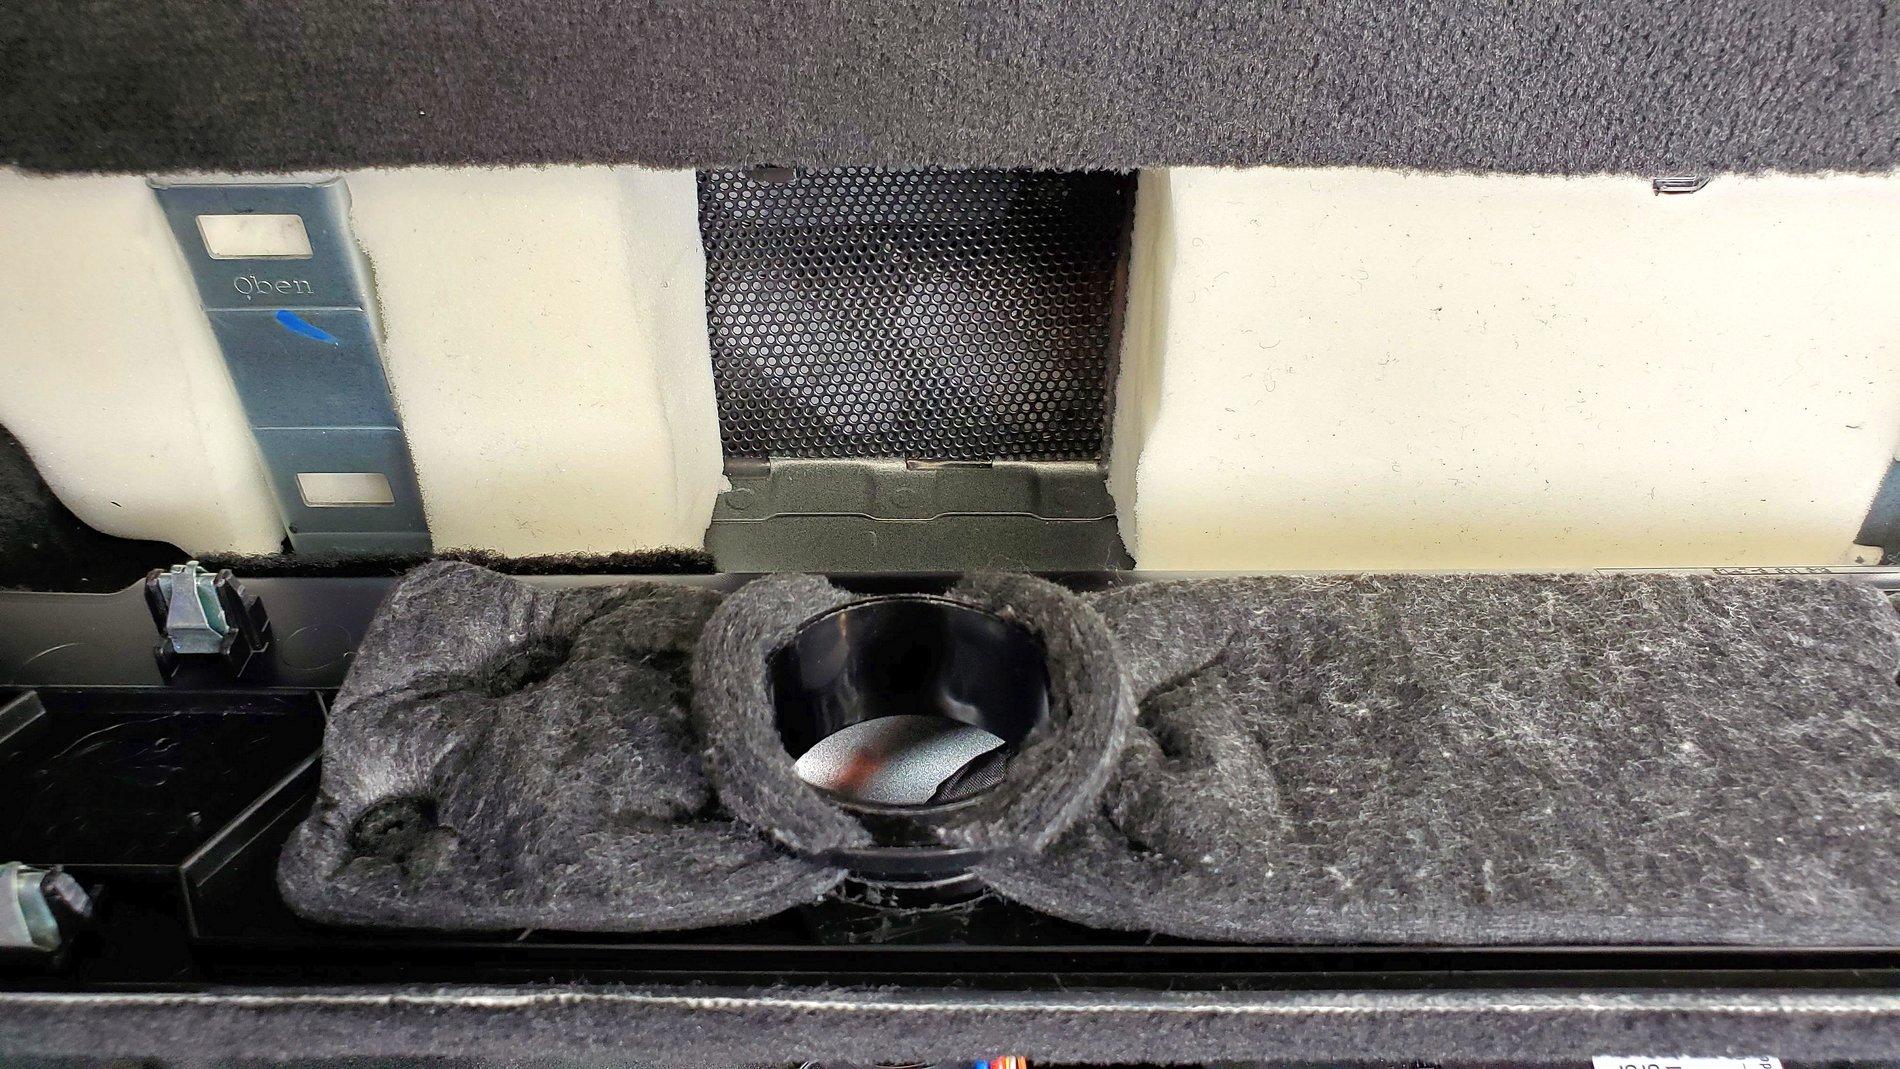
Next, the image below shows where some exhaust energy from the 3 elongated ports was also being released under the large rear floor panel causing it to vibrate greatly...With the floor panel removed simply place your hand under the narrow panel and you'll see / feel the exposed gap ...
Shown below are the locations where 2 adhesive back foam strips were applied to underside of exposed narrow rear panel ...The left adhesive backed foam strip was 1.5"D x 11" L x 0.25" H and the right foam strip is 1.5"D x 6" L x 0.25" H...This essentially sealed off the gap where the exhaust energy was also being channeled...
As a result the large rear floor panel vibration has pretty much been eliminated and side and rear trunk panels no longer vibrate during low bass / high volume music passages....
As far as materials, I used Noico RED 315 mil Sound Insulation , which I already had available for beginning my next project of eliminating front door speaker vibrations ....
Here is yet another area that required attention for eliminating subwoofer grill rattle / vibrations...I did this awhile ago and thought it might be helpful to post while we're on this topic....
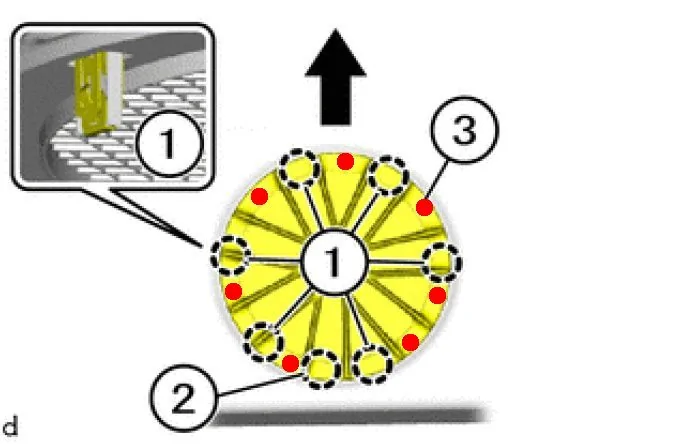
Remove the woofer grill assembly by prying up to free clips around the grill and then separate the 12 spoke grill cover from the flat grill plate and apply small dollops of flexible silicone adhesive around the underside of the 12 spoke cover (shown below)....Now reassemble and press firmly around the edge of the flat grill insert plate to secure it to the 12 spoke grill cover...

And finally, I applied some Dynamat to cargo area floor to eliminate any further vibrations and reduce road noise...
There is one more area that I would recommend applying some insulation where some vibrations occurred during low bass tracks...Behind the cargo panel there is quite a bit of open dead space and the plastic panel does not have any insulation between that and the body...
I used the 2" foam padding I had already purchased for the narrow rear sub cover panel and applied foam to the following areas shown below...The rear cargo panel is easily removed..I also opened the empty compartment that is used to store the roadside triangle that US Supra's don't have and inserted a 2" foam strip...
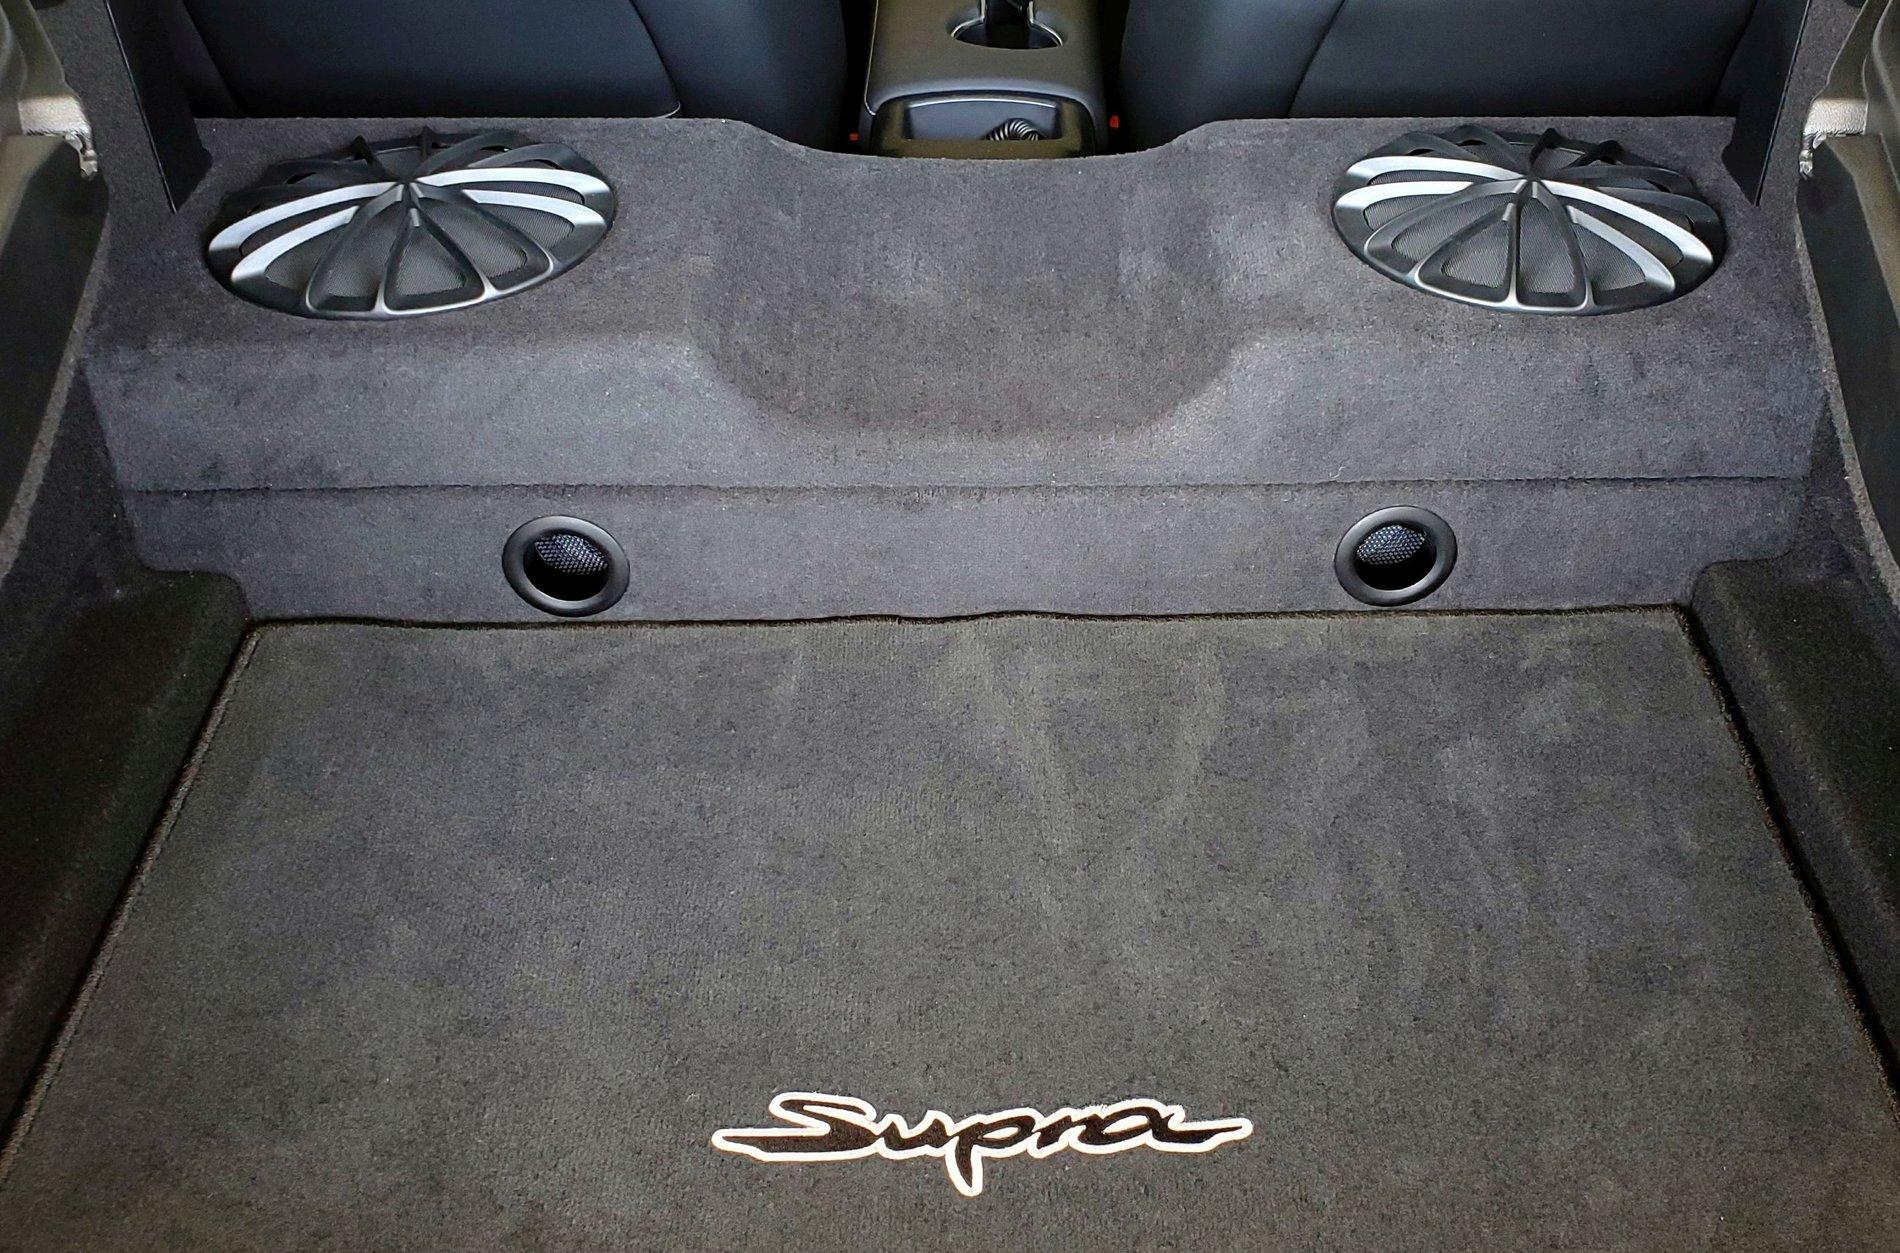
Shown below is a pic of the finished project:

---------------------------------------------------------------------------------------------------------------------------------------------------------------
Here is a list of materials I used:
2" Foam Pad
1" Speaker Wadding
2" Exhaust Port
Dynamat Extreme
Noico Adhesive Backed Foam Panels
--------------------------------------------------------------------------
Summary and Final Thoughts:
Surprisingly, the Harmon Kardon 8" Subs in the Supra are actually very good speakers once you correct some very basic design issues that were overlooked by Toyota... Without ports added, the bass exhaust energy was literally trapped behind the rear panel which created quite of bit of vibrational noise and also muddied bass response...
Adding exhaust ports to the rear panel along with lining the enclosure walls with wadding and insulating the space behind the narrow rear panel, essentially lowered the Q (damping effects) and resulted in a flatter / clearer bass response...The Bass is now deeper, punchier, and far less distorted and eliminated much of the vibrational noise heard...
For anyone considering installing direct replacement subwoofers as a knee-jerk reaction to improving sound distortions, vibrations, and rattles, these basic improvements should be seriously considered before replacing them...
---------------------------------------------------------------
To start with, some incremental improvements to bass response can be made by first removing the Active Sound Design (faux engine / exhaust noise) which is electrically overlayed onto the audio channels when sport mode is selected ...I found that the ASD feature actually "muddies" the bass and audio response and increases distortion and noise...
In addition, many of us have played with EQ settings in an attempt to optimize sound quality but the OE system still fell somewhat short...I also found that selecting the "Surround" enhancement feature added to the phase distortion which resulted in reduced sound clarity...This is one of the first things I turned off and the system clarity was noticeably improved...Also note that "Speed Volume" is turned all the way down as this will change the EQ curve as speed increases resulting in an undesirable response at hwy speeds...
Here are my current audio settings:
- ASD / Active Sound Design (off - using Bimmercode)
- Surround (off)
- Speed Volume (0)
- Balance: (0)
- Fade: (front +2)
- Broad Bass (+2)
- Broad Treble (-2)
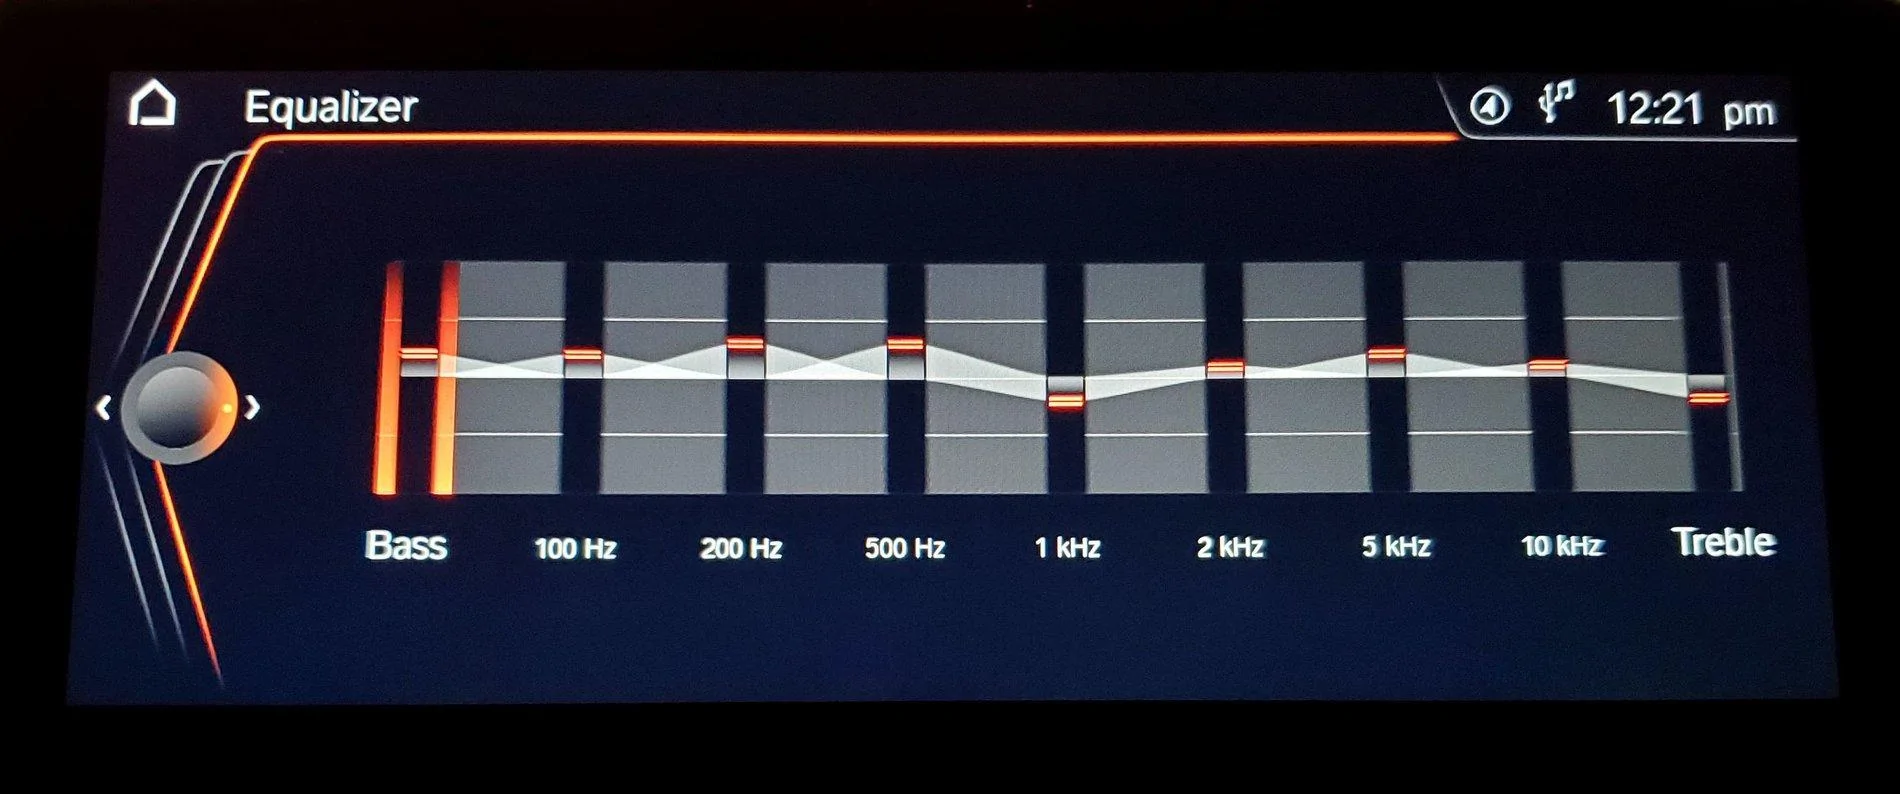
- Equalizer (shown below)
How to Setup and Optimize Sound Quality using OE Equalizer
=============================
Now with respect to the OE subwoofer enclosure itself what I outline below is where most of the major improvements to bass response and elimination of vibrations were made... I've identified a few notable areas for improvement after observing a few pics posted of the cargo area stripped down and began to get to work...It should be noted that the only panel that needs to be removed in order to make the following changes is the narrow rear subwoofer panel (shown below)...

First, lining the walls of both metal sub enclosures (which are indeed separated) with 1" speaker wadding improved lower bass response and bass quality by reducing distortions created by destructive waves within the metal enclosure..The wadding also serves to increase it's "effective" volume...
Pic below is posted just to show what enclosure looks like totally exposed....Again, the only panel you need to remove to line the walls with wadding is the narrow rear panel
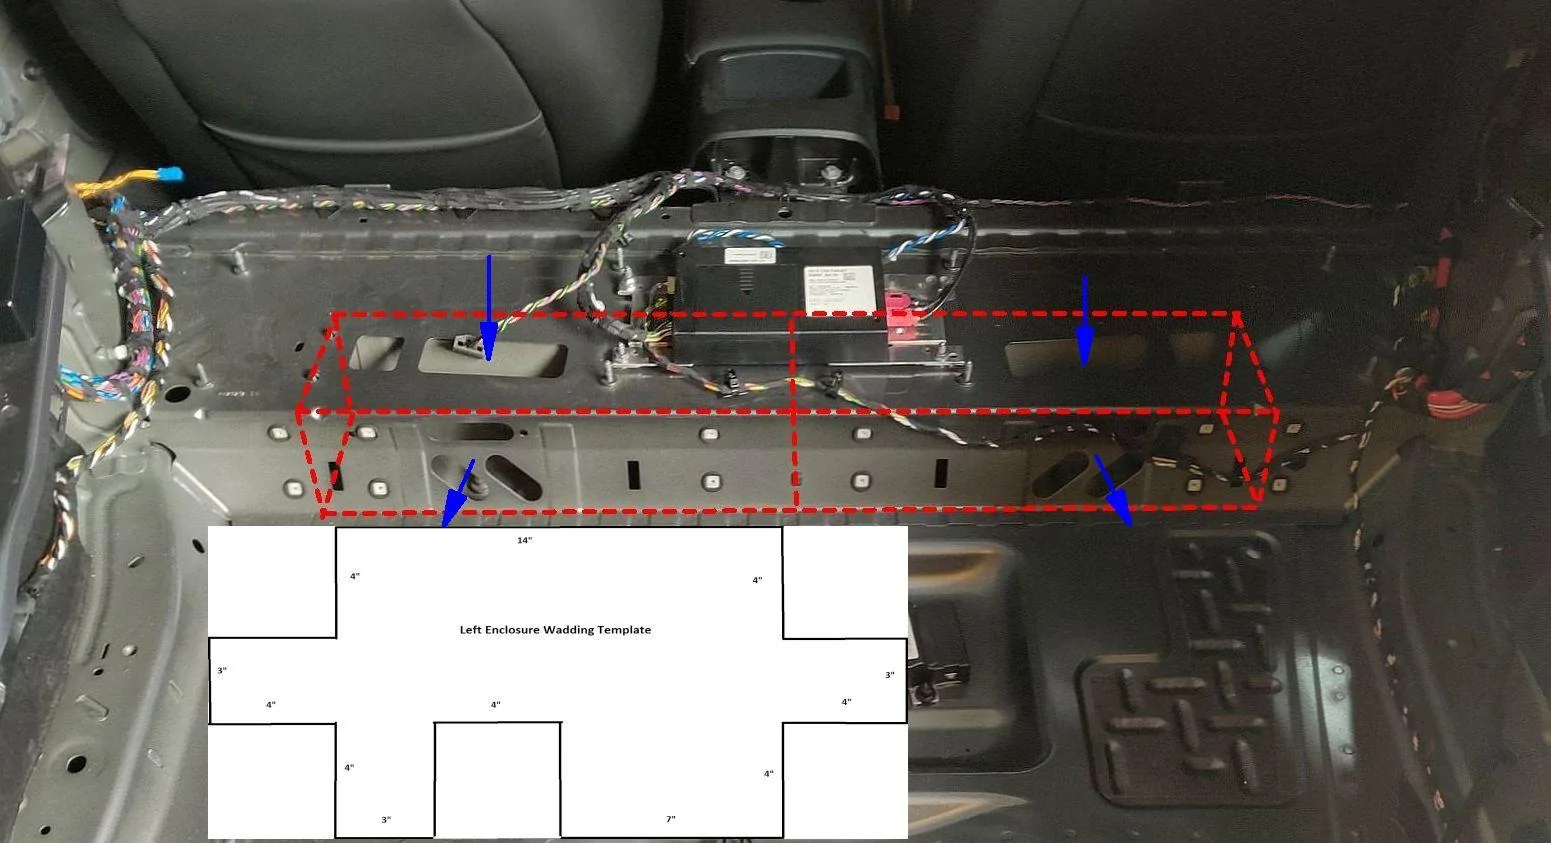
Enclosure Lining / Wadding Template: I was actually able to roll up the speaker batting cut from a template (shown below) and slip it through one of the elongated exhaust ports and then use a long screw driver to manipulate the cut batting to line the walls of the metal enclosure shown below:
Secondly, and most importantly is that the majority of the lower bass vibrational noise and bass distortion is actually caused by the narrow rear cover panel blocking the subwoofer exhaust energy...The solution here was to 1) Insulate the area within the narrow rear panel with 2" foam leaving the exhaust port open and 2) Adding 2" exhaust ports to the narrow rear panel...

Foam Cutout Dimensions (below):
Note: I didn't need to remove the narrow rear panel mounting brackets...I actually used a 4"h length of 2" foam and cut slits into the foam such that the foam could be worked in from the top behind each of the brackets...

Installing Rear Panel Exhaust Ports...
- Cover the front carpeted area of narrow rear panel to be cut with blue tape and mark a 2" diameter circle
- Use either a 2" hole saw or a dremel tool with disk to cut out the marked circle
- Use a small dremel grinding drum to finish the edges of the port hole
- Cut the black OE panel insulation in the the center of hole and fold back on either side
- Insert 2" exhaust port
- Use tie wrap to hold thin black OE panel insulation along side walls of exhaust port
- Secure port to rear panel with drops of epoxy or superglue at edges touching rear panel and port walls
I've also identified another area that needed to be addressed...I discovered this after implementing all these other improvements, thus allowing me to significantly increase volume along with raising bass EQ settings...What I found was that there was some exhaust port energy escaping from under the long narrow rear panel (which as I show in a few pics below) causing the rear floor panel to vibrate...Keep in mind that this is yet another design problem which causes the floor panel to vibrate where in-turn this vibrational energy is transferred to the cargo areas' side and back panels causing them to vibrate as well...
The solution here was to apply some adhesive back foam to the areas show below which eliminated any energy transfer under the rear cargo floor panel...
Shown below, I first applied 1.5"d x 4" L x 0.25" h adhesive backed foam strips above and below both exhaust ports to isolate them further from the top cover and floor....
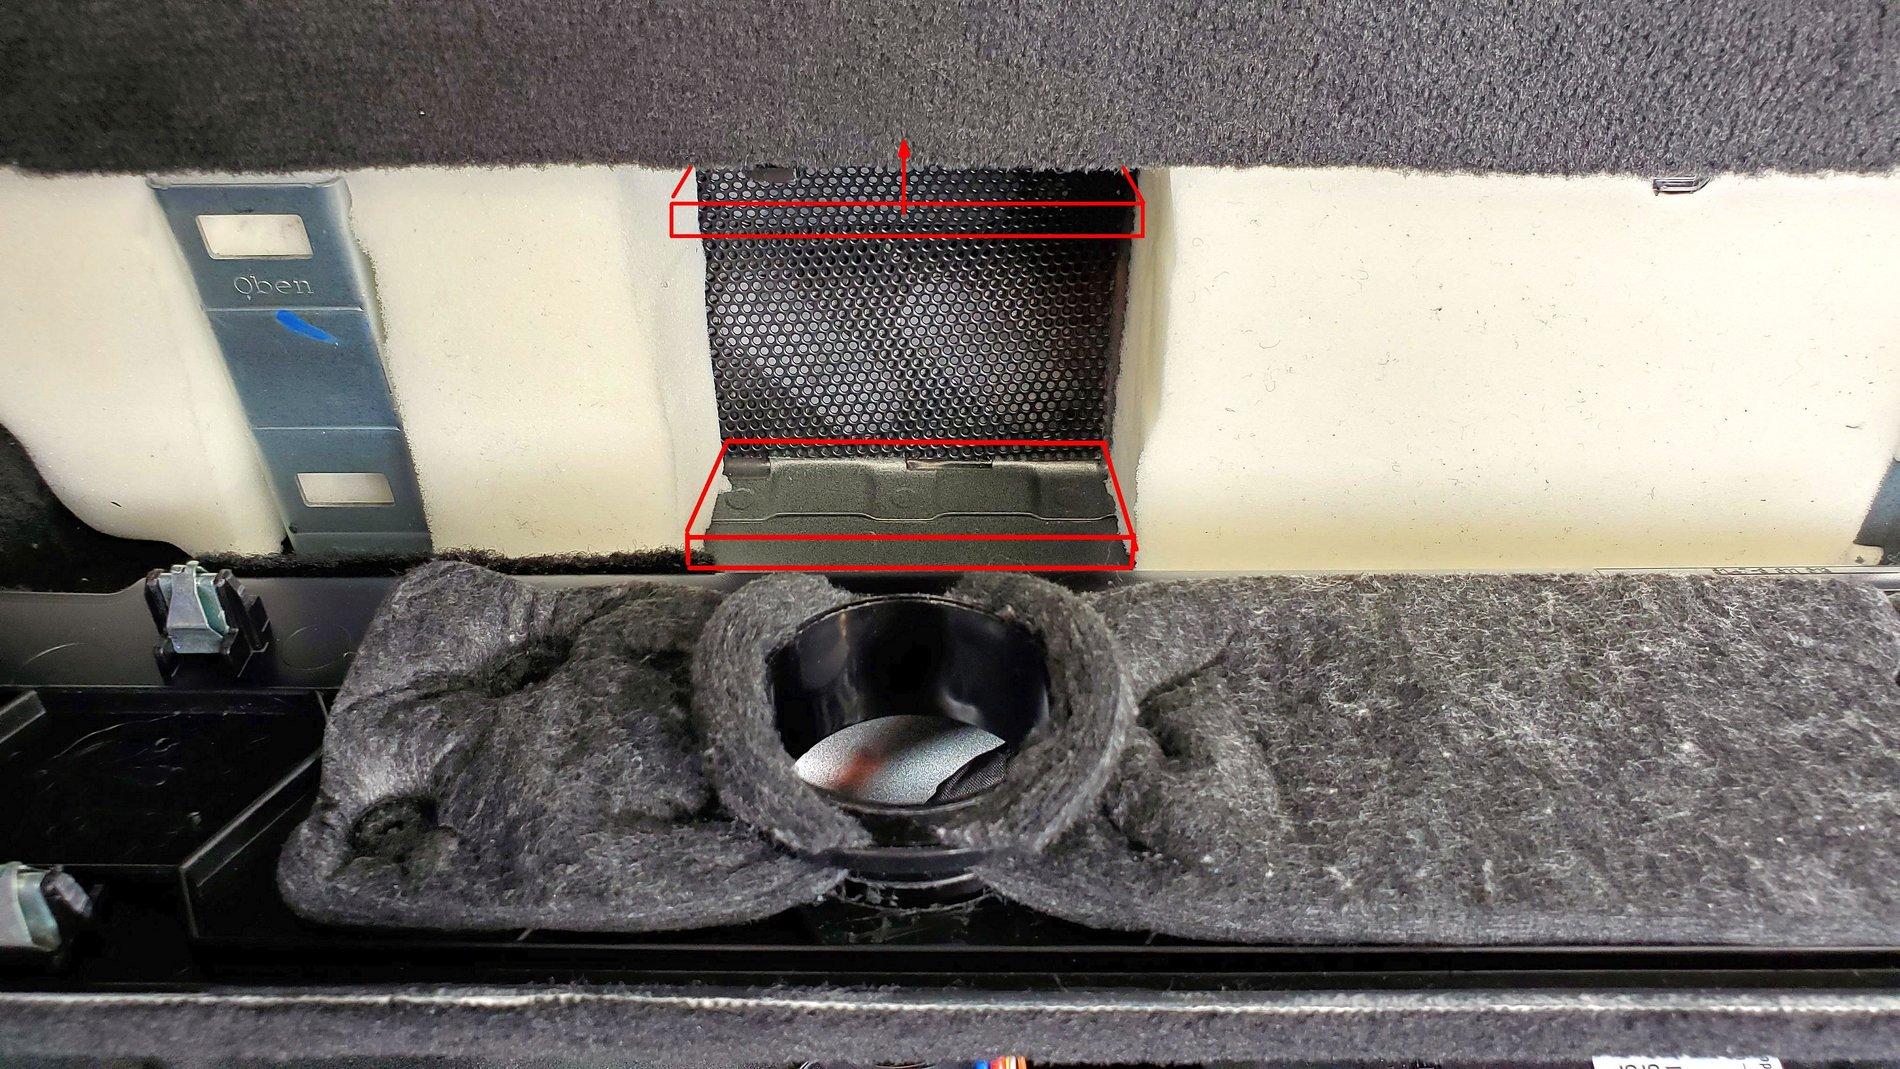
Next, the image below shows where some exhaust energy from the 3 elongated ports was also being released under the large rear floor panel causing it to vibrate greatly...With the floor panel removed simply place your hand under the narrow panel and you'll see / feel the exposed gap ...
Shown below are the locations where 2 adhesive back foam strips were applied to underside of exposed narrow rear panel ...The left adhesive backed foam strip was 1.5"D x 11" L x 0.25" H and the right foam strip is 1.5"D x 6" L x 0.25" H...This essentially sealed off the gap where the exhaust energy was also being channeled...
As a result the large rear floor panel vibration has pretty much been eliminated and side and rear trunk panels no longer vibrate during low bass / high volume music passages....
As far as materials, I used Noico RED 315 mil Sound Insulation , which I already had available for beginning my next project of eliminating front door speaker vibrations ....

Here is yet another area that required attention for eliminating subwoofer grill rattle / vibrations...I did this awhile ago and thought it might be helpful to post while we're on this topic....
Remove the woofer grill assembly by prying up to free clips around the grill and then separate the 12 spoke grill cover from the flat grill plate and apply small dollops of flexible silicone adhesive around the underside of the 12 spoke cover (shown below)....Now reassemble and press firmly around the edge of the flat grill insert plate to secure it to the 12 spoke grill cover...
And finally, I applied some Dynamat to cargo area floor to eliminate any further vibrations and reduce road noise...
There is one more area that I would recommend applying some insulation where some vibrations occurred during low bass tracks...Behind the cargo panel there is quite a bit of open dead space and the plastic panel does not have any insulation between that and the body...
I used the 2" foam padding I had already purchased for the narrow rear sub cover panel and applied foam to the following areas shown below...The rear cargo panel is easily removed..I also opened the empty compartment that is used to store the roadside triangle that US Supra's don't have and inserted a 2" foam strip...

Shown below is a pic of the finished project:
---------------------------------------------------------------------------------------------------------------------------------------------------------------
Here is a list of materials I used:
2" Foam Pad
1" Speaker Wadding
2" Exhaust Port
Dynamat Extreme
Noico Adhesive Backed Foam Panels
--------------------------------------------------------------------------
Summary and Final Thoughts:
Surprisingly, the Harmon Kardon 8" Subs in the Supra are actually very good speakers once you correct some very basic design issues that were overlooked by Toyota... Without ports added, the bass exhaust energy was literally trapped behind the rear panel which created quite of bit of vibrational noise and also muddied bass response...
Adding exhaust ports to the rear panel along with lining the enclosure walls with wadding and insulating the space behind the narrow rear panel, essentially lowered the Q (damping effects) and resulted in a flatter / clearer bass response...The Bass is now deeper, punchier, and far less distorted and eliminated much of the vibrational noise heard...
For anyone considering installing direct replacement subwoofers as a knee-jerk reaction to improving sound distortions, vibrations, and rattles, these basic improvements should be seriously considered before replacing them...
Sponsored
Last edited:
")