Thraxbert
Well-Known Member
- Thread starter
- #1
This is concerning the Phase 2 Motortrend (P2M) rigid collar kit for the A90 Supra. I am not compensated by or affiliated with this company.
History: Aside from my Supra, I also have a big turbo Genesis Coupe 3.8 that I've been building for 8 years. The Genesis Coupe has a notorious amount of undesirable subframe movement under high-G maneuvers, such that it's not uncommon for people really building out their chassis setup to loosen the subframe bolts and shove the subframes back into place with a big-ass prybar. After that: rigid collars for the subframe bolt holes, and aluminum shims to fill cavities in the subframe bolt bushings, are not uncommon. Tightens everything up real nice, and my own Genesis ran this setup until I swapped the rear subframe for one from another car with a 5L V8.
It's that as a background that I wondered what the subframe situation looked like on the Supra and if rigid collars would be beneficial. After tearing everything apart and doing the install, I wanted to share my general thoughts and tips on what I found.
1) As a starter, you will need (or should have, to make life easier) the following tools:
4) The rear subframe bolts are hidden by plastic splash guards (8mm hex). The front subframe bolts are hidden by the metal skid plate under the oil pan (16mm hex) and plastic splash guard (8mm hex).
5) It's very important that you hand tighten all of these bolts to gently feed the collar into the subframe holes. Some of them will be snug, so be prepared to partially install and remove each bolt several times to inspect the collar, ensuring it's not being marred or distorted. Once you are confident the collar is not being damaged, proceed with full installation. My front driver side subframe collar (E18 bolt) was especially tight, and I legitimately checked this bolt 7-8 times with only a few revolutions of hand-tightening before bringing it up to torque. I also test-fit each collar in the bolt hole in the subframe by inserting the collar by hand, before even putting a bolt in the hole.
6) ONLY REMOVE ONE SUBFRAME BOLT AT A TIME. Do one corner at a time, and fully reassemble it to torque prior to moving to the next bolt.
7) This is a very easy install IF you take the right preparatory steps to remove splash guards, skid plates, and chassis braces before attempting to install a collar. If you have any questions, DM me! Overall, fitment was very good and total time took me about 2 hours inclusive of getting distracted by my phone and a beer break.
8) So, do I need the collars? Hard to say. I don't track my car, but the amount of wiggle room in the holes for the subframe bolts are much bigger than the bolts. I can definitely see this leading to some wobble under motion. Unlike the Genesis Coupe, however, the front Supra subframe has more bolts than the Genesis and the rear Supra subframe has chassis ties at all four corners--the Genesis does not. This extra bracing from the Supra somewhat diminishes the need for collars versus other platforms that are less reinforced. But, still: those bolt holes are mighty big. It's a cheap upgrade to bring some additional rigidity, and that's never so bad!


History: Aside from my Supra, I also have a big turbo Genesis Coupe 3.8 that I've been building for 8 years. The Genesis Coupe has a notorious amount of undesirable subframe movement under high-G maneuvers, such that it's not uncommon for people really building out their chassis setup to loosen the subframe bolts and shove the subframes back into place with a big-ass prybar. After that: rigid collars for the subframe bolt holes, and aluminum shims to fill cavities in the subframe bolt bushings, are not uncommon. Tightens everything up real nice, and my own Genesis ran this setup until I swapped the rear subframe for one from another car with a 5L V8.
It's that as a background that I wondered what the subframe situation looked like on the Supra and if rigid collars would be beneficial. After tearing everything apart and doing the install, I wanted to share my general thoughts and tips on what I found.
1) As a starter, you will need (or should have, to make life easier) the following tools:
- A torque wrench capable of 90 ft-lbs, preferably 1/2" drive for ease of tightening
- Long-handle 3/8" drive ratchet to break the nut, and an electric ratchet to speed removal -- these bolts are very long
- Extenders in 6" and 12"
- The following sockets:
- 8mm hex for screws securing the plastic splash guards
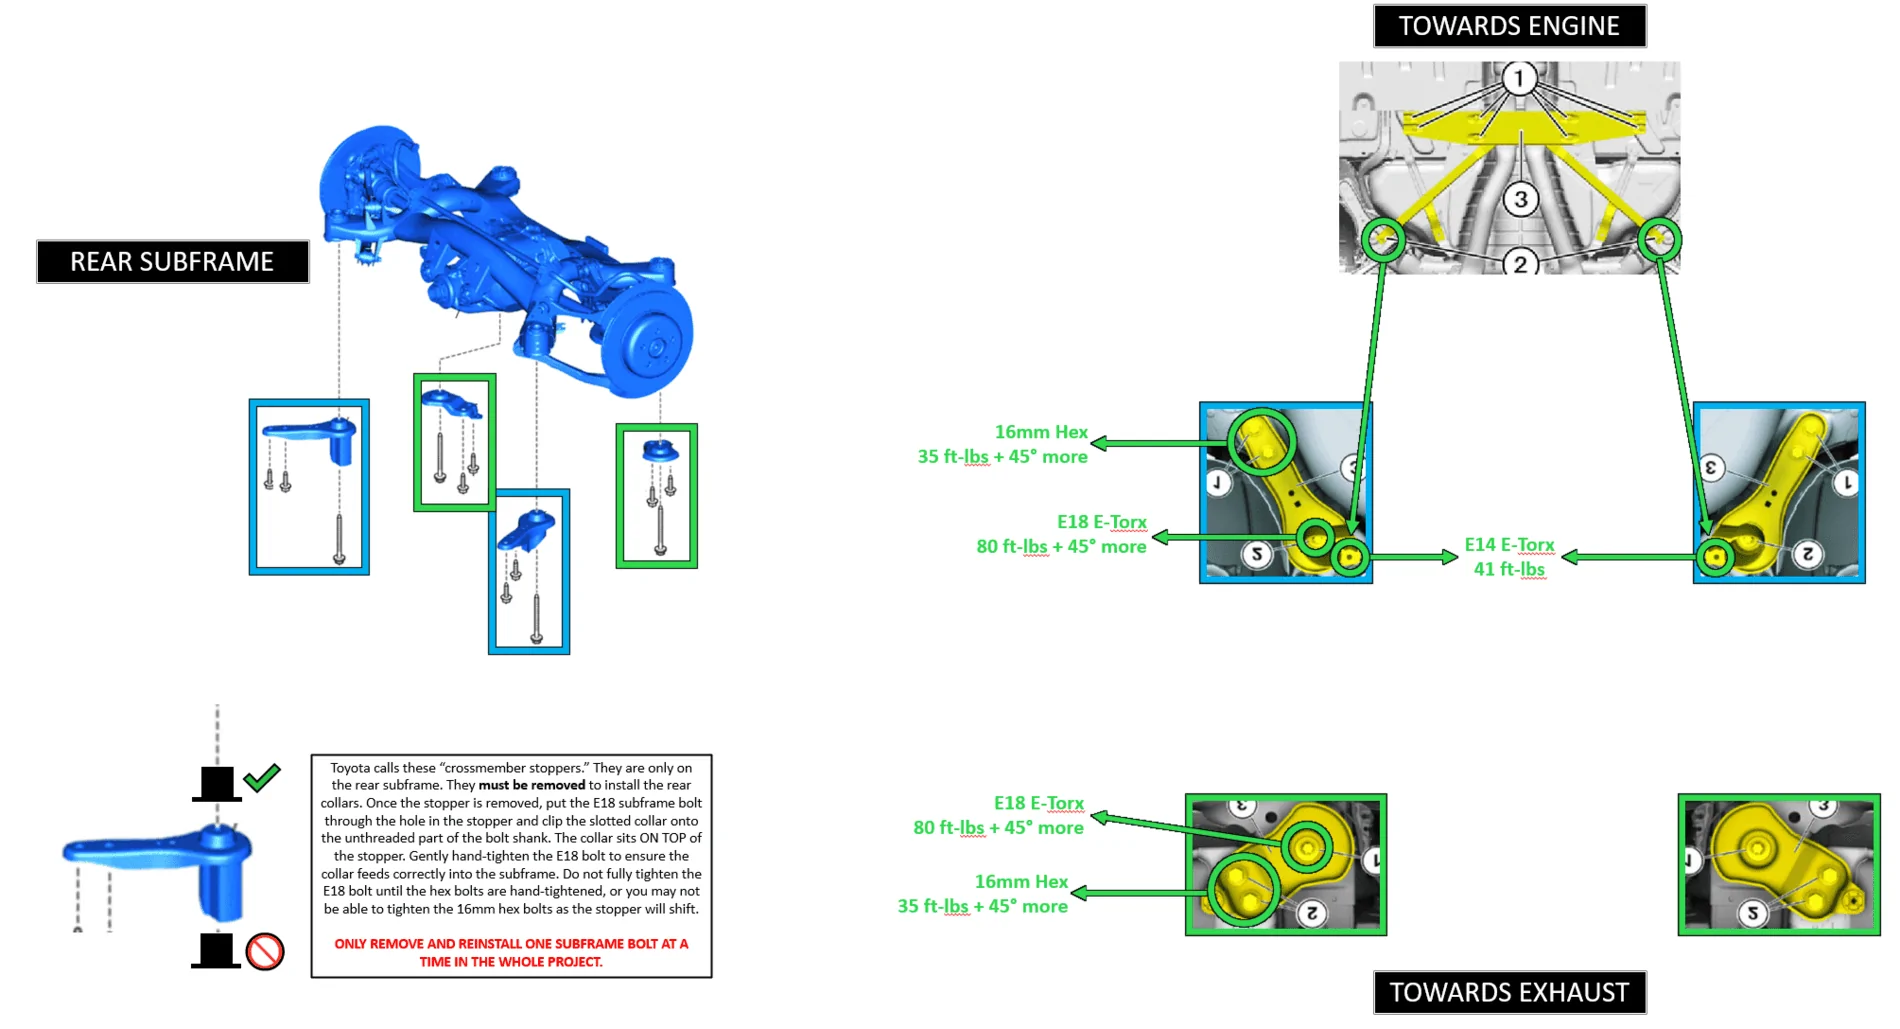
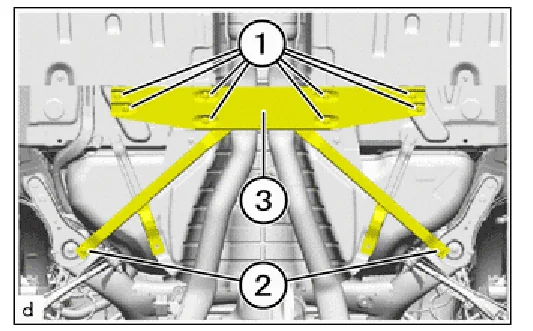
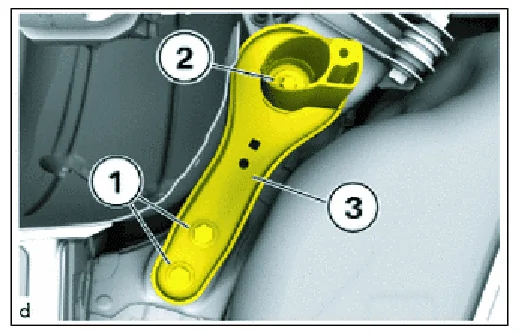
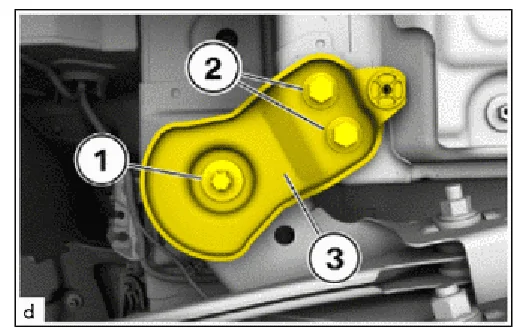
- 16mm hex for metal skid plate under the oil pan, plus rear subframe chassis ties (forward tie bolts marked #1, rear tie bolts marked #2)
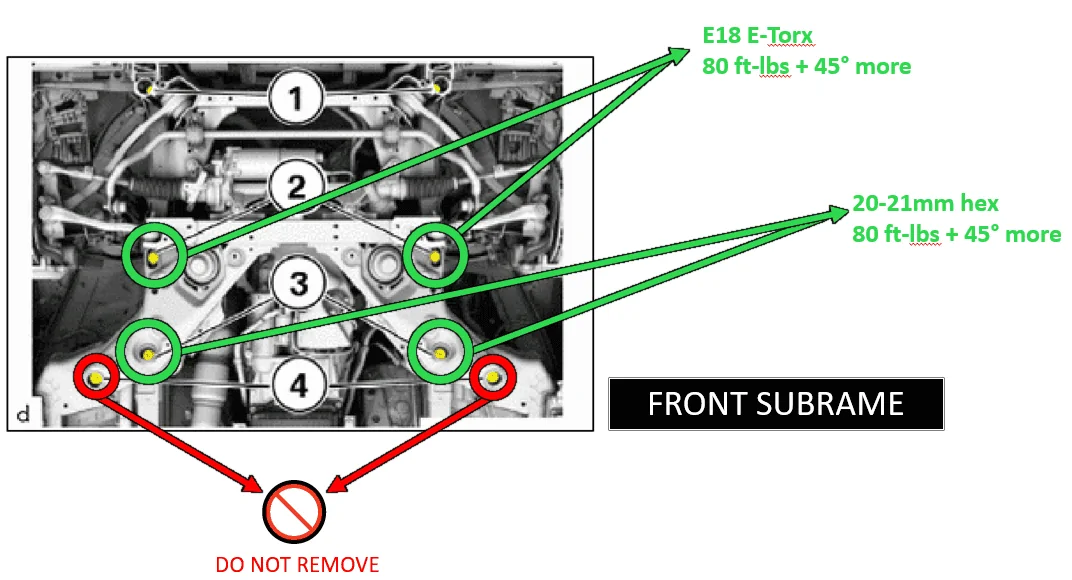
- 20mm (maybe 21mm?) hex for two bolts on the front subframe
- E14 E-Torx to remove two bolts from the rear floor panel brace (#2 marked bolts)
- E18 E-Torx for 4 of 4 rear subframe bolts, and 2 of 4 front subframe bolts
- Front Subframe, correct bolts + torque (pg 1250 of shop manual) -- note I've hidden the irrelevant bolts so you can better identify what to remove
- Rear Subframe, correct bolts + torque (pg 2070 of shop manual) -- note I've hidden the irrelevant bolts so you can better identify what to remove
4) The rear subframe bolts are hidden by plastic splash guards (8mm hex). The front subframe bolts are hidden by the metal skid plate under the oil pan (16mm hex) and plastic splash guard (8mm hex).
5) It's very important that you hand tighten all of these bolts to gently feed the collar into the subframe holes. Some of them will be snug, so be prepared to partially install and remove each bolt several times to inspect the collar, ensuring it's not being marred or distorted. Once you are confident the collar is not being damaged, proceed with full installation. My front driver side subframe collar (E18 bolt) was especially tight, and I legitimately checked this bolt 7-8 times with only a few revolutions of hand-tightening before bringing it up to torque. I also test-fit each collar in the bolt hole in the subframe by inserting the collar by hand, before even putting a bolt in the hole.
6) ONLY REMOVE ONE SUBFRAME BOLT AT A TIME. Do one corner at a time, and fully reassemble it to torque prior to moving to the next bolt.
7) This is a very easy install IF you take the right preparatory steps to remove splash guards, skid plates, and chassis braces before attempting to install a collar. If you have any questions, DM me! Overall, fitment was very good and total time took me about 2 hours inclusive of getting distracted by my phone and a beer break.
8) So, do I need the collars? Hard to say. I don't track my car, but the amount of wiggle room in the holes for the subframe bolts are much bigger than the bolts. I can definitely see this leading to some wobble under motion. Unlike the Genesis Coupe, however, the front Supra subframe has more bolts than the Genesis and the rear Supra subframe has chassis ties at all four corners--the Genesis does not. This extra bracing from the Supra somewhat diminishes the need for collars versus other platforms that are less reinforced. But, still: those bolt holes are mighty big. It's a cheap upgrade to bring some additional rigidity, and that's never so bad!
Sponsored
Last edited:
