Bassoonytoon
Well-Known Member
- Thread starter
- #1
Hi all,
I know that a lot of us have OBDLink Bluetooth modules for Bimmercode, but just in case you didn't know, these devices also have an app that can display a variety of real-time gauges and sensor readouts.
Obdlink® App
I wanted to share my setup and how to easily create gauges that match the Supra's gauges and lighting somewhat closely. Even if you don't use my settings, hopefully this write-up will help some people with creating displays which are helpful to them.
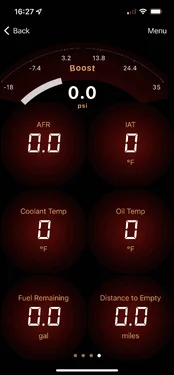
This is my "Dashboard" for reference:

By the way, this app also has a performance mode for 0-60, 1/8 mile, 1/4 mile, 60 foot, etc. readings. I don't know how accurate these are but they can be fun to try out") This was my first attempt at using the app for this purpose in -1' C (30F). Not bad for a very cold run on stock tires... I think?
This was my first attempt at using the app for this purpose in -1' C (30F). Not bad for a very cold run on stock tires... I think?

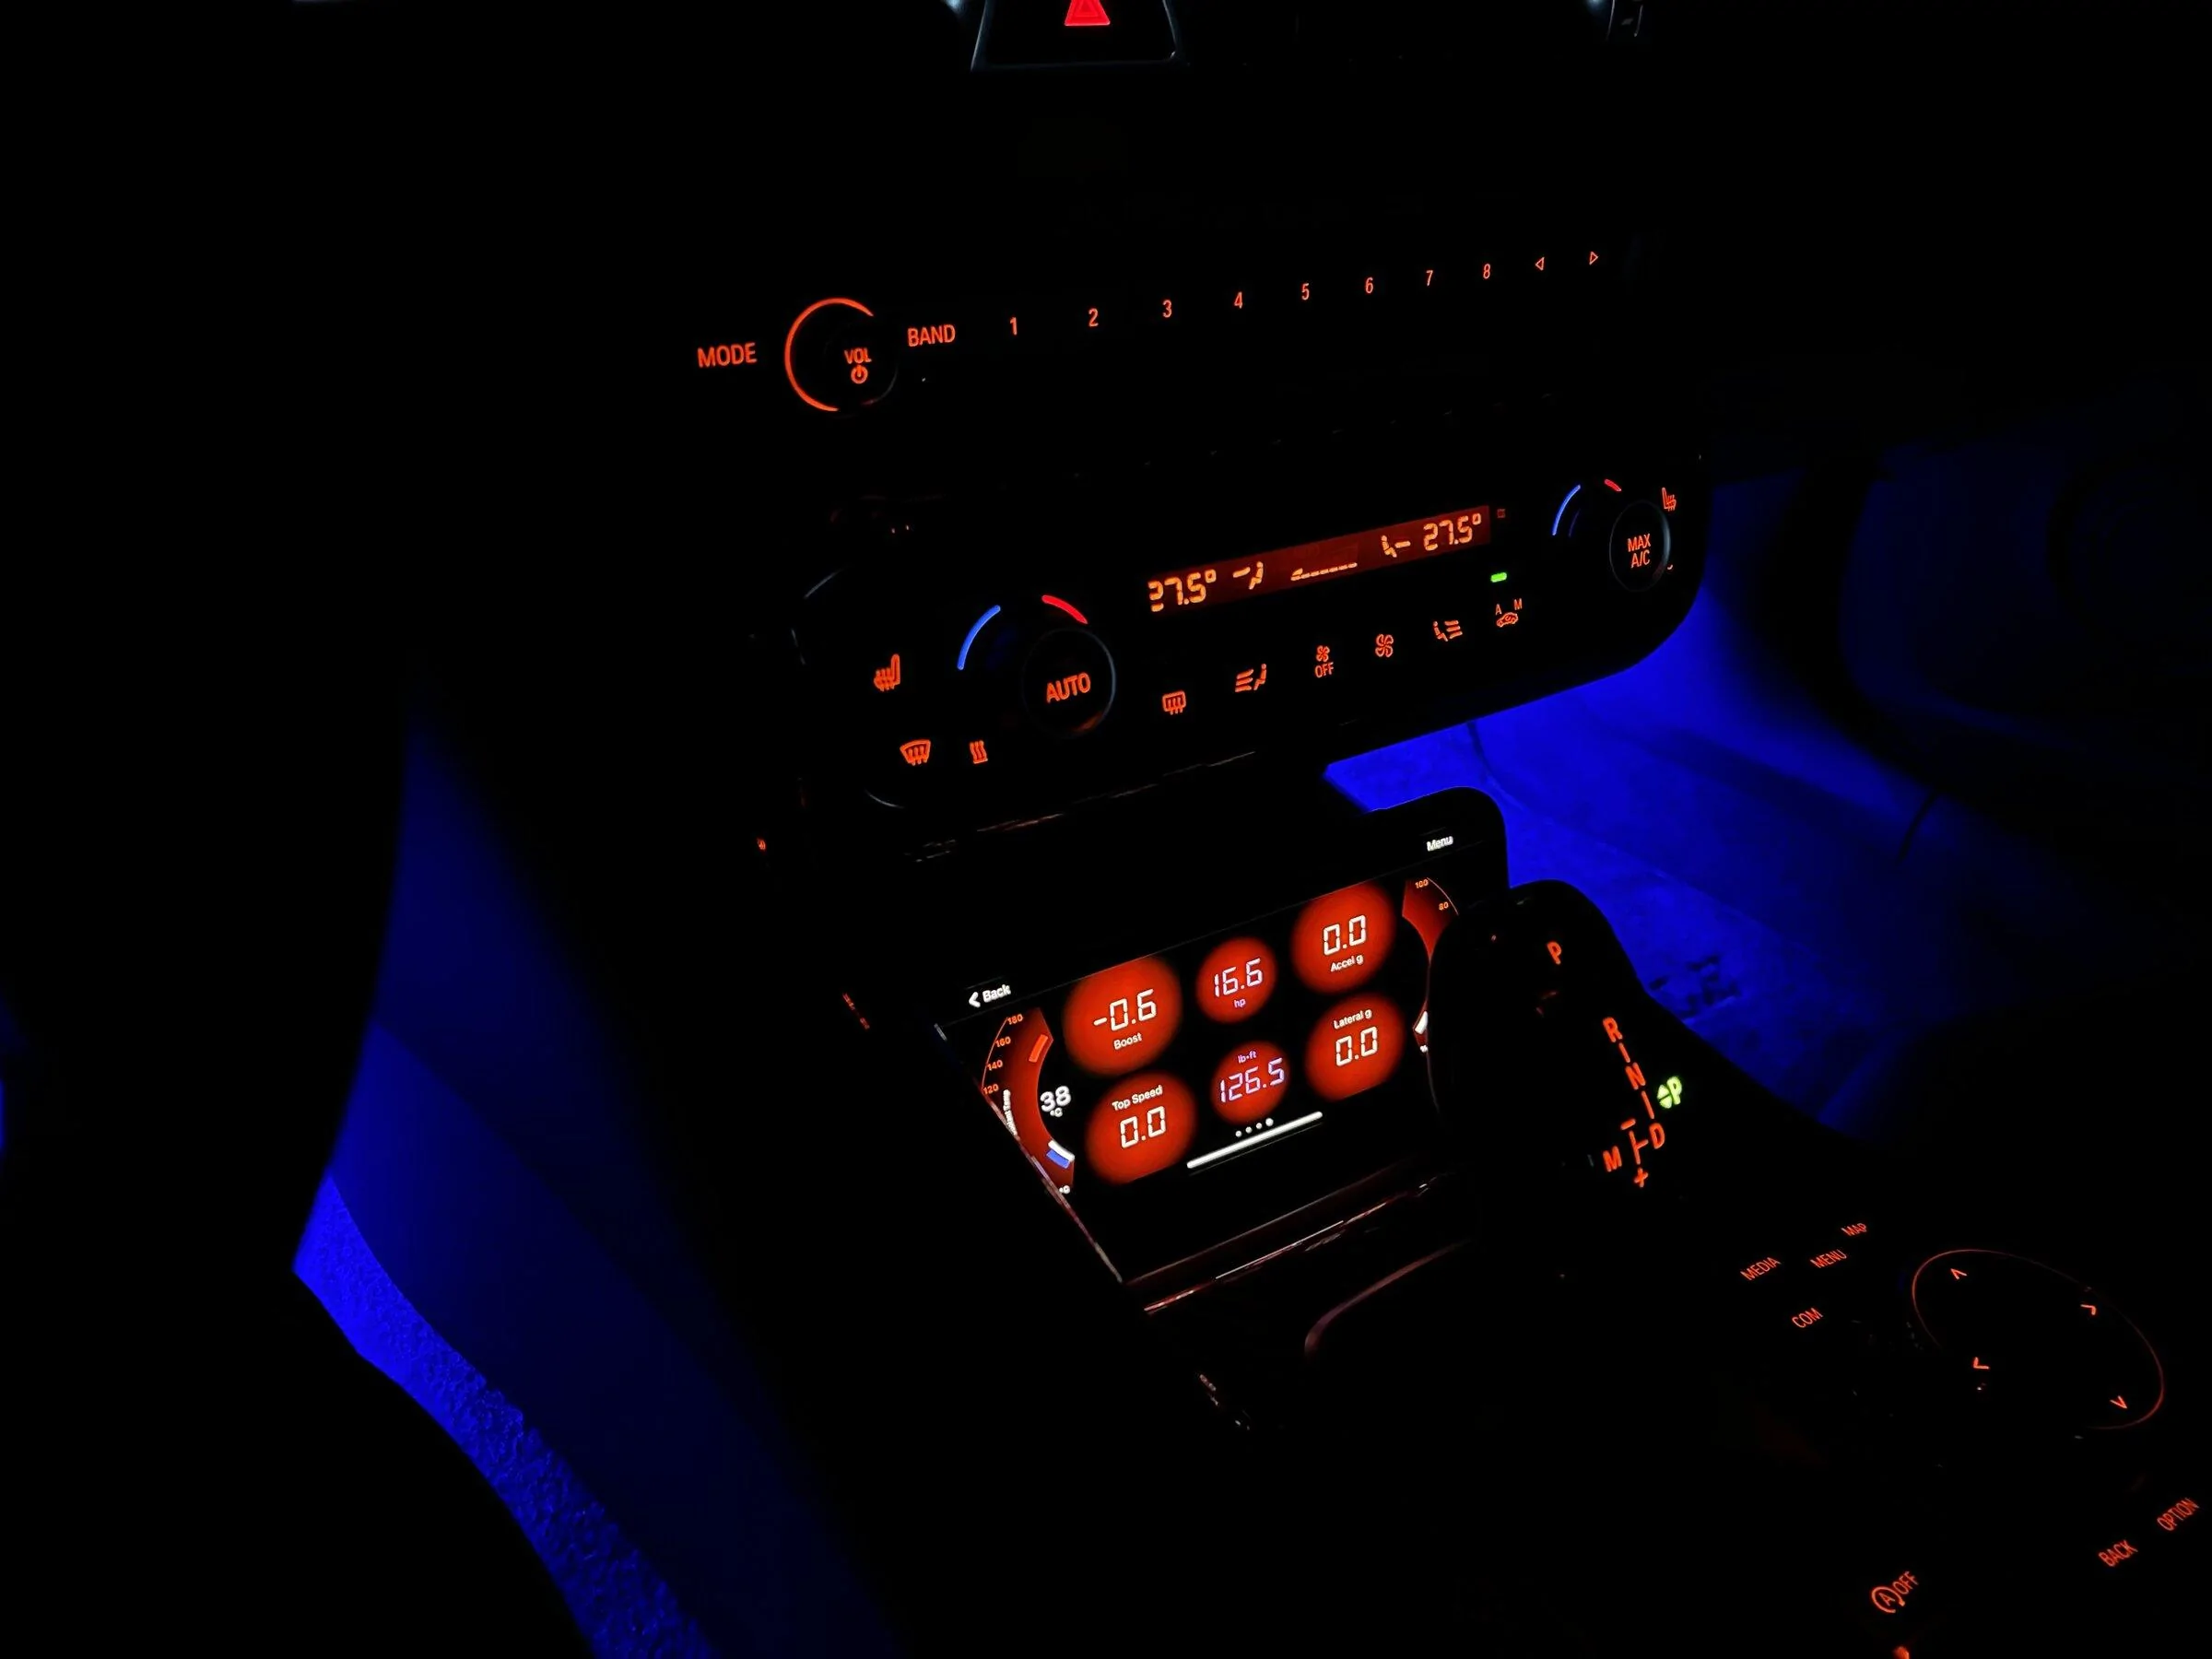
To mount my phone I used this Scosche magnetic mount. It mounts to the cover above the wireless charger and holds the phone securely with no vibrations or rattles (note I'm using an iPhone 11 Pro Max with a case).
MagicMount Car Vent Phone Holder MAGVM2 (scosche.com)
This is an older picture of what the setup looks like - I will try to update this post with a newer picture (using the dashboard I posted above which has colors that better match the Supra's lighting).

I'm sorry for what is about to be a very lengthy post. Although it's long, if you do this with the app open it should be a fairly quick process to navigate.
One tip that I didn't realize until after a few days of using the app, when you change the color of a display, you can click on the label of letters/numbers (for example: FFFB7200) then manually edit them. This makes color matching much simpler.
Step 1: Create the dashboard and begin adding displays
All of this can be edited after you have created a display in the "Display Configuration" tab so you don't have to go through the whole process of adding a display if you decide to change from one PID to another.
After you edit the settings in each gauge type but while still in the editing screen, go back into the "Style" tab, click "Menu" and then "Save Template." The next time you create a digital gauge, finish creating it (in any of the default styles), then you can go to the menu and load the template and all the settings should transfer to this new gauge. You will need to this for three different gauges which I have listed below.
1: Inside digital gauges (boost, speed, rpm, etc.)
Display type:
Digital Gauge
In the "Size and Location" tab:
In the "Style" tab:
In the "frame" sub-tab:
Background color:
2: Outside Arc Gauges (there are actually two separate things happening for these gauges):
2a - First the main gauge:
Add an Arc Gauge:
Position Left
In the "Size and Location" tab:
In the "Display Configuration" tab:
If you are using these gauges for engine and coolant temperatures, I changed the "Range" values to:
In the "Style" tab:
In the "Frame" sub-tab:
Location: Left (after you create another template for this gauge, all you should need to do is change this to right for the gauge on the right side)
Background Color
In the "Axis" sub-tab:
Major Ticks
In the "Range" sub-tab:
Fill:
Add a digital gauge
In the "Size and Location" tab:
In the "Display Configuration" tab:
In the "Style" tab:
Background color:
After all of this is done, you will have to move the gauges to where you would like them. To do this, tap and hold a display for a couple of seconds. A menu will pop up - scroll down to "Drag and Move." This will allow you to place the displays where you would like them.
If you forgot to save a template, tap and hold the display, click on "Style" then click on "Menu" and you can save the template at any time. This is also helpful if you decided to change a display to something that better fits your preferences. You can then click and hold any previously made display, open the "Menu" in the "Style" tab and then load the template into the old gauge so it matches your changes.
I hope this was helpful! Good luck and I would love to see what kinds of "dashboards" anyone may create with this app!
I know that a lot of us have OBDLink Bluetooth modules for Bimmercode, but just in case you didn't know, these devices also have an app that can display a variety of real-time gauges and sensor readouts.
Obdlink® App
I wanted to share my setup and how to easily create gauges that match the Supra's gauges and lighting somewhat closely. Even if you don't use my settings, hopefully this write-up will help some people with creating displays which are helpful to them.
This is my "Dashboard" for reference:

By the way, this app also has a performance mode for 0-60, 1/8 mile, 1/4 mile, 60 foot, etc. readings. I don't know how accurate these are but they can be fun to try out
This was my first attempt at using the app for this purpose in -1' C (30F). Not bad for a very cold run on stock tires... I think?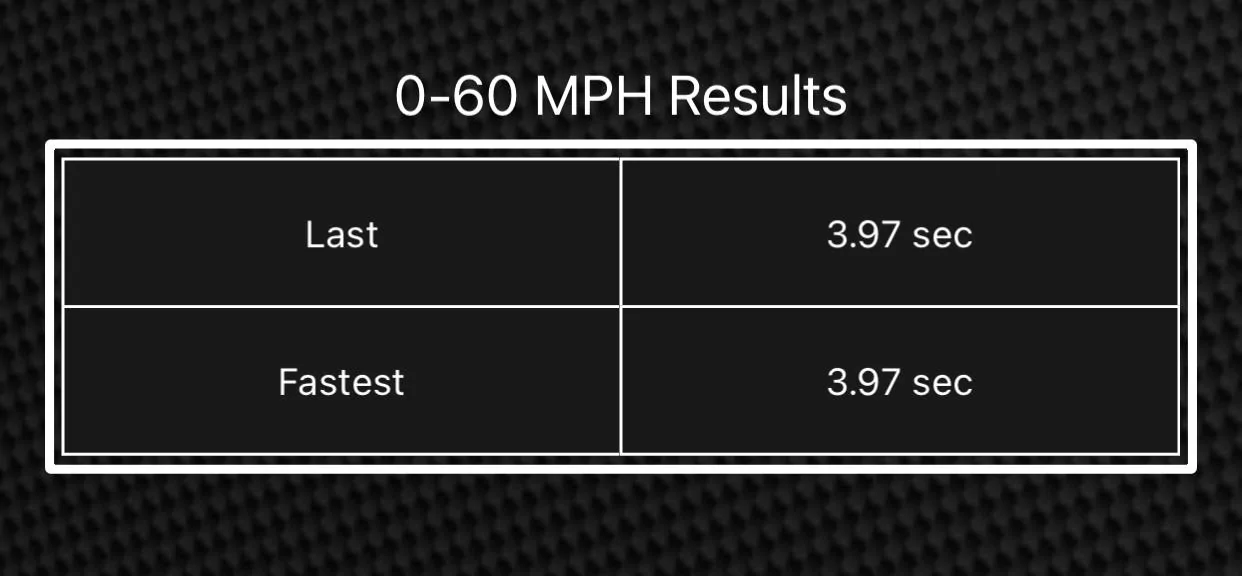
To mount my phone I used this Scosche magnetic mount. It mounts to the cover above the wireless charger and holds the phone securely with no vibrations or rattles (note I'm using an iPhone 11 Pro Max with a case).
MagicMount Car Vent Phone Holder MAGVM2 (scosche.com)
This is an older picture of what the setup looks like - I will try to update this post with a newer picture (using the dashboard I posted above which has colors that better match the Supra's lighting).
I'm sorry for what is about to be a very lengthy post. Although it's long, if you do this with the app open it should be a fairly quick process to navigate.
One tip that I didn't realize until after a few days of using the app, when you change the color of a display, you can click on the label of letters/numbers (for example: FFFB7200) then manually edit them. This makes color matching much simpler.
Step 1: Create the dashboard and begin adding displays
- In the Dashboards area of the app, click on "Menu" then "Add Dashboard"
- You should automatically be brought into your new dashboard. If not, swipe the screen to the left until you reach your blank dashboard
- Click "Menu" and then "Add Display"
All of this can be edited after you have created a display in the "Display Configuration" tab so you don't have to go through the whole process of adding a display if you decide to change from one PID to another.
After you edit the settings in each gauge type but while still in the editing screen, go back into the "Style" tab, click "Menu" and then "Save Template." The next time you create a digital gauge, finish creating it (in any of the default styles), then you can go to the menu and load the template and all the settings should transfer to this new gauge. You will need to this for three different gauges which I have listed below.
1: Inside digital gauges (boost, speed, rpm, etc.)
Display type:
Digital Gauge
In the "Size and Location" tab:
- Height 55
- Width 33
In the "Style" tab:
In the "frame" sub-tab:
Background color:
- Inner Color: ff660000
- Outer Color: ff030303
- Gradient Radius: 0.55
- Inner Color: 00000000
- Outer Color: 00000000
- Back Gradient Radius: 0.55
- Width: 0
- Flatness: 0
- Color 1/2: these won't matter
- Color: FFFB7200
- Font scale: 0.085
- Position: 0.698
- Value Color: FFFB7200
- Font Scale: 0.34
- Position: 0.423
- Font Scale: 0.02 (all the way down) but if you would rather see the units, use the same color from the previous values (FFFB7200) as this matches the interior lighting fairly well (although keep in mind I am pretty colorblind)
- Disabled
2: Outside Arc Gauges (there are actually two separate things happening for these gauges):
2a - First the main gauge:
Add an Arc Gauge:
Position Left
In the "Size and Location" tab:
- Height: 90
- Width: 33
- Top: 5
- Left: 3.895089
In the "Display Configuration" tab:
If you are using these gauges for engine and coolant temperatures, I changed the "Range" values to:
- Min: 20
- Max: 200
In the "Style" tab:
In the "Frame" sub-tab:
Location: Left (after you create another template for this gauge, all you should need to do is change this to right for the gauge on the right side)
Background Color
- Inner Color: FFDF0000
- Outer Color: FF0A0000
- Gradient Radius: 0.675
- Width: 0 (this should be the only setting that matters here)
- Title Color: FFFB7200
- Font Scale: 0.032
- Position: -0.026
- Horizontal Position: 0.04
- Value Visible: disabled
- Color: FFFB7200
- Font Scale: 0.035
- Vertical Position: 0.075
- Horizontal Position: 0
In the "Axis" sub-tab:
Major Ticks
- Width 0
- Length 0
- Width 0
- Length 0
- Visible: yes
- Rotate: no
- Color: FF24402
- Font Scale: 0.038
- Offset From Tickline: -0.025
- Position: 1
- Width: 0.573
- Color: FFF50404
In the "Range" sub-tab:
Fill:
- Enabled: yes
- Inner Position: 0.632
- Outer Position: 0.664
- Color: FFFB7200
- Border Width: 0
- Inner Position: 0.67
- Outer Position: 0.72
- Border Width: 0
Add a digital gauge
In the "Size and Location" tab:
- Height: 28
- Width: 33
- Top: 35
- Left: 0.9737723
In the "Display Configuration" tab:
- Delete the title
In the "Style" tab:
Background color:
- Inner Color: 00000000
- Outer Color: 00000000
- Gradient Radius: 0
- Inner Color: FF000000
- Outer Color: FF000000
- Back Gradient Radius: 0
- Width: 0
- n/a
- Value Color: FFFB7200
- Font Scale: 0.34
- Position: 0.42
- Value Color: FFFB7200
- Font Scale: 0.085
- Position: 0.8
- Disabled
After all of this is done, you will have to move the gauges to where you would like them. To do this, tap and hold a display for a couple of seconds. A menu will pop up - scroll down to "Drag and Move." This will allow you to place the displays where you would like them.
If you forgot to save a template, tap and hold the display, click on "Style" then click on "Menu" and you can save the template at any time. This is also helpful if you decided to change a display to something that better fits your preferences. You can then click and hold any previously made display, open the "Menu" in the "Style" tab and then load the template into the old gauge so it matches your changes.
I hope this was helpful! Good luck and I would love to see what kinds of "dashboards" anyone may create with this app!
Sponsored