Sponsored
3D Print Options for the Supra
- Thread starter BrodoFratgins
- Start date
- Watchers 45
-
- Tags
- 3d print 3d printed
- First Name
- Evan
- Joined
- Dec 10, 2021
- Threads
- 45
- Messages
- 709
- Reaction score
- 1,142
- Location
- Pittsburgh, PA
- Car(s)
- 21 Nitro Yellow A90 Supra, 10 Honda Fit Sport 5spd
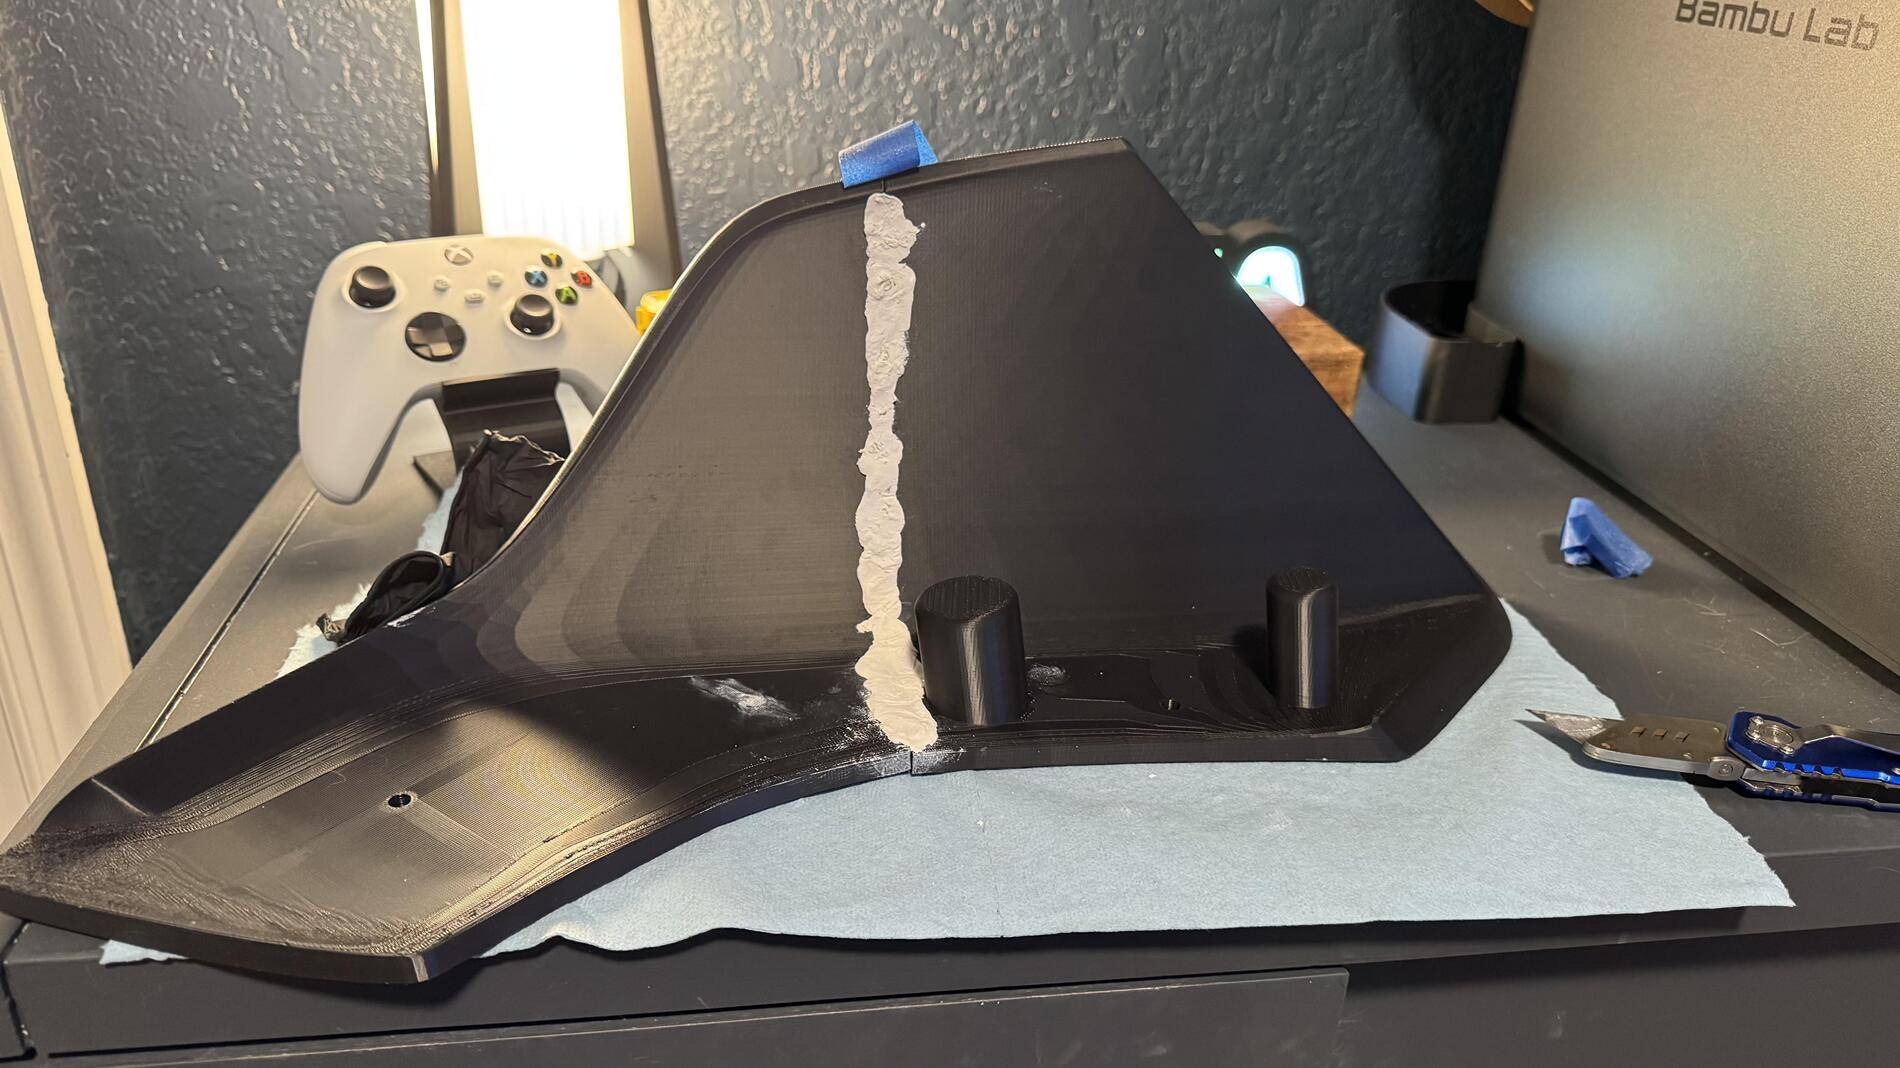
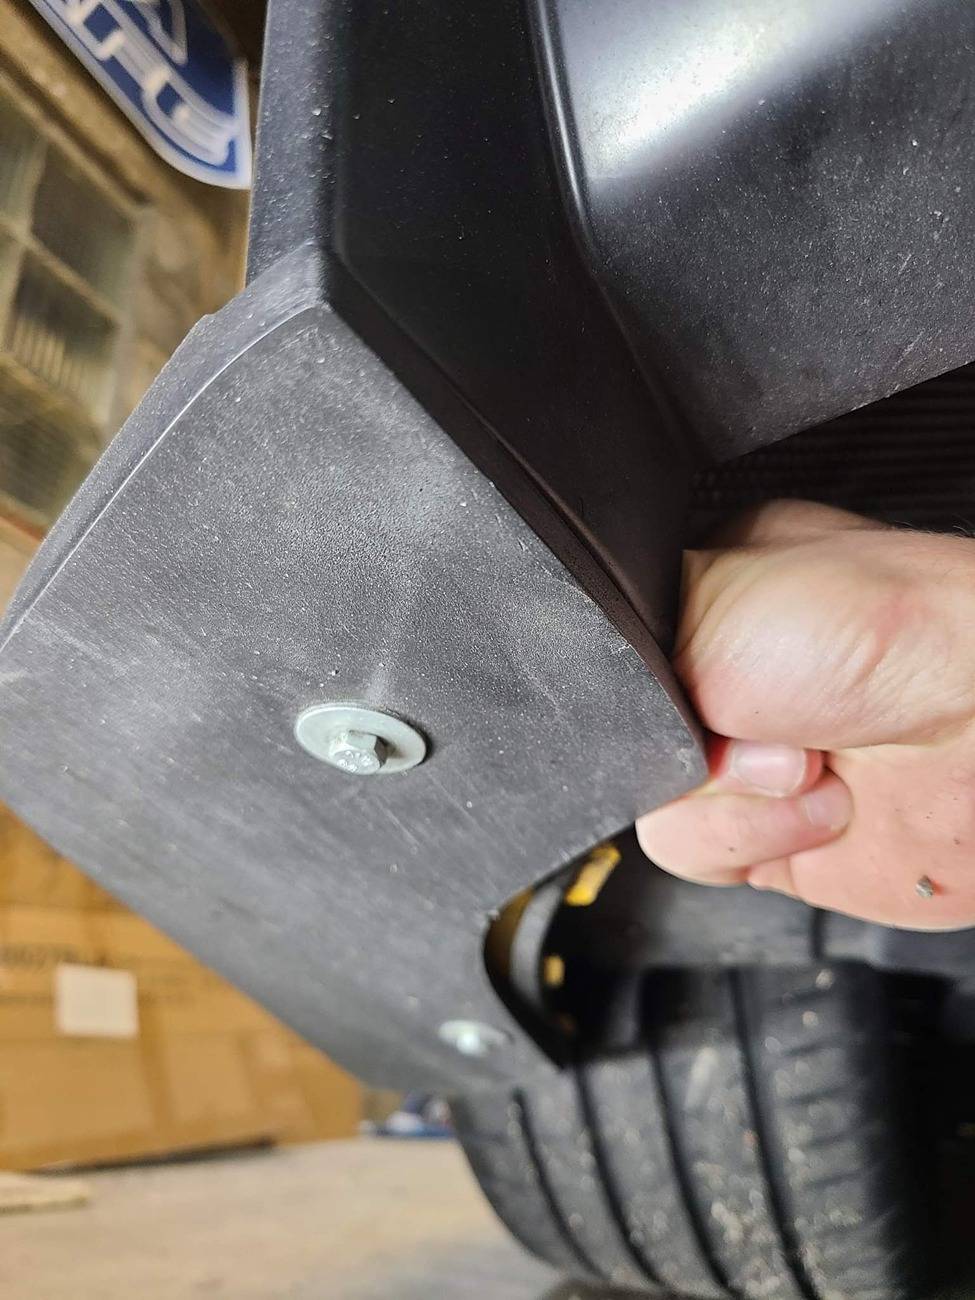
Hell yeah dude! Although just to note You'll have to trim off those two nubs that stick upright. I believe the one file had them and the other didnt. I cant quite remember.I'm currently trying JB Weld Plastic Weld putty. Granted, I plan to sand it a bit and eventually vinyl wrap the part so any imperfections shouldn't be visible afterwards.
Will updated on how that goes.
OP
OP
BrodoFratgins
Well-Known Member
- First Name
- Will
- Joined
- Feb 8, 2023
- Threads
- 8
- Messages
- 188
- Reaction score
- 410
- Location
- Florence, AL
- Car(s)
- 2023 MKV Supra MT
- Thread starter
- #48
Oh shoot I must have misread the documentation. I thought you could go with either fileHell yeah dude! Although just to note You'll have to trim off those two nubs that stick upright. I believe the one file had them and the other didnt. I cant quite remember.
OP
OP
BrodoFratgins
Well-Known Member
- First Name
- Will
- Joined
- Feb 8, 2023
- Threads
- 8
- Messages
- 188
- Reaction score
- 410
- Location
- Florence, AL
- Car(s)
- 2023 MKV Supra MT
- Thread starter
- #50
ASA currentlyWhat material did you guys go with for the spats? I might print a pair in PETG or ABS.
Supra.steve
New Member
- First Name
- Lam
- Joined
- Jun 8, 2020
- Threads
- 0
- Messages
- 3
- Reaction score
- 3
- Location
- Kinston, NC
- Car(s)
- 2020 Toyota Supra
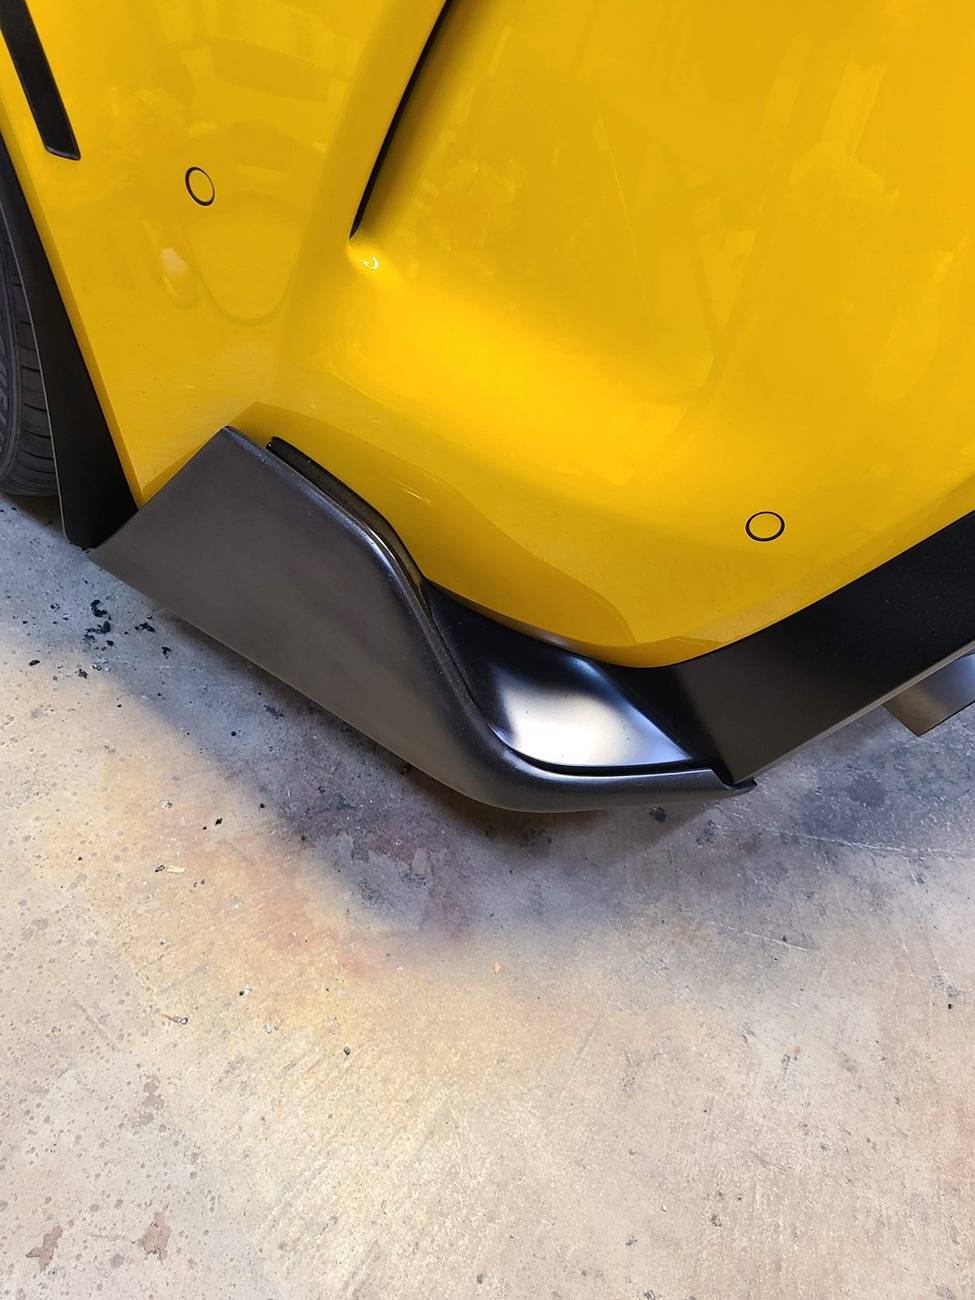
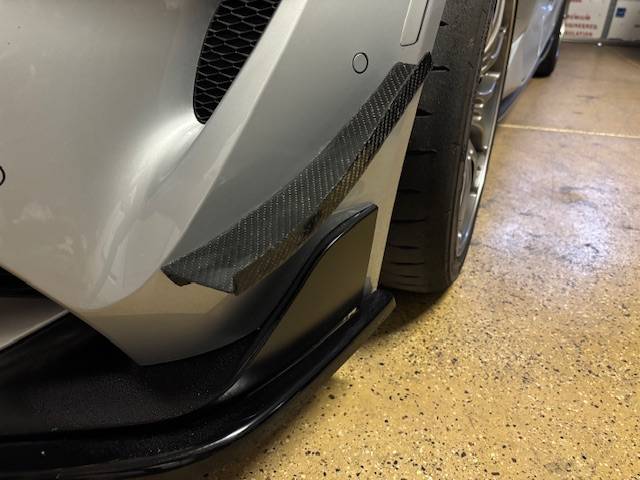
Do you have the file for the front spats? I would like to try them outFigured I'd share some other 3d printed forays:
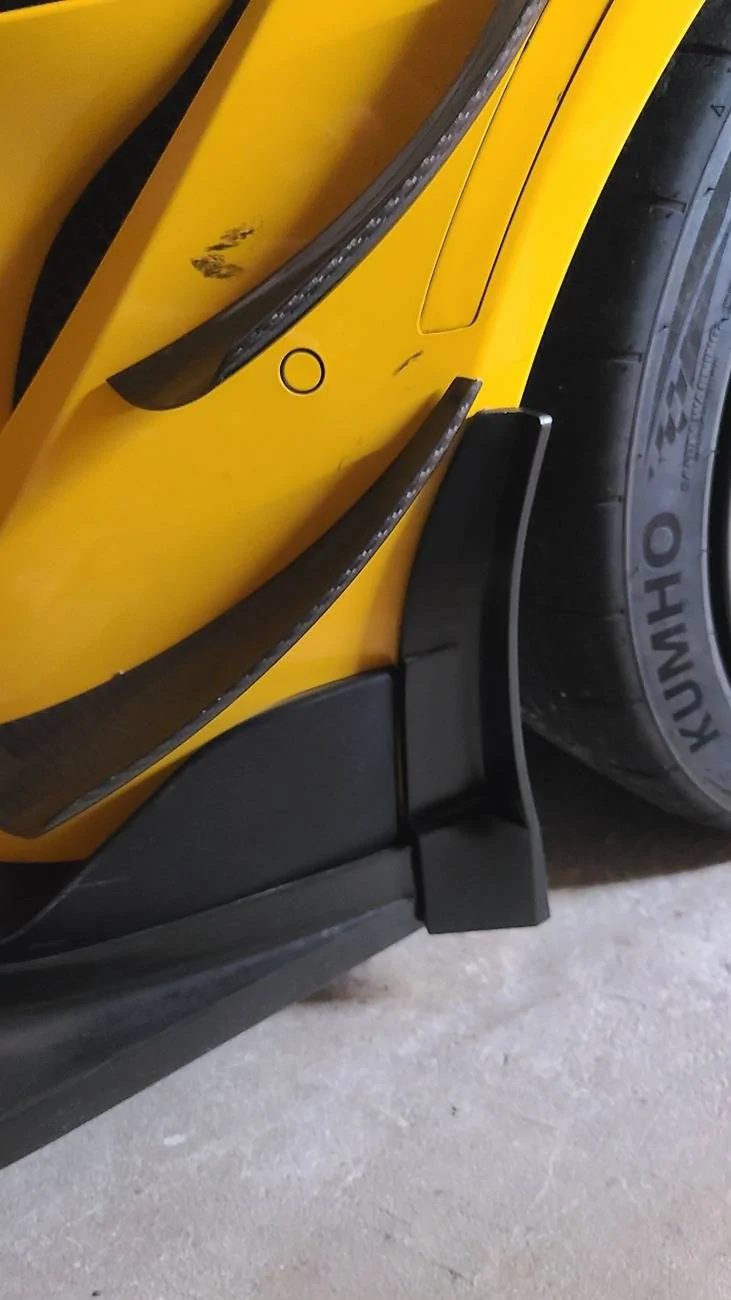
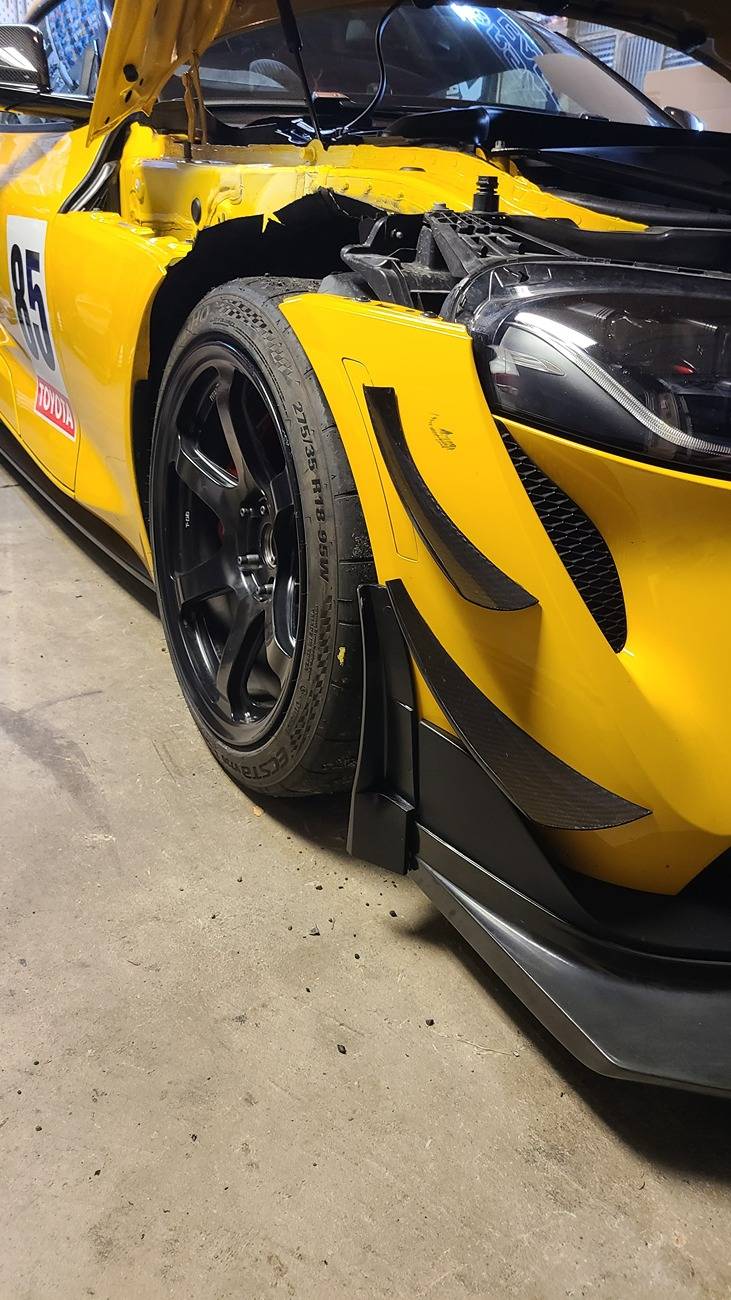
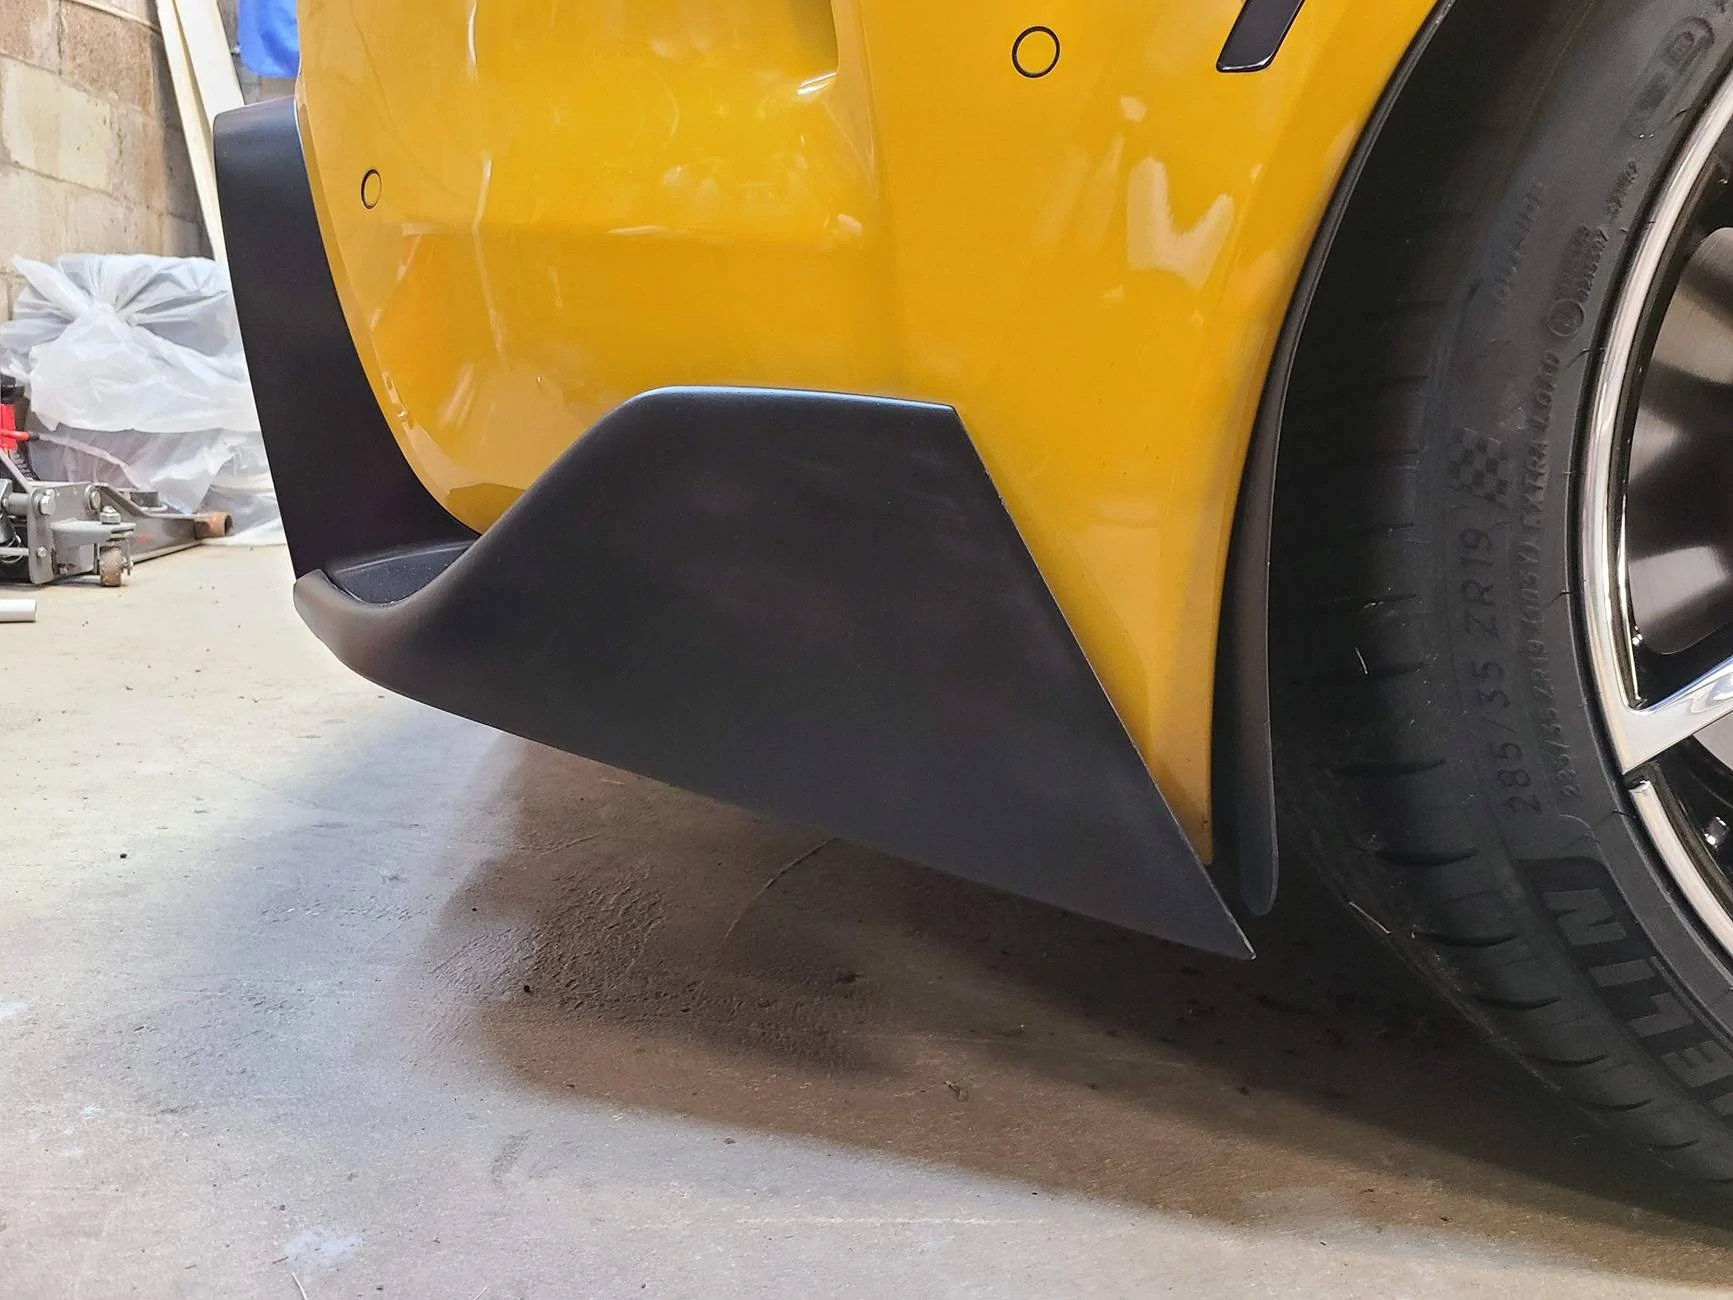
Front Spats
-these interact with the stock lip + the Aeroluxe GT4 lip

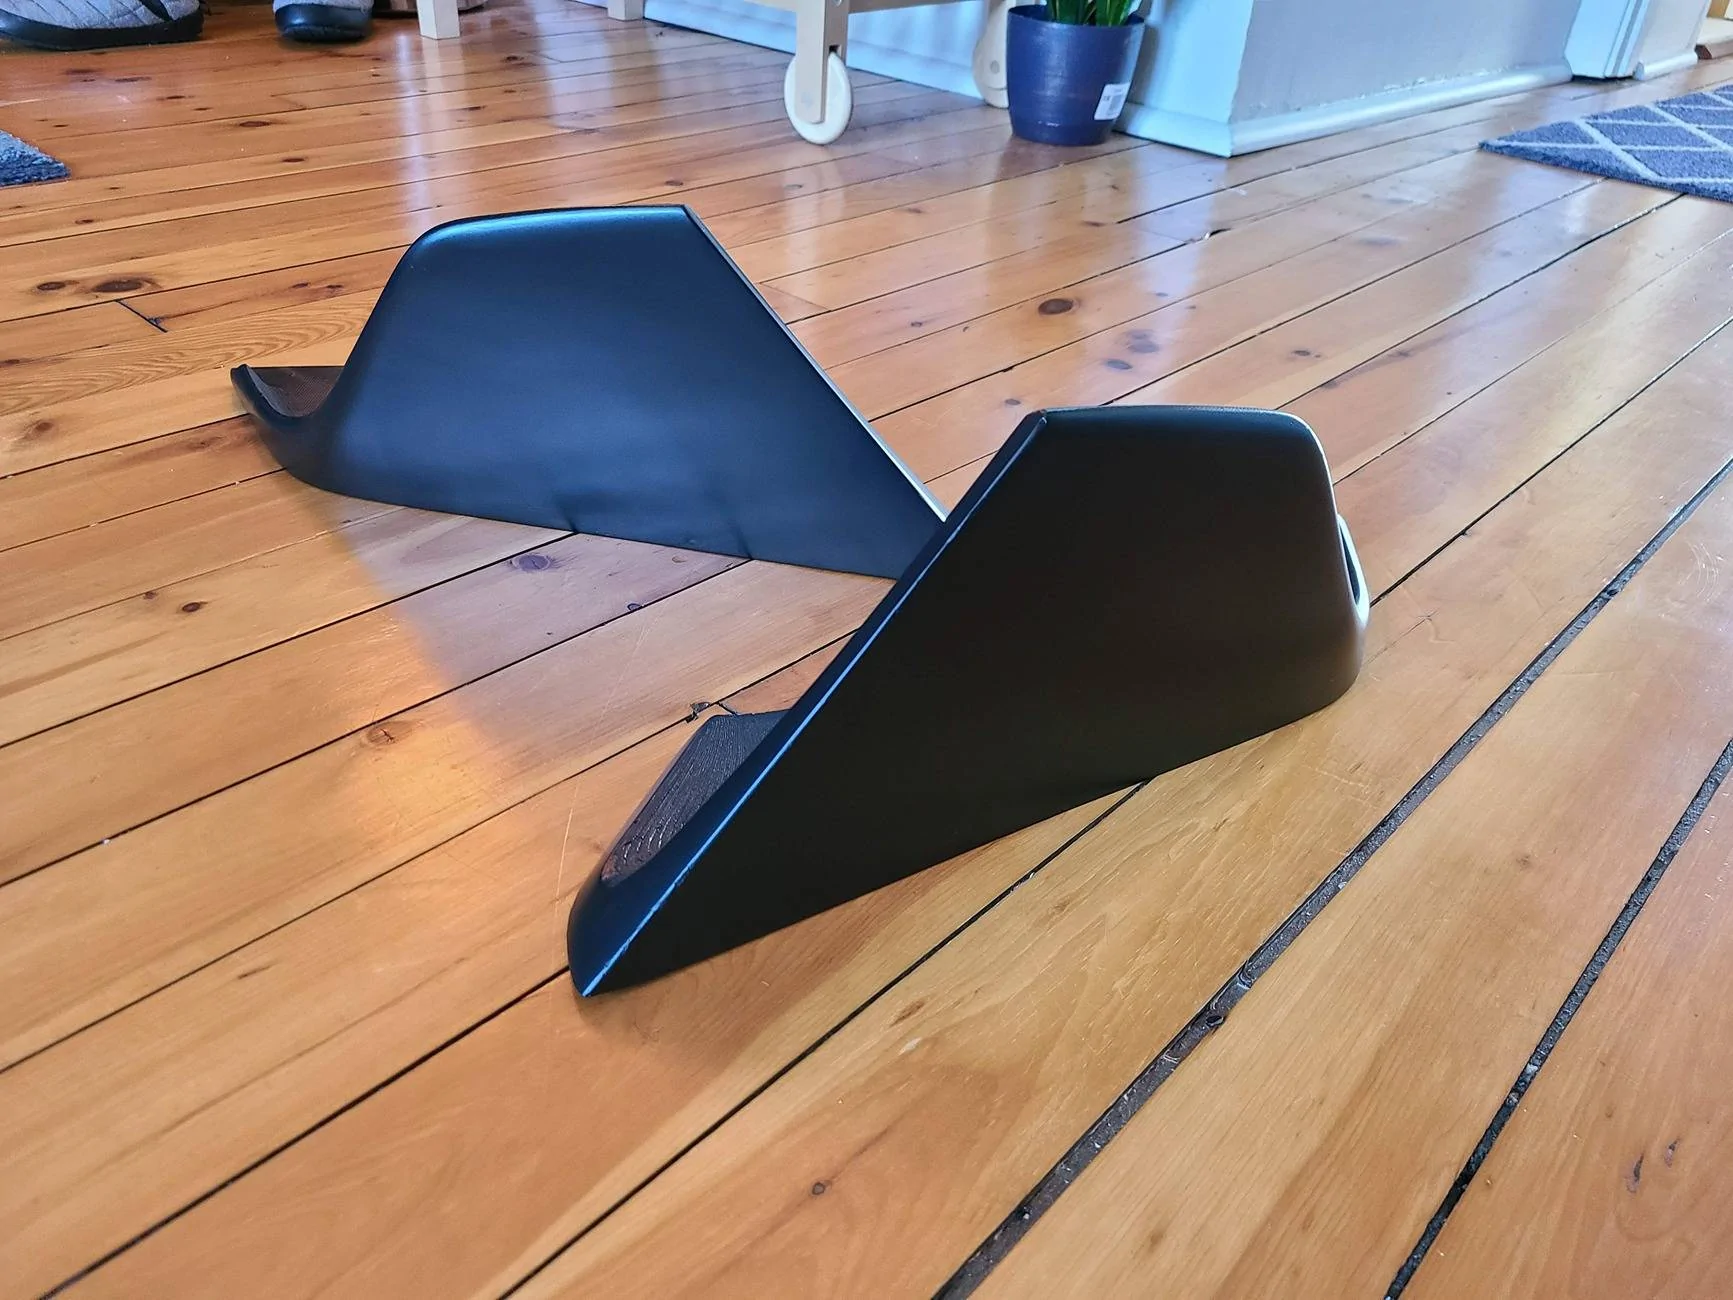
Rear spats (Aimgain style)
-These were the first thing I printed for my car. I haven't uploaded the files to Cults but I suppose I could do that if there is enough interest


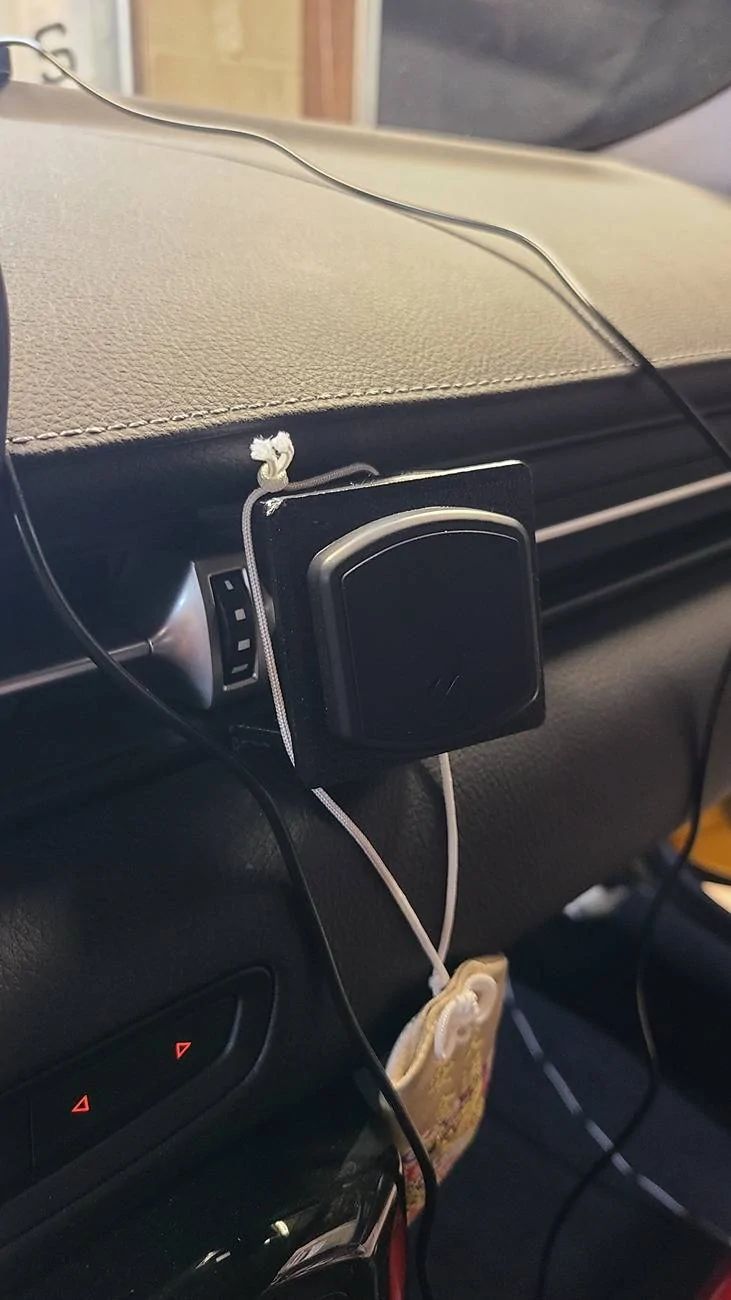
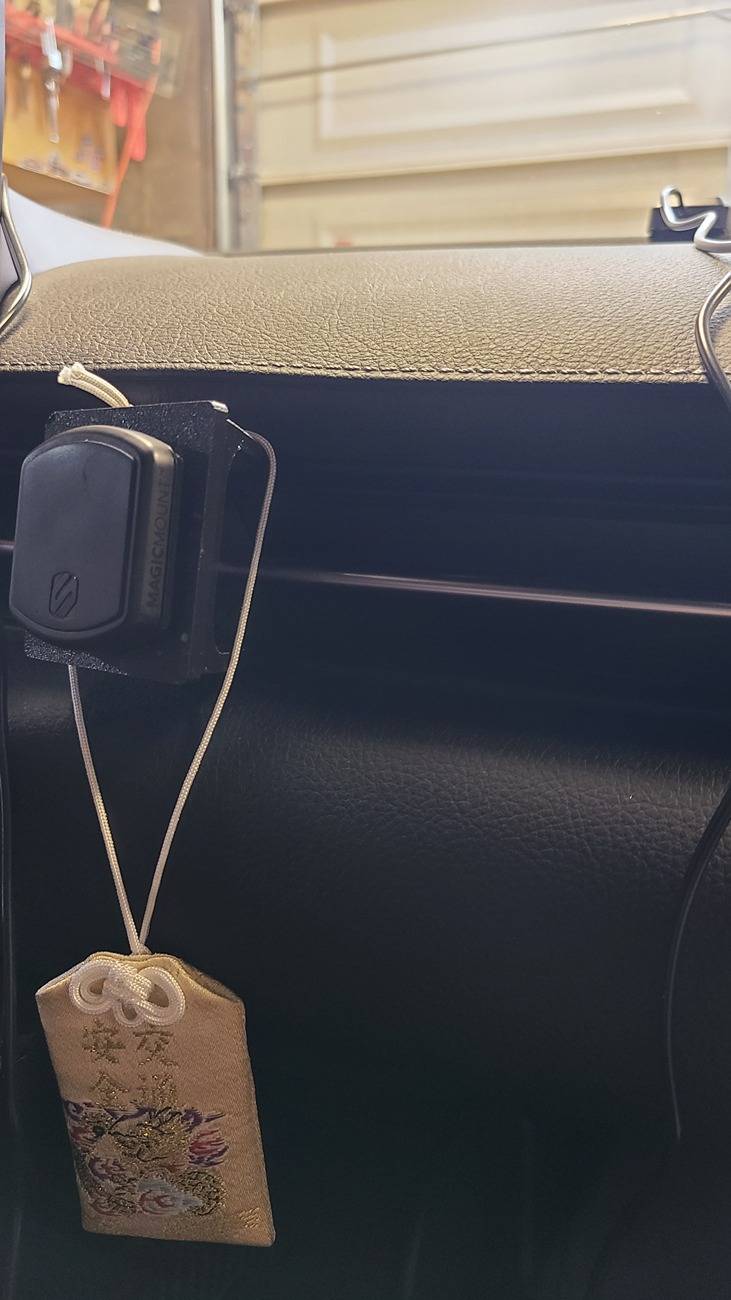
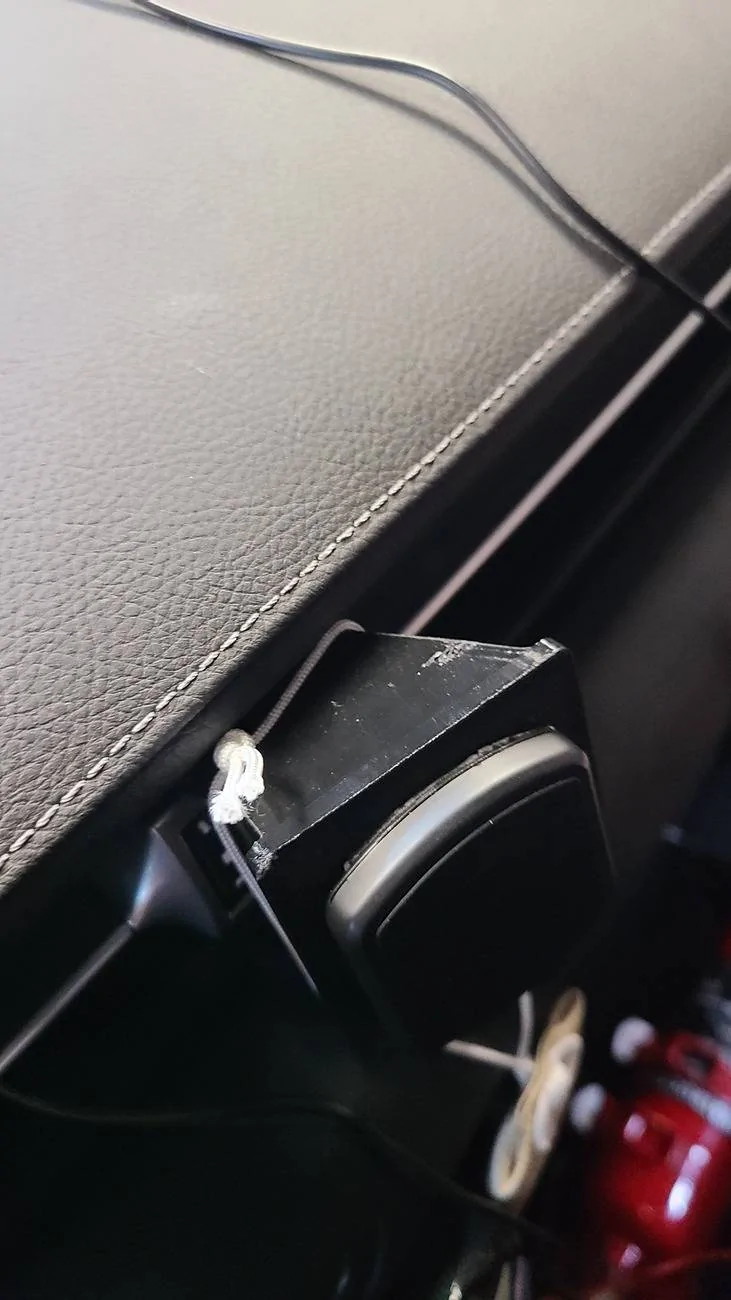
Phone/tablet mount
-This part is similar to the proclip mount but not $50 for a piece of plastic. This is NOT my design but I can find it with a bit of looking if there is interest
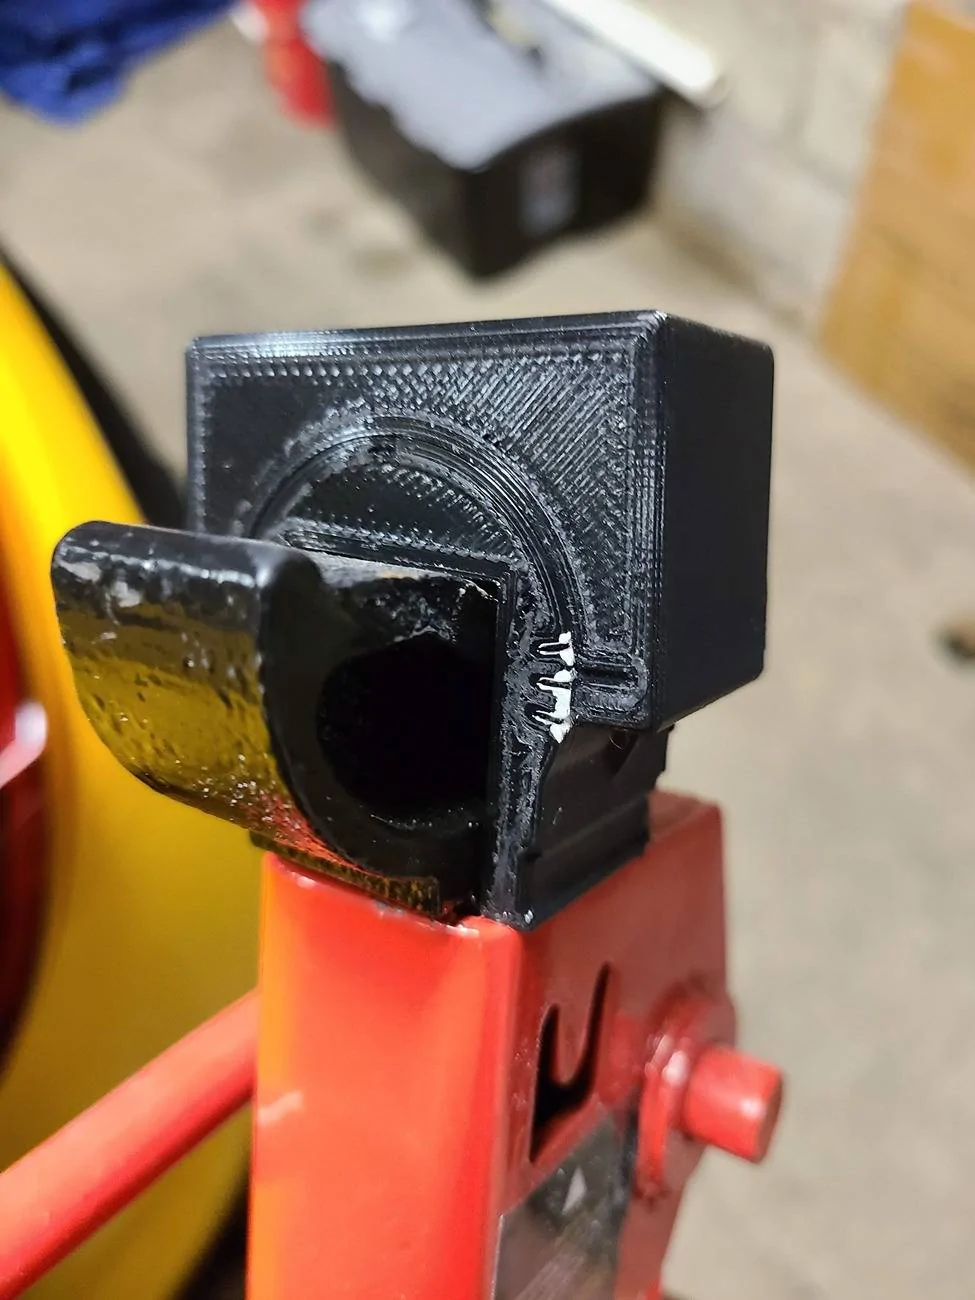
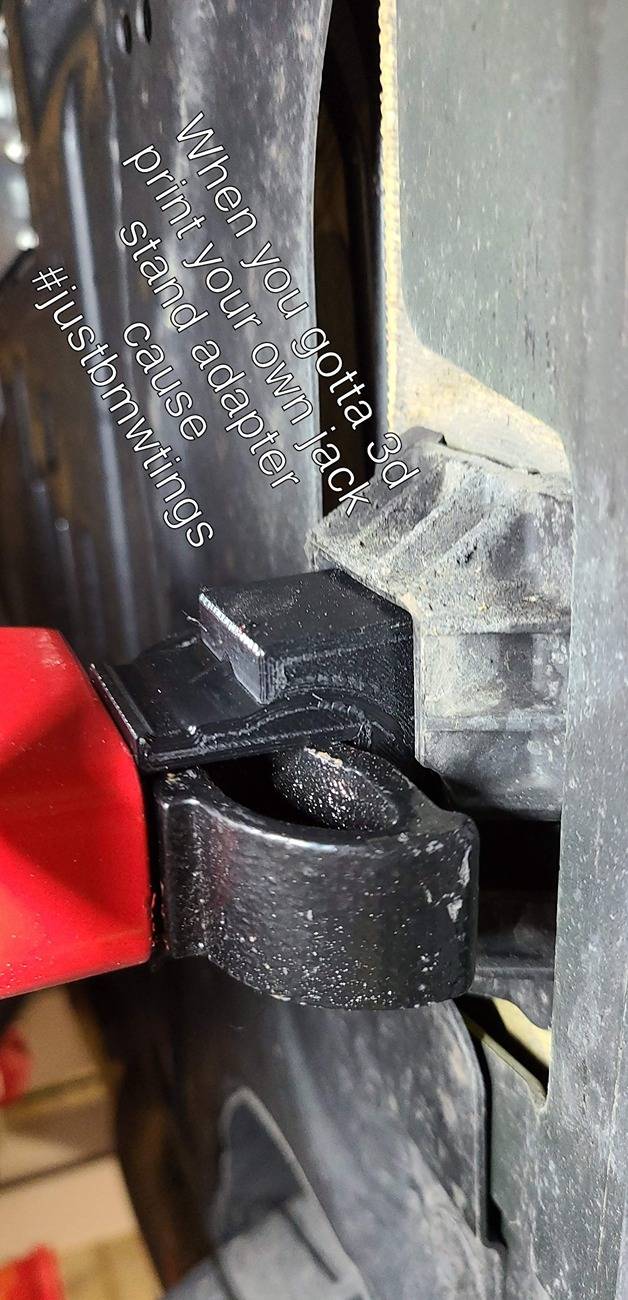
Jack stand adapters
-these are also NOT my design and were designed for essentially all BMWs with the rectangular jacking point. They are 100% solid PETG and I've used the same set on my car for almost 3 years at this point. Again, I can do some digging and find the files if there is interest

- First Name
- Evan
- Joined
- Dec 10, 2021
- Threads
- 45
- Messages
- 709
- Reaction score
- 1,142
- Location
- Pittsburgh, PA
- Car(s)
- 21 Nitro Yellow A90 Supra, 10 Honda Fit Sport 5spd
I can upload them yeah, however they are supposed to work with the aeroluxe GT4 lip. You can obviously get creative and make them work otherwise but just keep that in mind. I'll post a link in a bit.Do you have the file for the front spats? I would like to try them out
EDIT:
Here is the link for the front spat design
https://cults3d.com/en/3d-model/gadget/a90-supra-front-spats
Last edited:
i3igpete
Well-Known Member
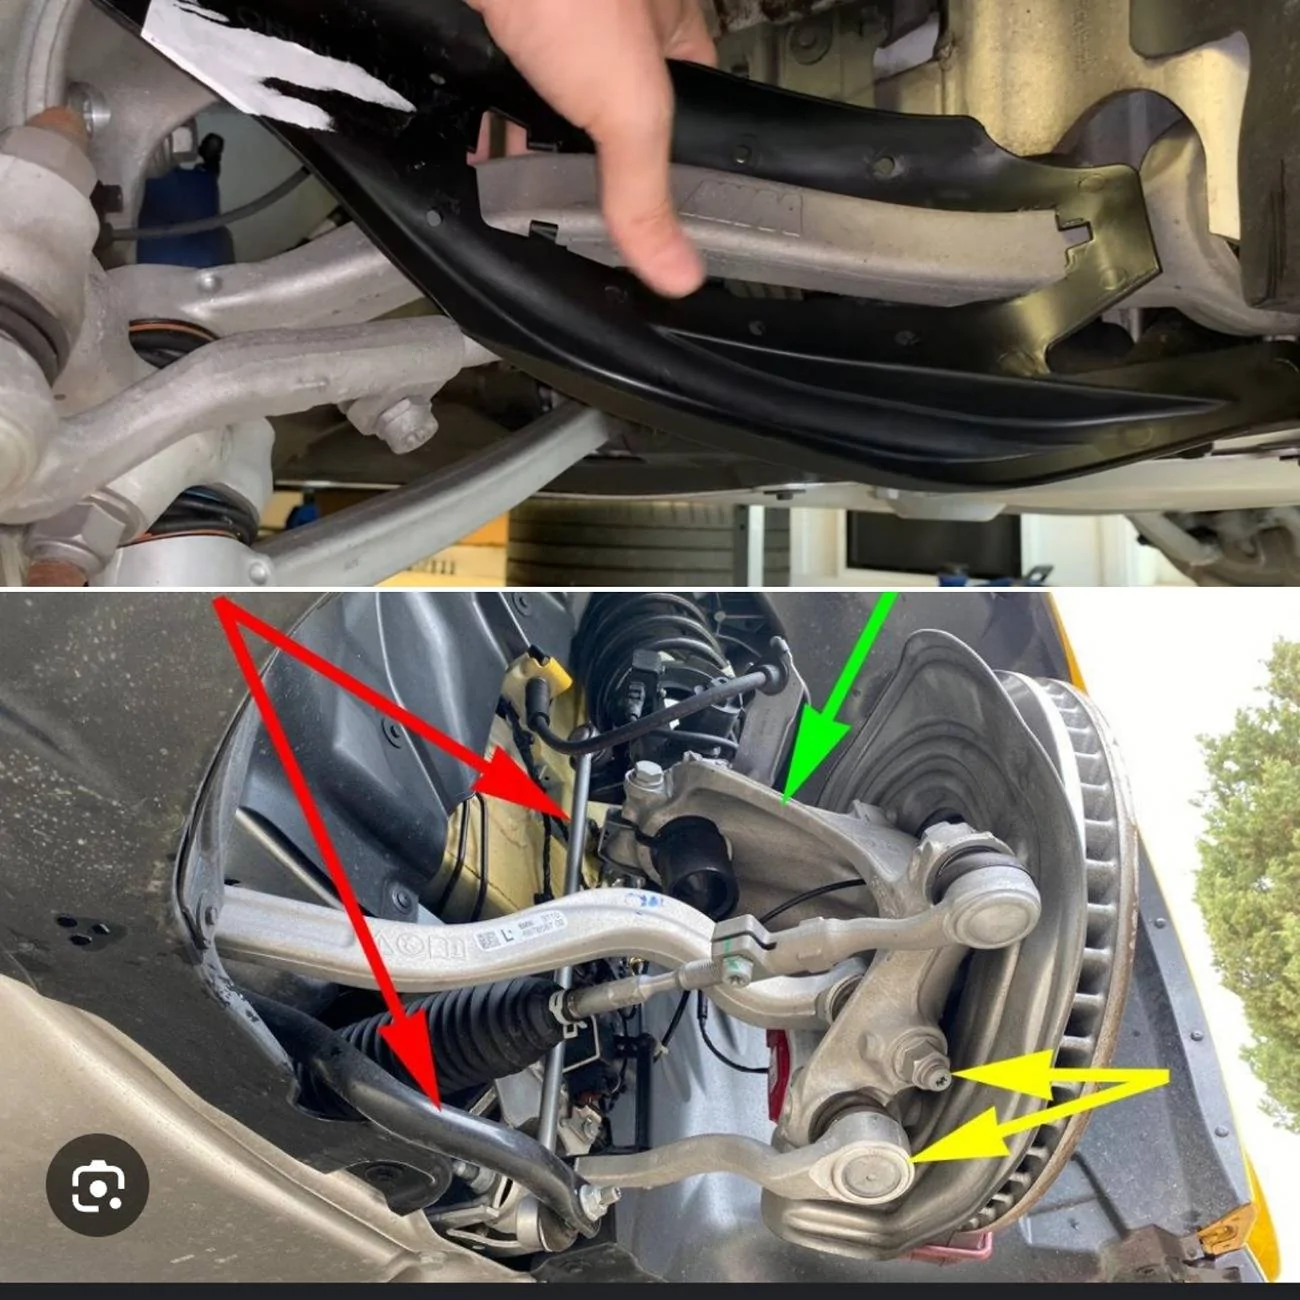
I had to mount these a little bit higher because my racebred splitter is wider than Evan's verus splitter, and the airdam is taller than the aeroluxe lip. this means the curvature on the leading chamfer is kind of floating too far away to attach. nevertheless i got kinda lucky that everything pretty much lines up and looks pretty good together.Front Spats
-these interact with the stock lip + the Aeroluxe GT4 lip

the only suggestion is to maybe make a variant without the chamfer, since the AJH canards (which i am also eyeing) come right up to that corner as well.
Last edited:
lucky phil
Well-Known Member
Looks like you have room for one more.I had to mount these a little bit higher because my racebred splitter is wider than Evan's verus splitter, and the airdam is taller than the aeroluxe lip. this means the curvature on the leading chamfer is kind of floating too far away to attach. nevertheless i got kinda lucky that everything pretty much lines up and looks pretty good together.


the only suggestion is to maybe make a variant without the chamfer, since the AJH canards (which i am also eyeing) come right up to that corner as well.

Phil
puzzled
Well-Known Member
That little piece that closes up the factory splitter gap to fender arch opening looks good. Not sure why Toyota thought making the splitter shorter than the bumper on the sides was a good idea.. cause it's not, and one of the main reasons why I bought a black car.. to hide weirdness.  .. and German panel line unevenness..
.. and German panel line unevenness..- First Name
- Evan
- Joined
- Dec 10, 2021
- Threads
- 45
- Messages
- 709
- Reaction score
- 1,142
- Location
- Pittsburgh, PA
- Car(s)
- 21 Nitro Yellow A90 Supra, 10 Honda Fit Sport 5spd
Thank you!That little piece that closes up the factory splitter gap to fender arch opening looks good. Not sure why Toyota thought making the splitter shorter than the bumper on the sides was a good idea.. cause it's not, and one of the main reasons why I bought a black car.. to hide weirdness.
Vegas17
Well-Known Member
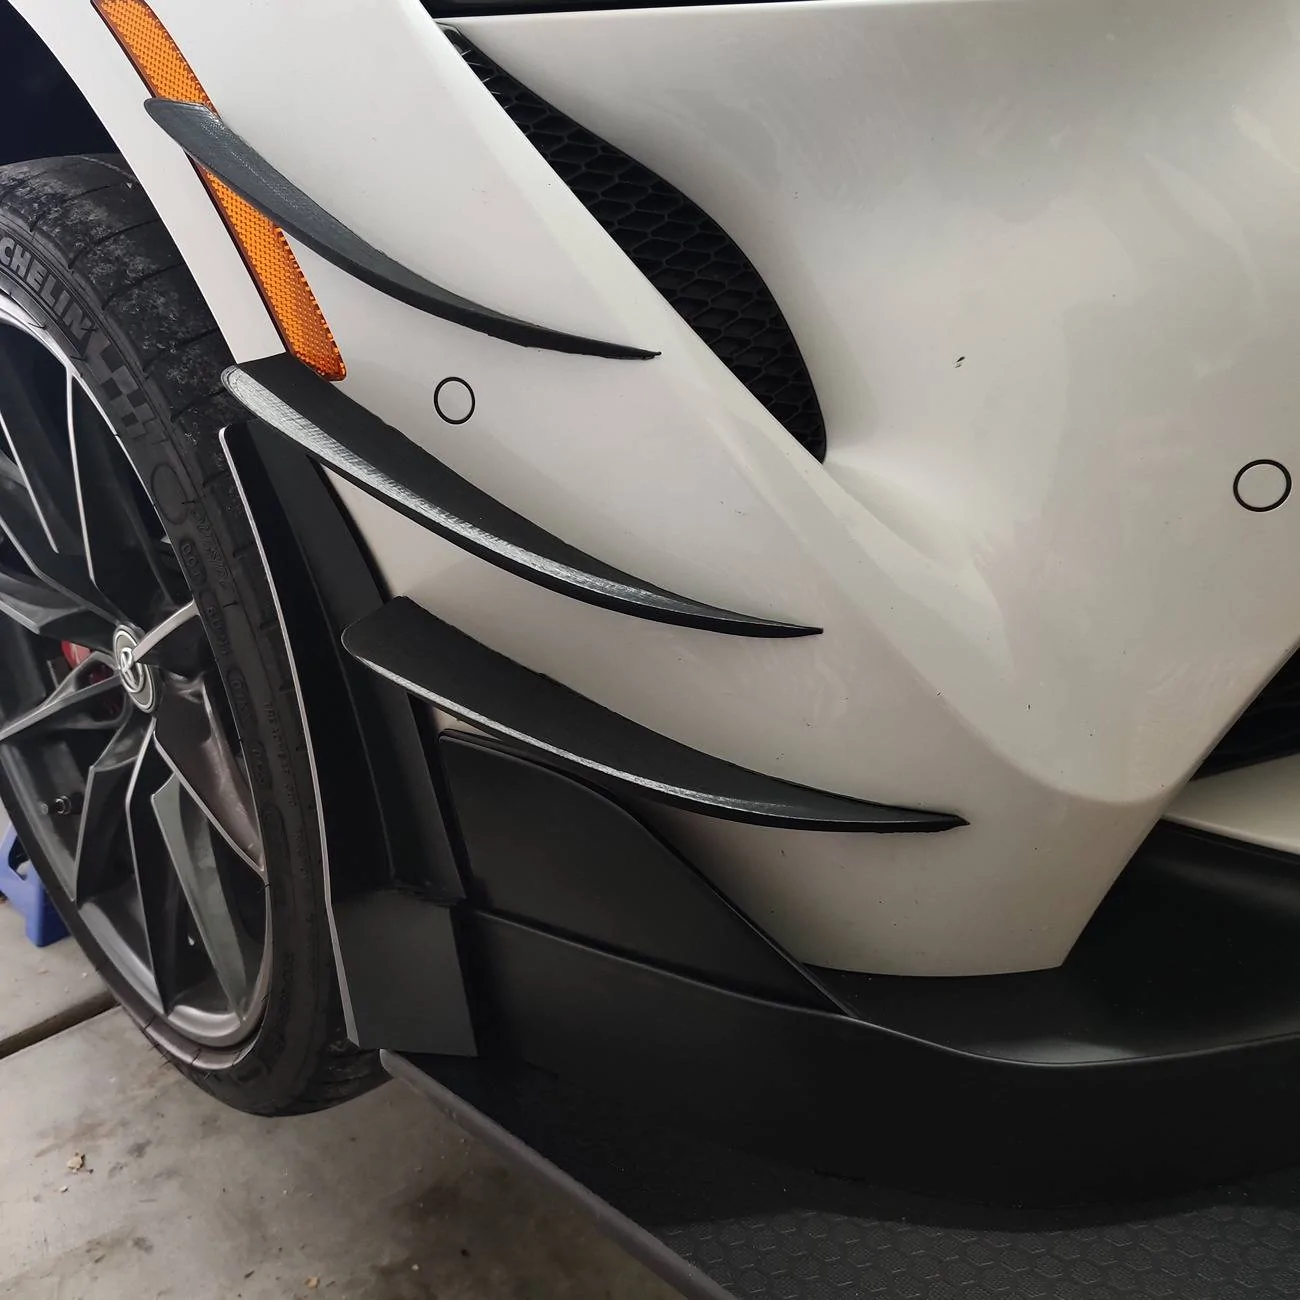
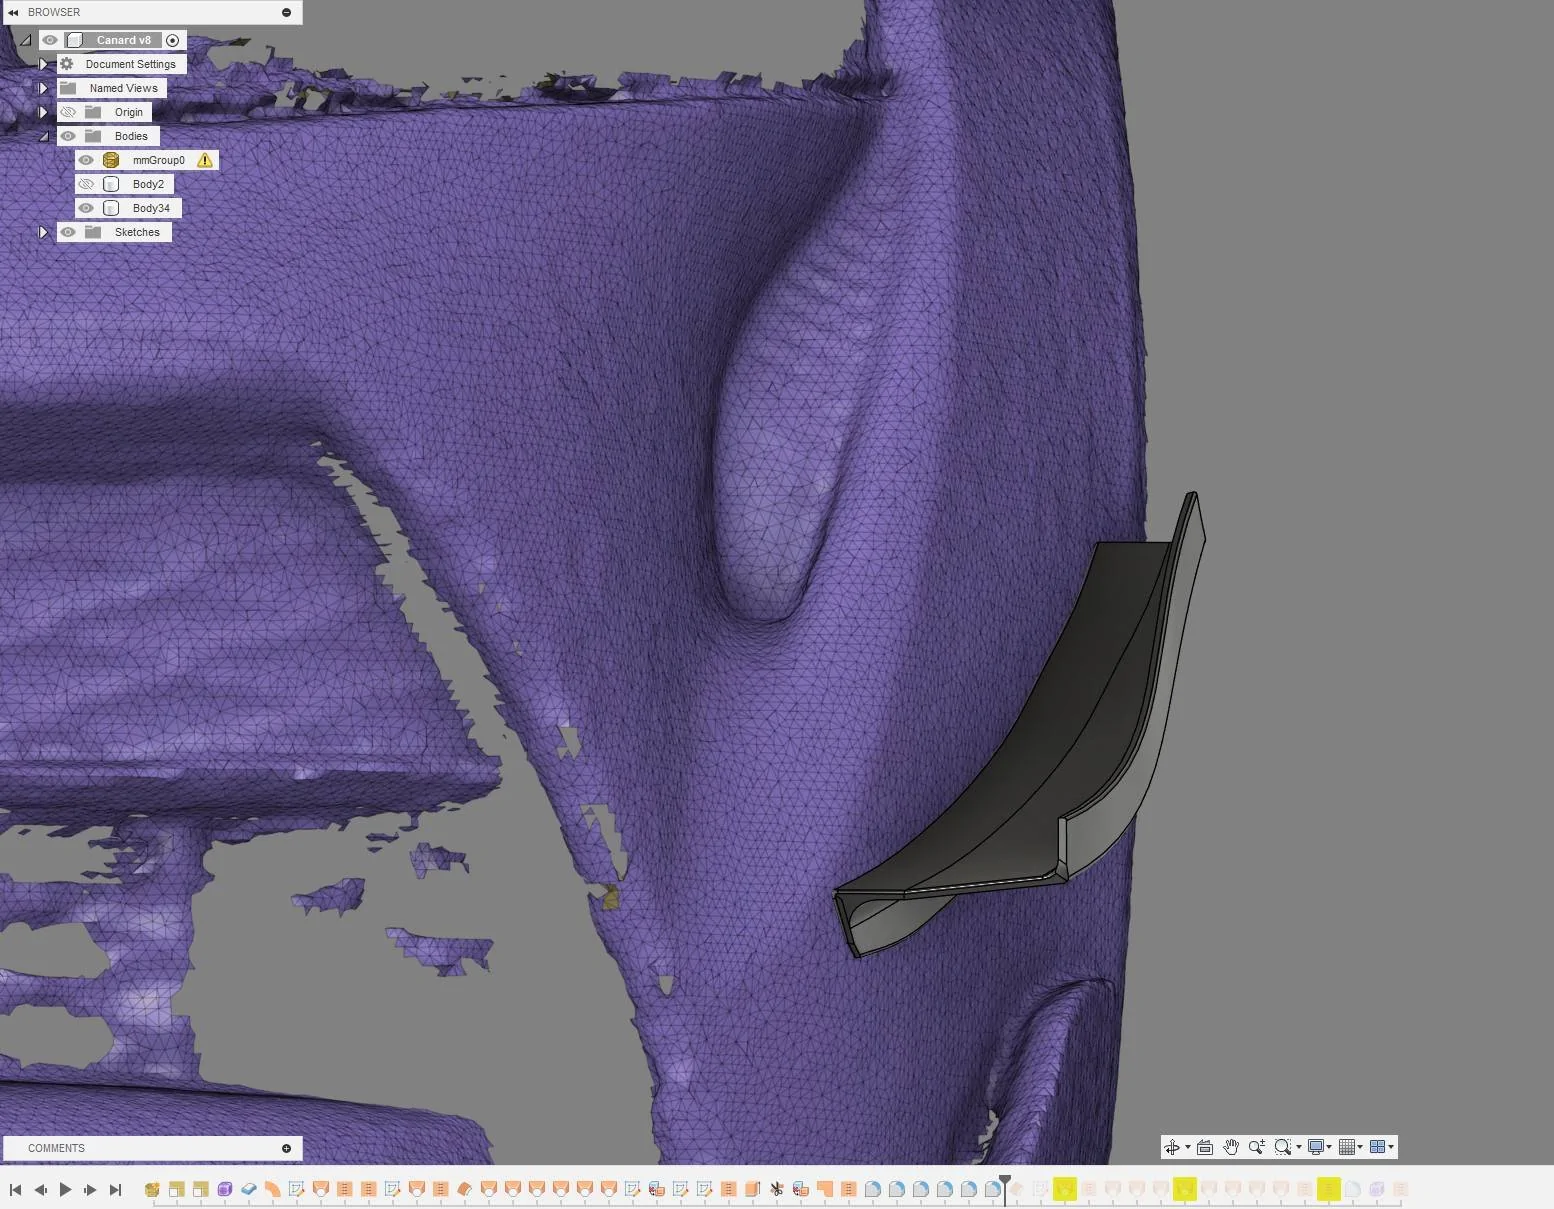
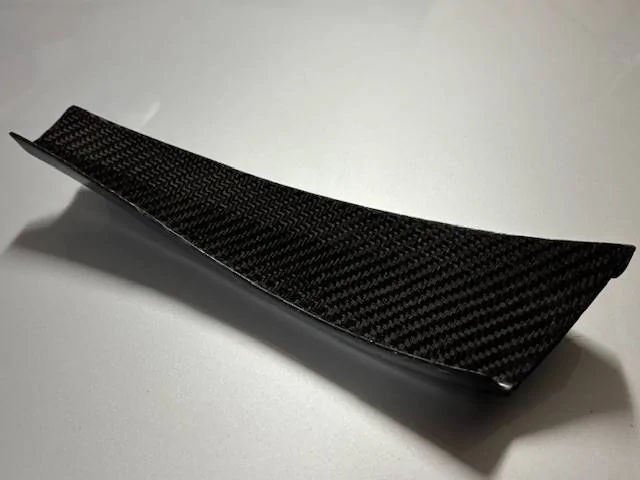
Kinda proud of this one. Scanned the front corner of my car just using my Iphone with the Heges app and modeled out canards in Fusion 360. Printed a bunch of beta's using PLA and adjusted the sizing as needed. Final prints were using ASA with my X1C in a single piece. Print was a little rough but smoothed with UV resin and a UV light. I was going to just paint black but ended up skinning the front side with Carbon Fiber using vacuum bags. Plenty of sanding and epoxy smoothing with a final polish. Saved some heartache and just painted the bottom side black.
I'm going to try and print a mirrored mold to vacuum bag a full carbon version.


I'm going to try and print a mirrored mold to vacuum bag a full carbon version.

i3igpete
Well-Known Member
do you happen to have a picture of how you trimmed your deflector? i tried to follow this f-chassis video but it seems like our arm is thicker AND more bendy to clear the tie rod. by the time I got it on the arm and trimmed to clear the splash guard, there really wasn't much deflector left and it was pretty floppy.You can also just buy some cheap deflectors from Porsche gt3s and mount them on the caster arm.
lucky phil
Well-Known Member
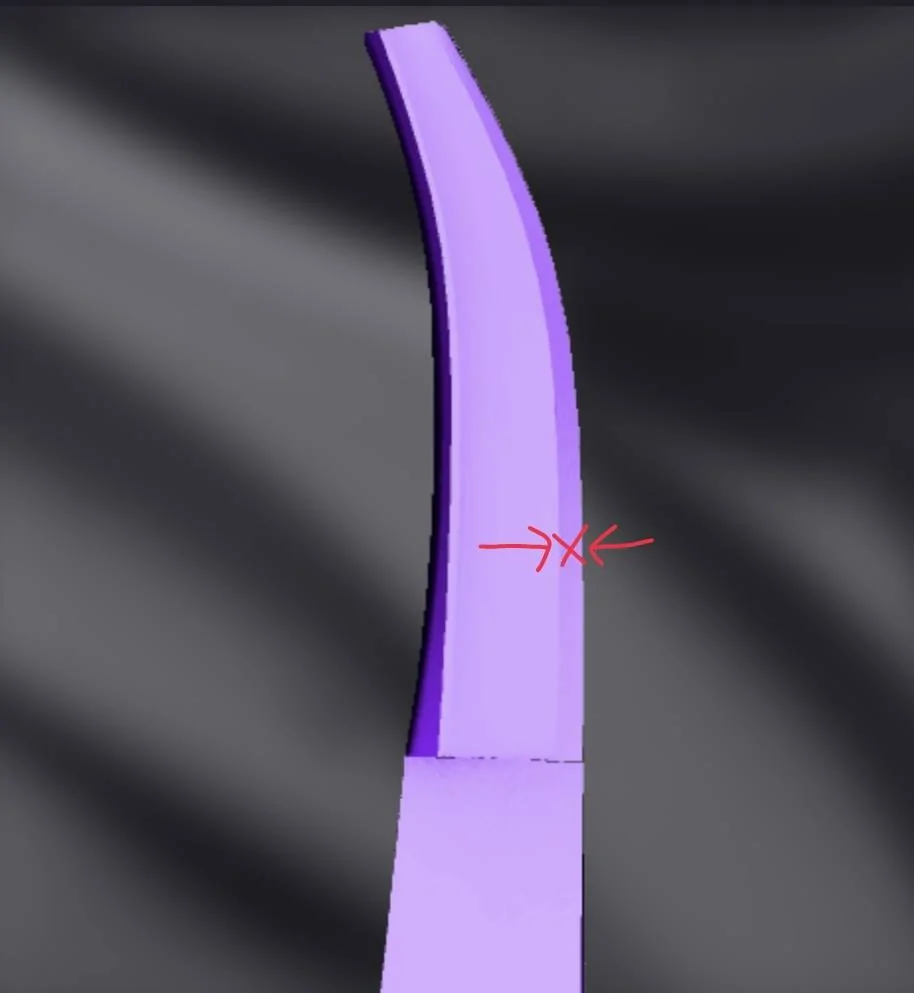
Great work, wish I had the time to learn this stuff. A few points. I would angle the vertical outboard leading edge back at maybe 45 degrees or so. Looks like the vertical mounting face is back angled already and could do with a little more. Both for aesthetics. Might just be the image perspective.Kinda proud of this one. Scanned the front corner of my car just using my Iphone with the Heges app and modeled out canards in Fusion 360. Printed a bunch of beta's using PLA and adjusted the sizing as needed. Final prints were using ASA with my X1C in a single piece. Print was a little rough but smoothed with UV resin and a UV light. I was going to just paint black but ended up skinning the front side with Carbon Fiber using vacuum bags. Plenty of sanding and epoxy smoothing with a final polish. Saved some heartache and just painted the bottom side black.
I'm going to try and print a mirrored mold to vacuum bag a full carbon version.
Phil
garudathree
Well-Known Member
the way to do it on the supra is to treat it as an 80% preformed deflector, and to use a heatgun to reform it for clearance vs cutting material. i no longer have photos of mine but it took minimum trimming.do you happen to have a picture of how you trimmed your deflector? i tried to follow this f-chassis video but it seems like our arm is thicker AND more bendy to clear the tie rod. by the time I got it on the arm and trimmed to clear the splash guard, there really wasn't much deflector left and it was pretty floppy.
Sponsored
