OP
OP
30MilesOffshore
Well-Known Member
- Joined
- Jan 27, 2020
- Threads
- 50
- Messages
- 455
- Reaction score
- 399
- Location
- Charlotte, NC
- Car(s)
- 2020 Supra
Subs are powered separately (independent channels) and are not wired serial or parallel of one another...@30MilesOffshore do we know for sure the two subs are ran parallel? I was thinking of going Audison and putting in their bmw sub replacement, using it as the woofer for the front 3 way setup.
You might want to read this before installing those Ghostsubs...@30MilesOffshore
First, this is awesome. Thank you so much for taking the time to document!
Second, I have BavSound Ghost subs in my parts bin. I plan to do this porting mod but wonder if it is better with the Ghost subs?
Thanks! Looks like they are going on Ebay....You might want to read this before installing those Ghostsubs...
Bavsound Ghostsub Review: I really wanted to like them...
Just return them you got a 100 day trial.Thanks! Looks like they are going on Ebay....
Looks like that is the call system module:Can someone tell me what box that is right between the subs? And what is it used for?
I would look into 8" grills.Has anyone replaced the grilles of the subwoofer? If so, is there a specification you used when looking for replacements?
I was curious if any codes will get thrown if u pull out the old box and replace it with a new after market one?Thought I would start a thread discussing only the subs. The other thread has too many pages and stuff is getting buried and mixed in. So chime in on anything you want to discuss about them.
I spent all day messing around with them and thought I would share my findings. Since there isn't a How To Remove Subwoofer section yet, I'll get started with that first. This probably isn't 100% correct but it worked for me. It was more of a pain to reinstall everything than it was to take it apart.
------------------------------------------
How To Remove Subs:
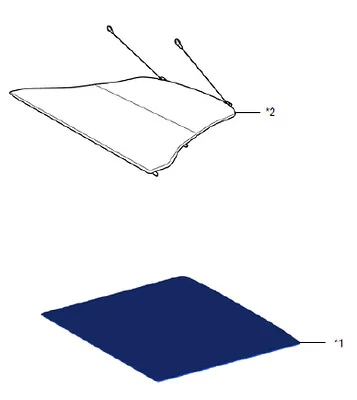
- Remove the trunk security shade (#2).
- Remove the battery cover panel (#1).

-----------------------------------------
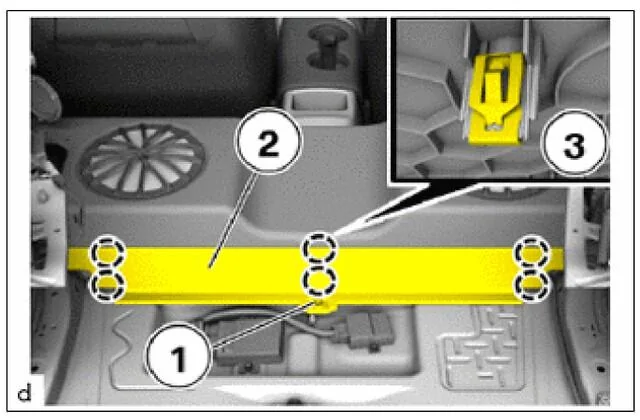
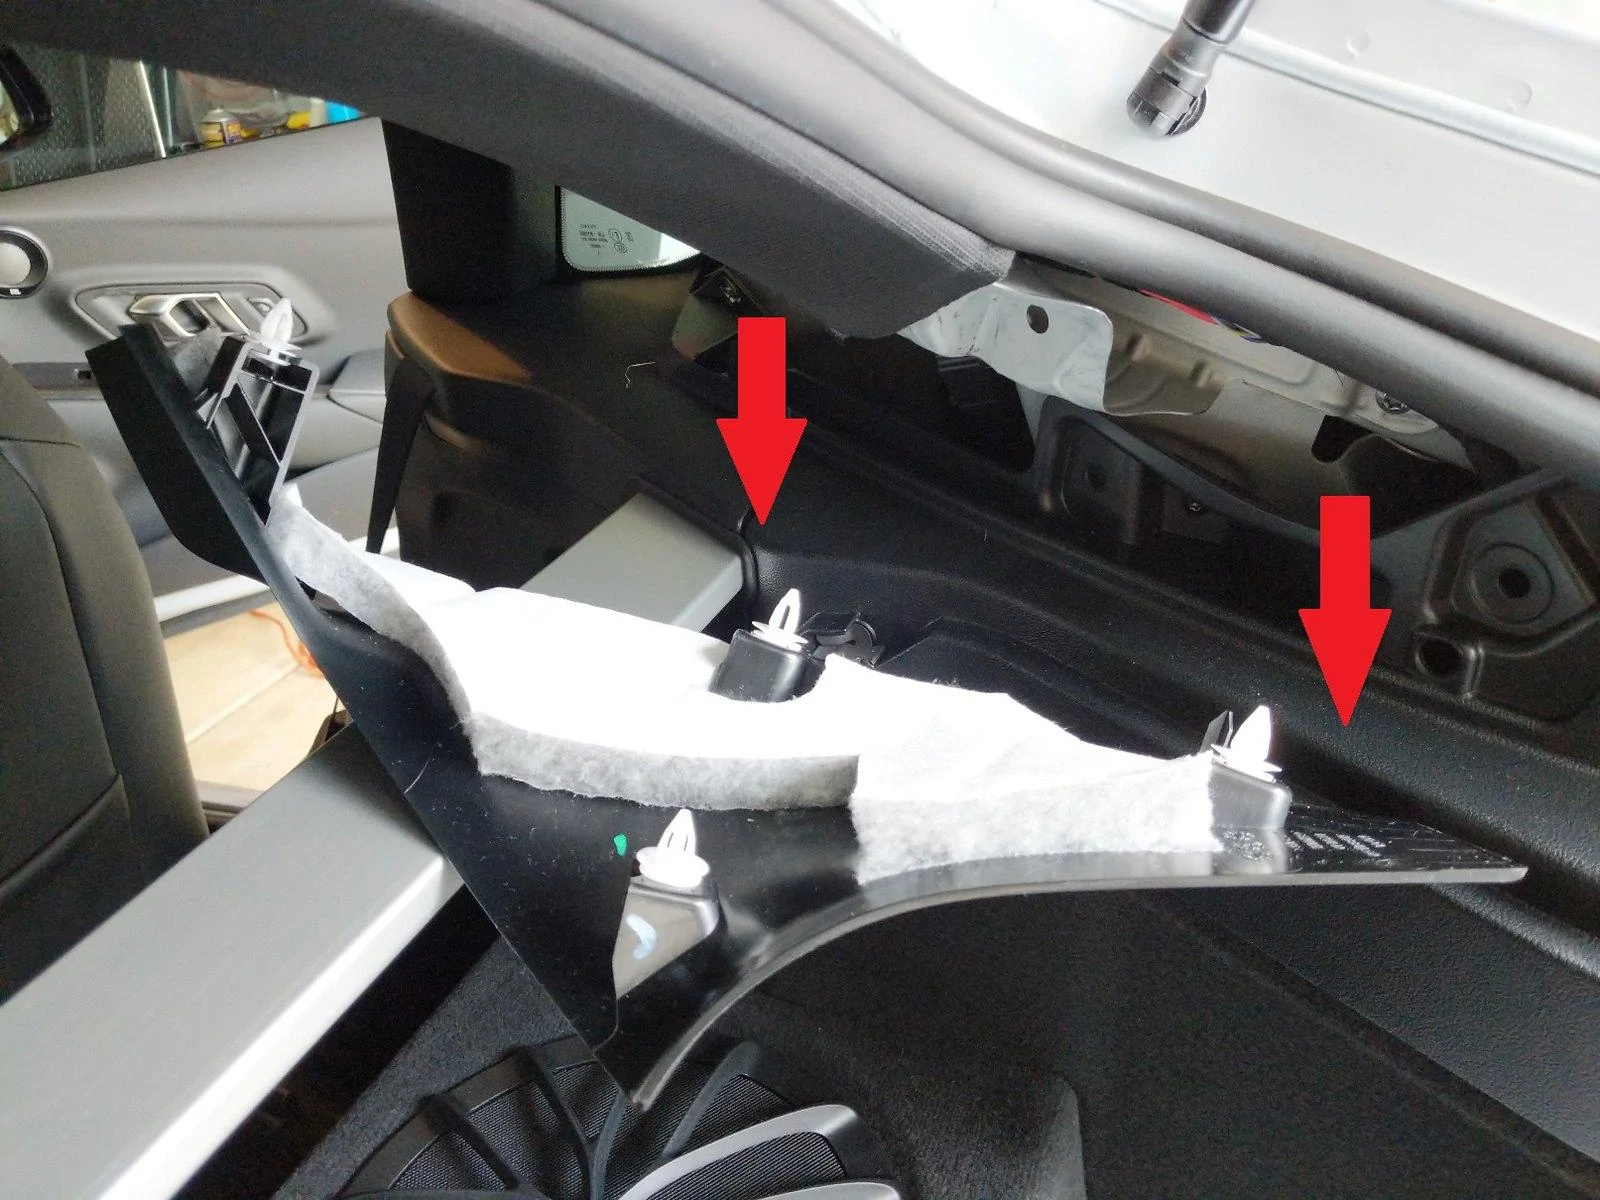
You will now be able to see the plastic clip holding the subwoofer trim board on. To remove the plastic push pin (#1), you need to pry up on the center of the clip and pull the plunger high and then the trim ring will pop right out.
Now remove the sub panel board (#2) by pulling straight back towards the rear of the car. There are clips (#3) on both ends and also in the center which will simply pop out.
With the panel board removed you should now see another clip in the middle of the subwoofer baffle board that will need to be removed too. This is similar to the previous plastic push pin.

--------------------------------------
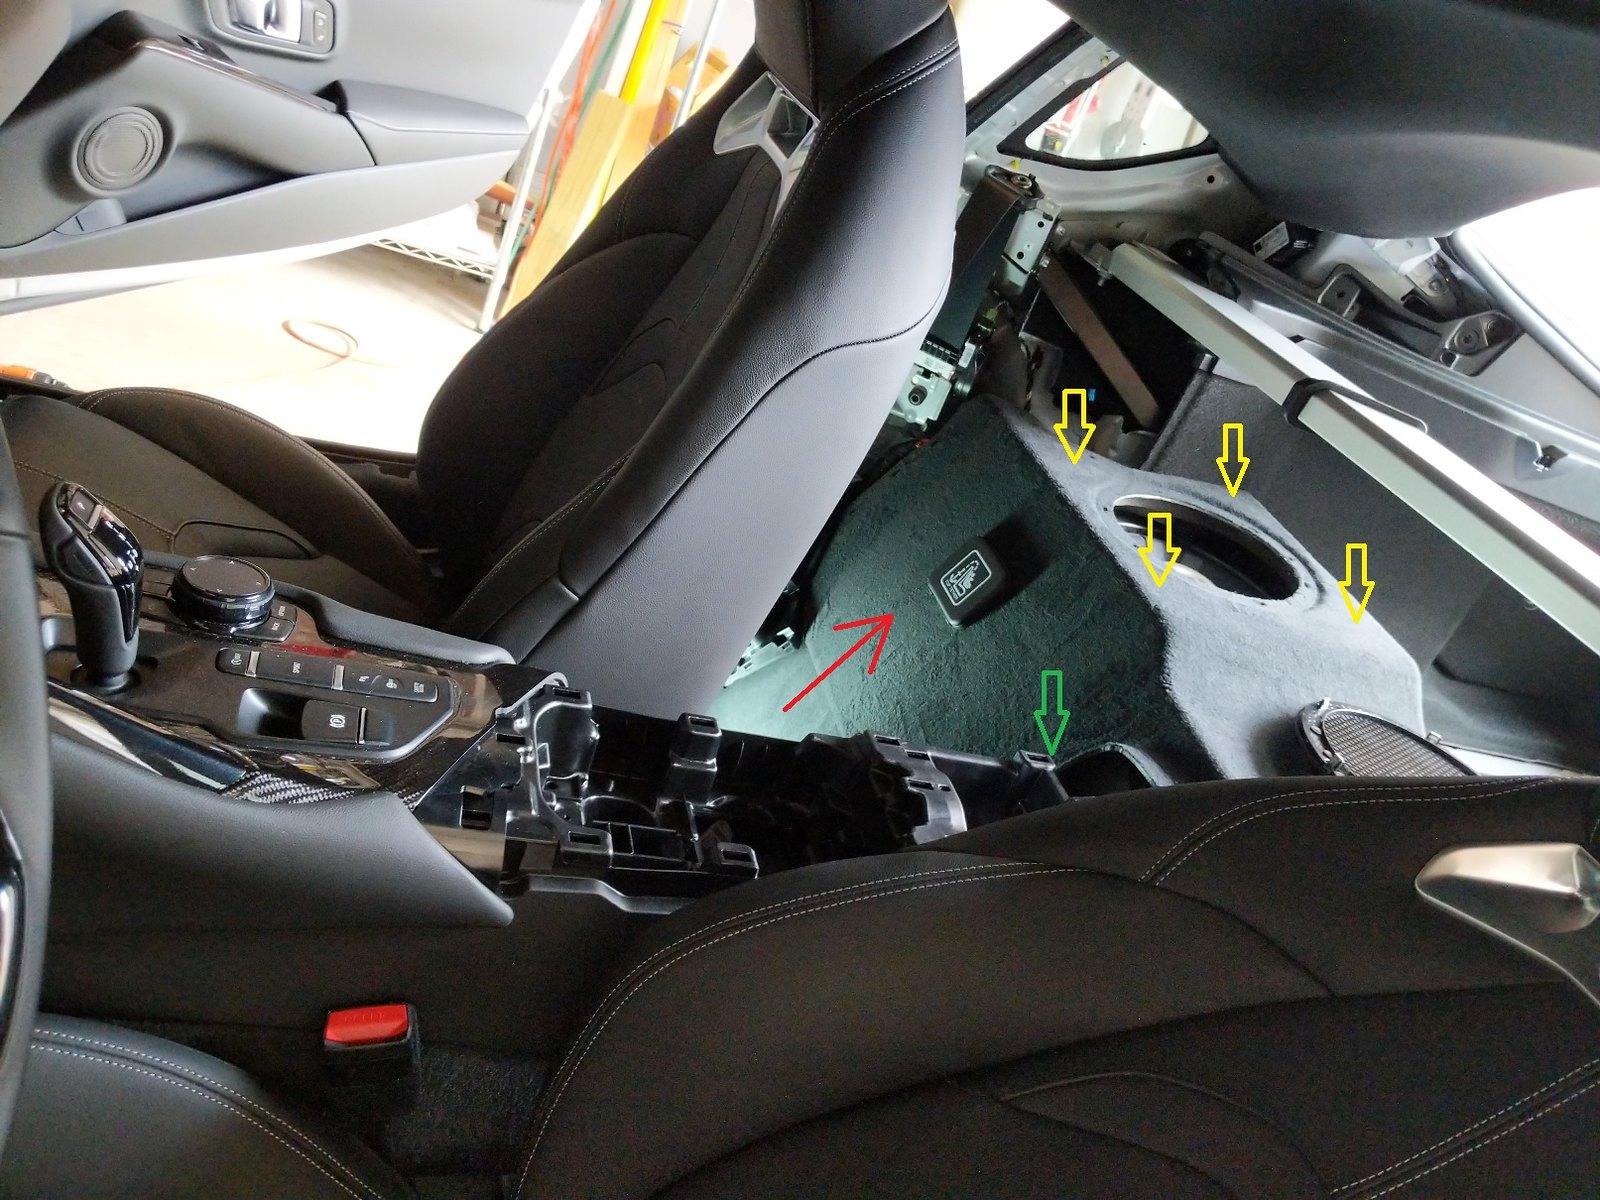
Remove Center Console
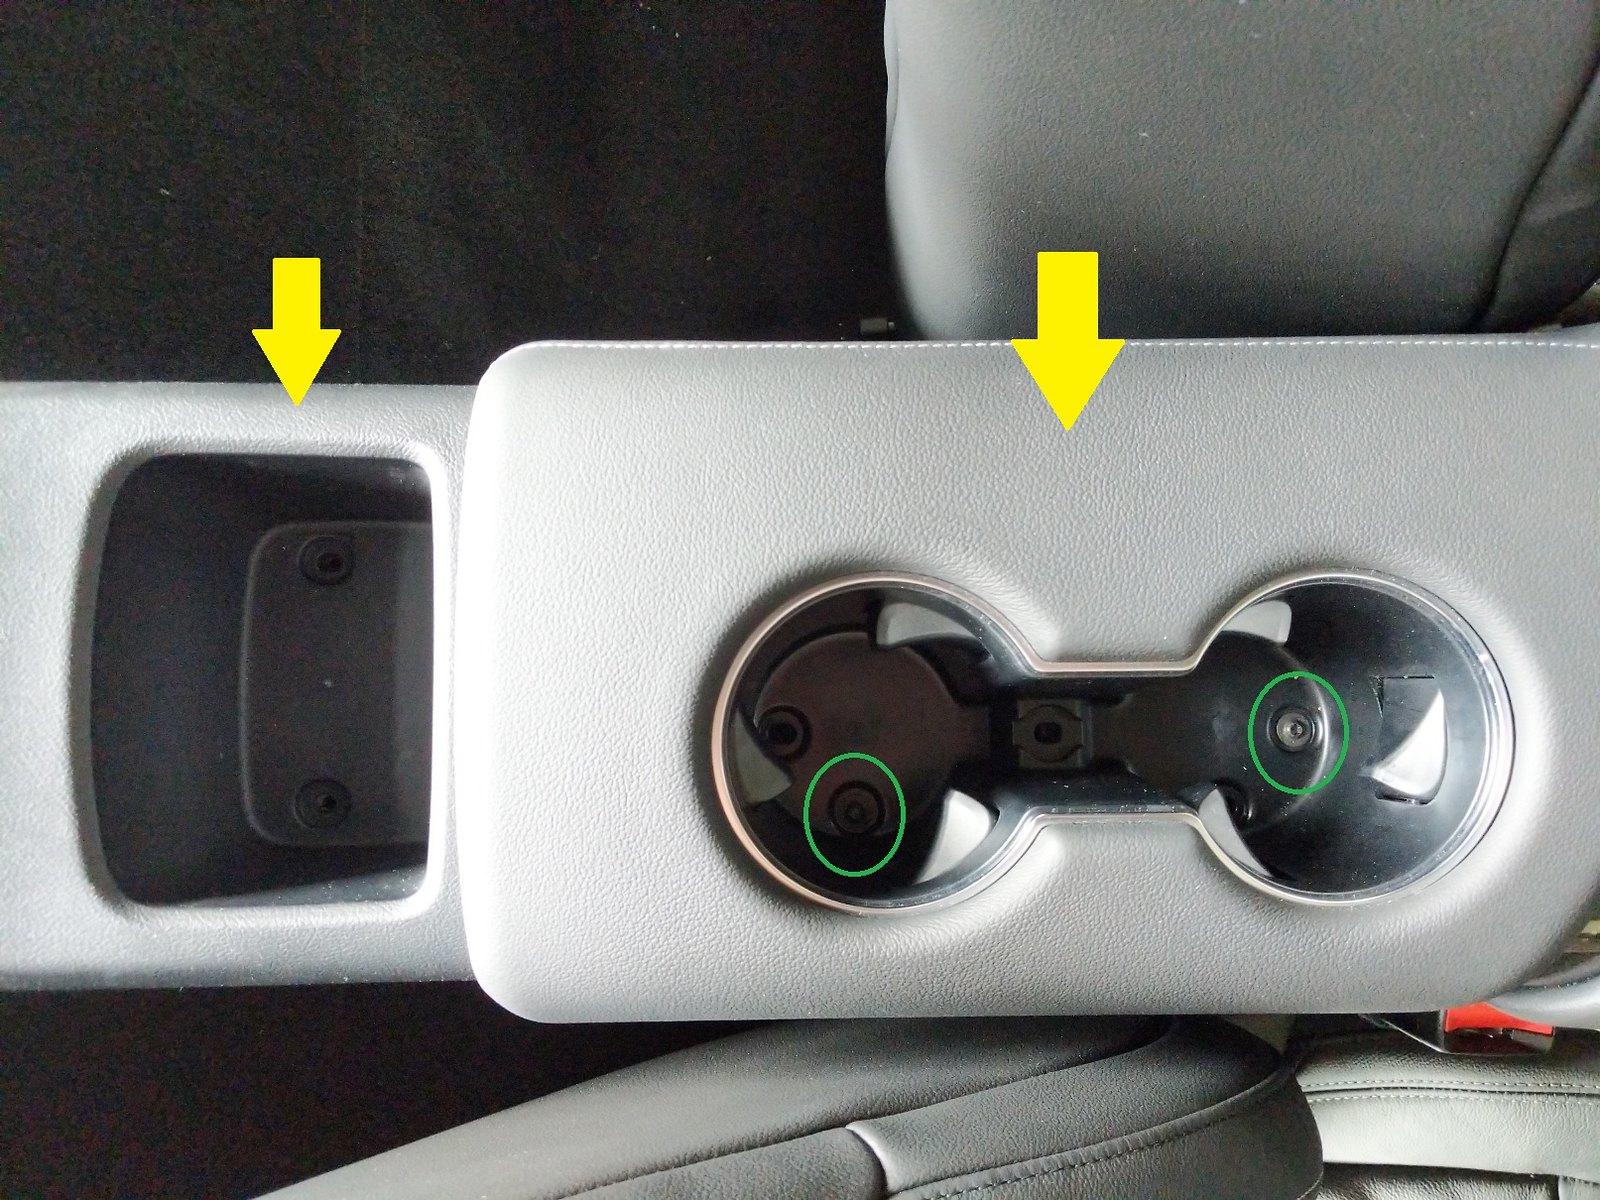
There are two T-20 screws located under the rubber mat that need to be removed (green circles). Once removed, you can pry straight up and the cup holder will pop out.
Next step is to make sure there aren't any screws in the cubby hole under the rubber mat. Mine did not have any installed but there are two holes there so double check. Once its clear, then pry straight up and it will pop out.

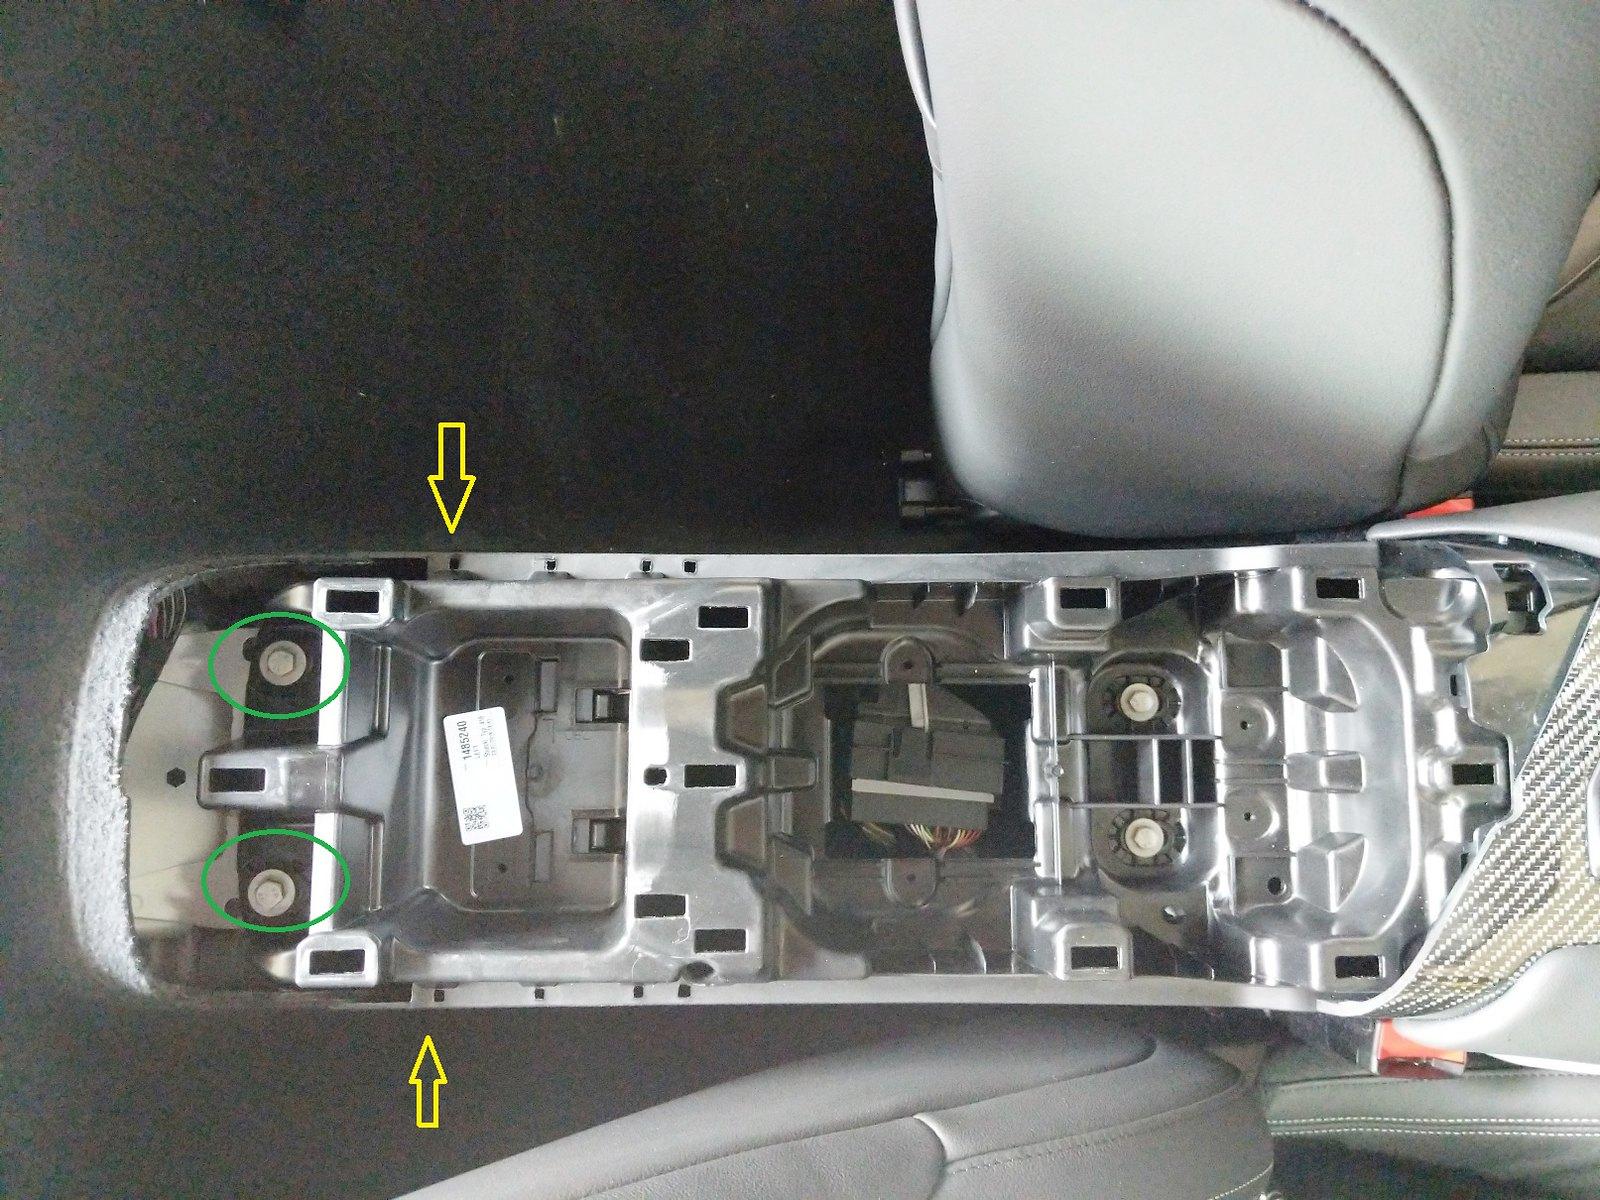
The manual shows two screws located in the center trim (yellow arrows) but I quadruple checked and could not find them at all. I could not see any place where the baffle board was connected to the center console so I did not have to do anything else. The two bolts (green) are only securing the center console down and do not have to be removed.
-------------------------------------
Rear Hatch Trim
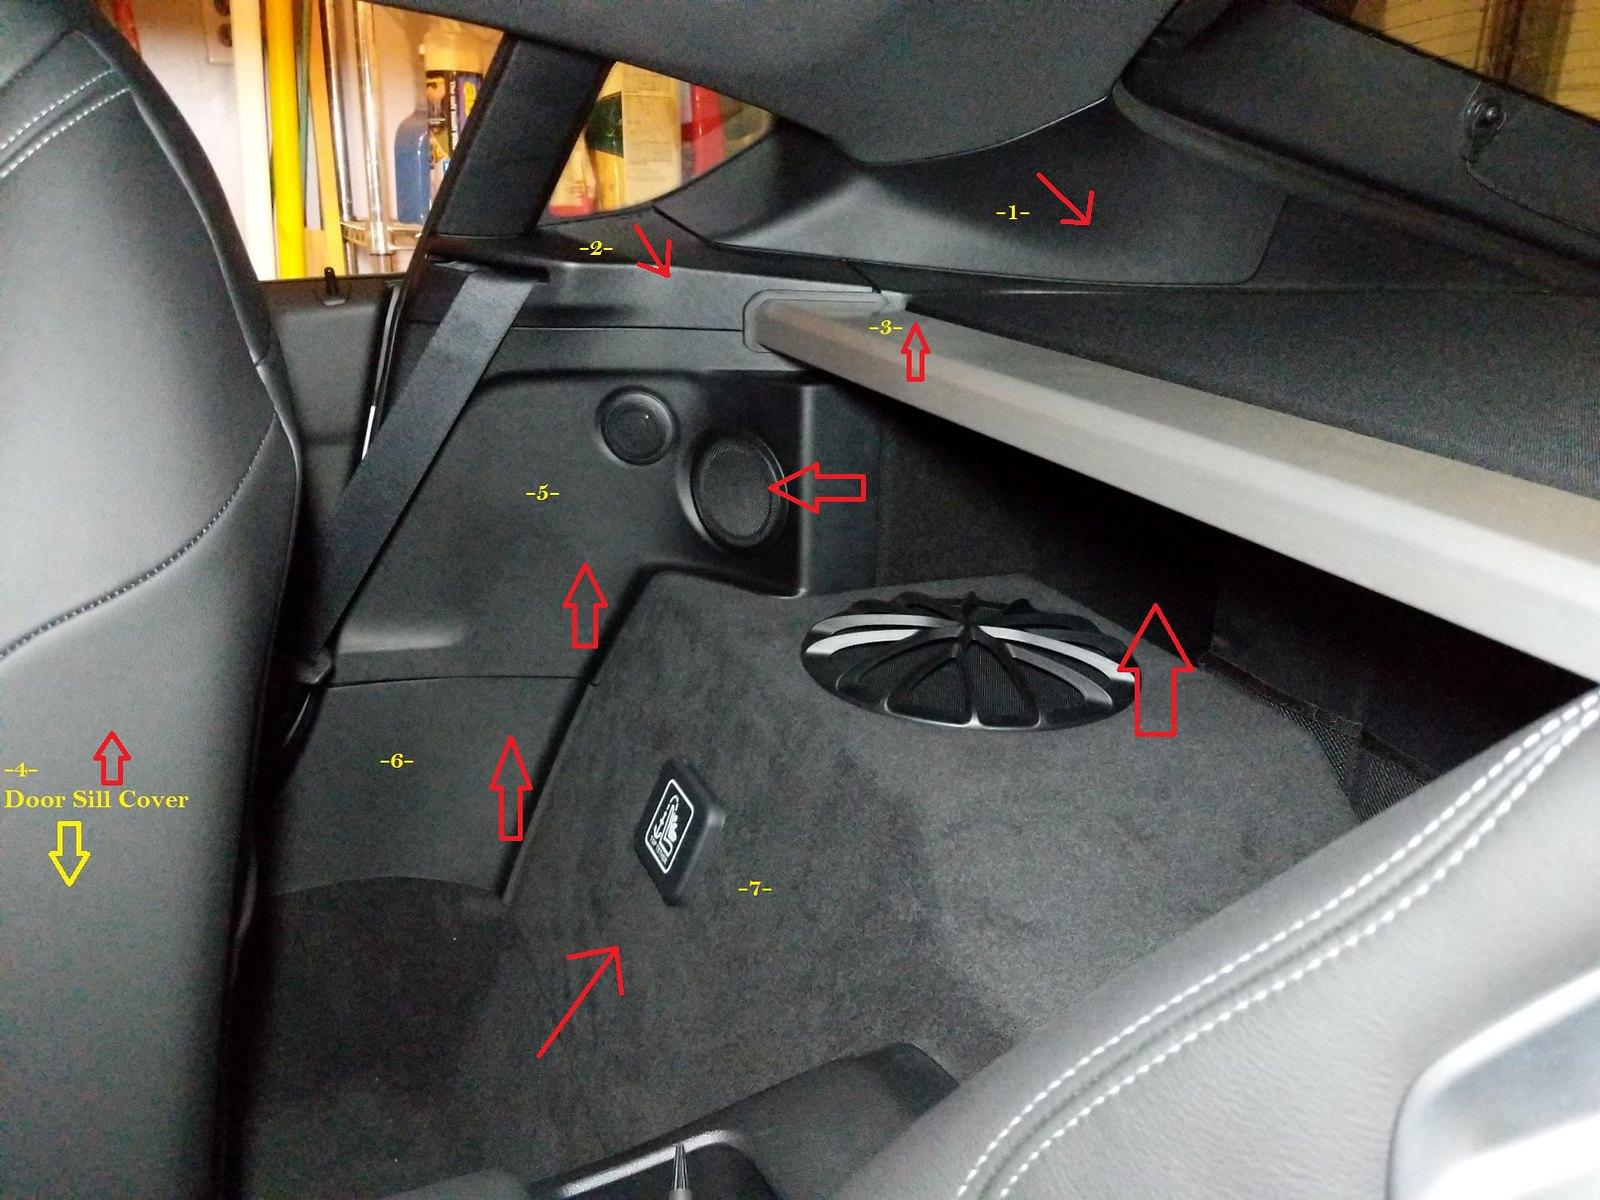
There are 7 pieces of trim that will need to be removed. You want to start at the top and work your way down. All of the pieces lock into each other so there isn't any other way to do it that I could see.
-------------------------------------
Piece -1-
This is held in by a few white plastic clips and will simply pry out. Be sure to pull horizontally towards the middle of the car and they will pop out.
------------------------------------
Piece -2-
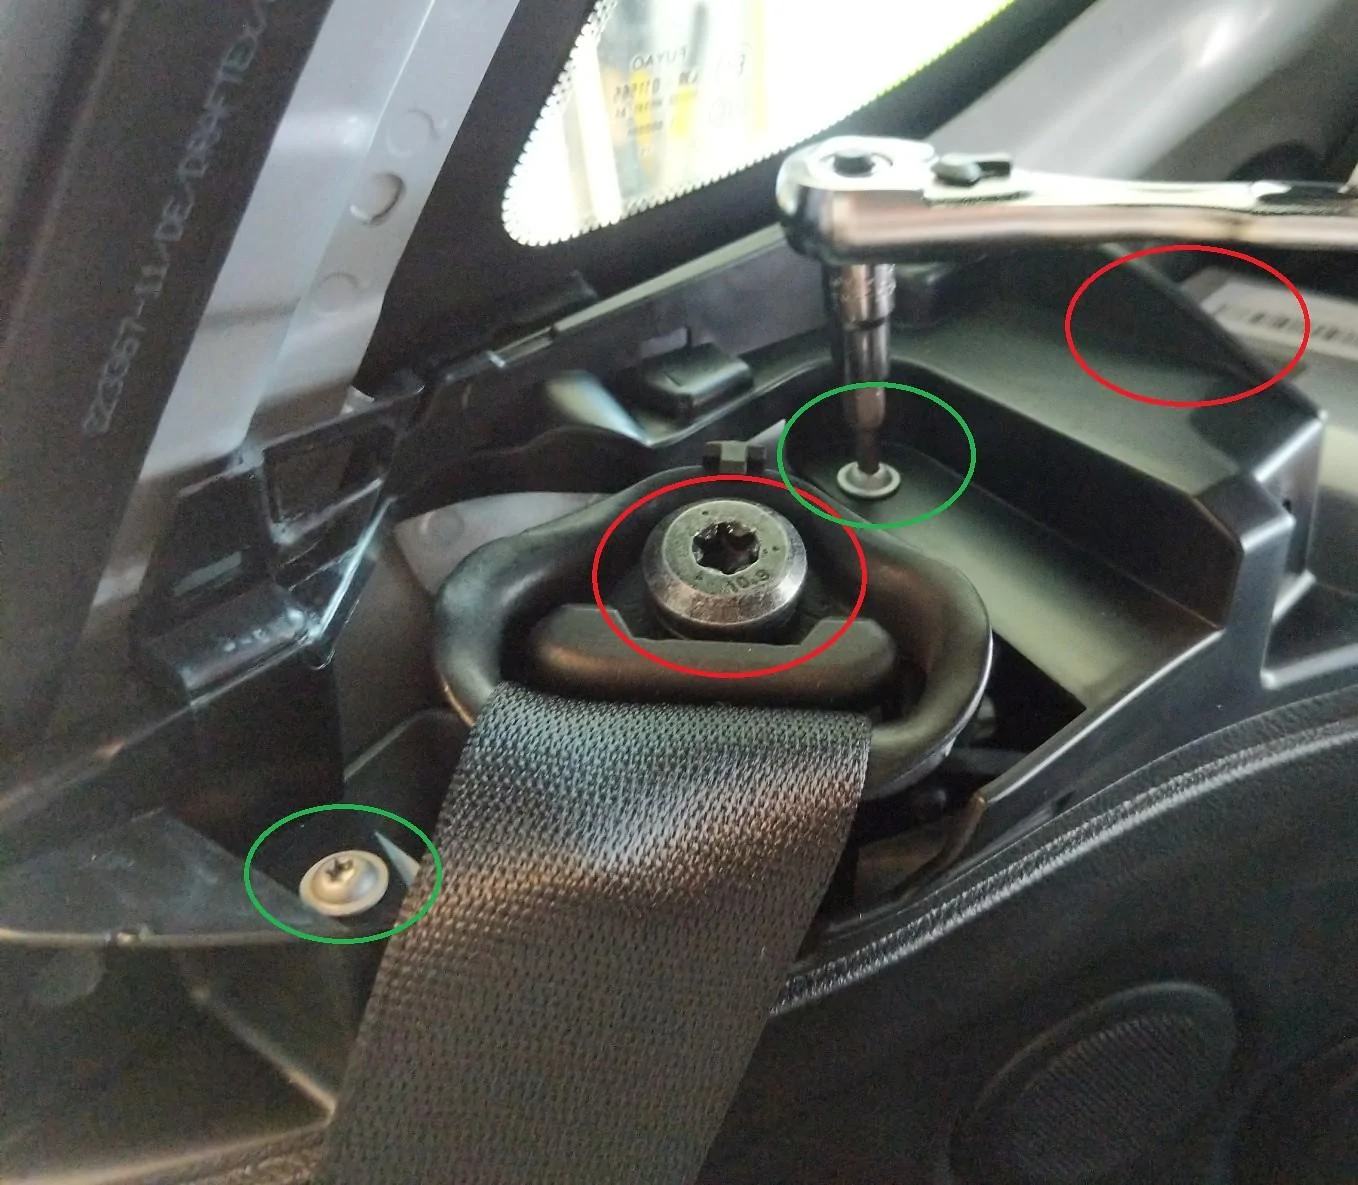
Using a Torx T-50 bit you will need to unbolt the transverse bar and seatbelt (red circles). There are also two T-20 screws that will need to be undone (green circles).
Now just like piece -1-, pull horizontally towards the middle of the car. Be sure to be delicate around the seatbelt area. The trim is split to allow the seatbelt to feed through and there is a clip located right behind the split.
Once removed, you can remove the trim piece right above it. I forgot to label it but it is about the size of a cell phone and attached to the roof of the car. The bottom will pry out first and then pull it straight down to release the top section.
----------------------------------
Piece -3-
Transverse pipe has one Torx screw located on each end. Using a T-50 bit just unbolt it and it will pop out. I would go ahead and remove the seatbelts at this time to since it's also a T-50 bit.
---------------------------------
Piece -4-
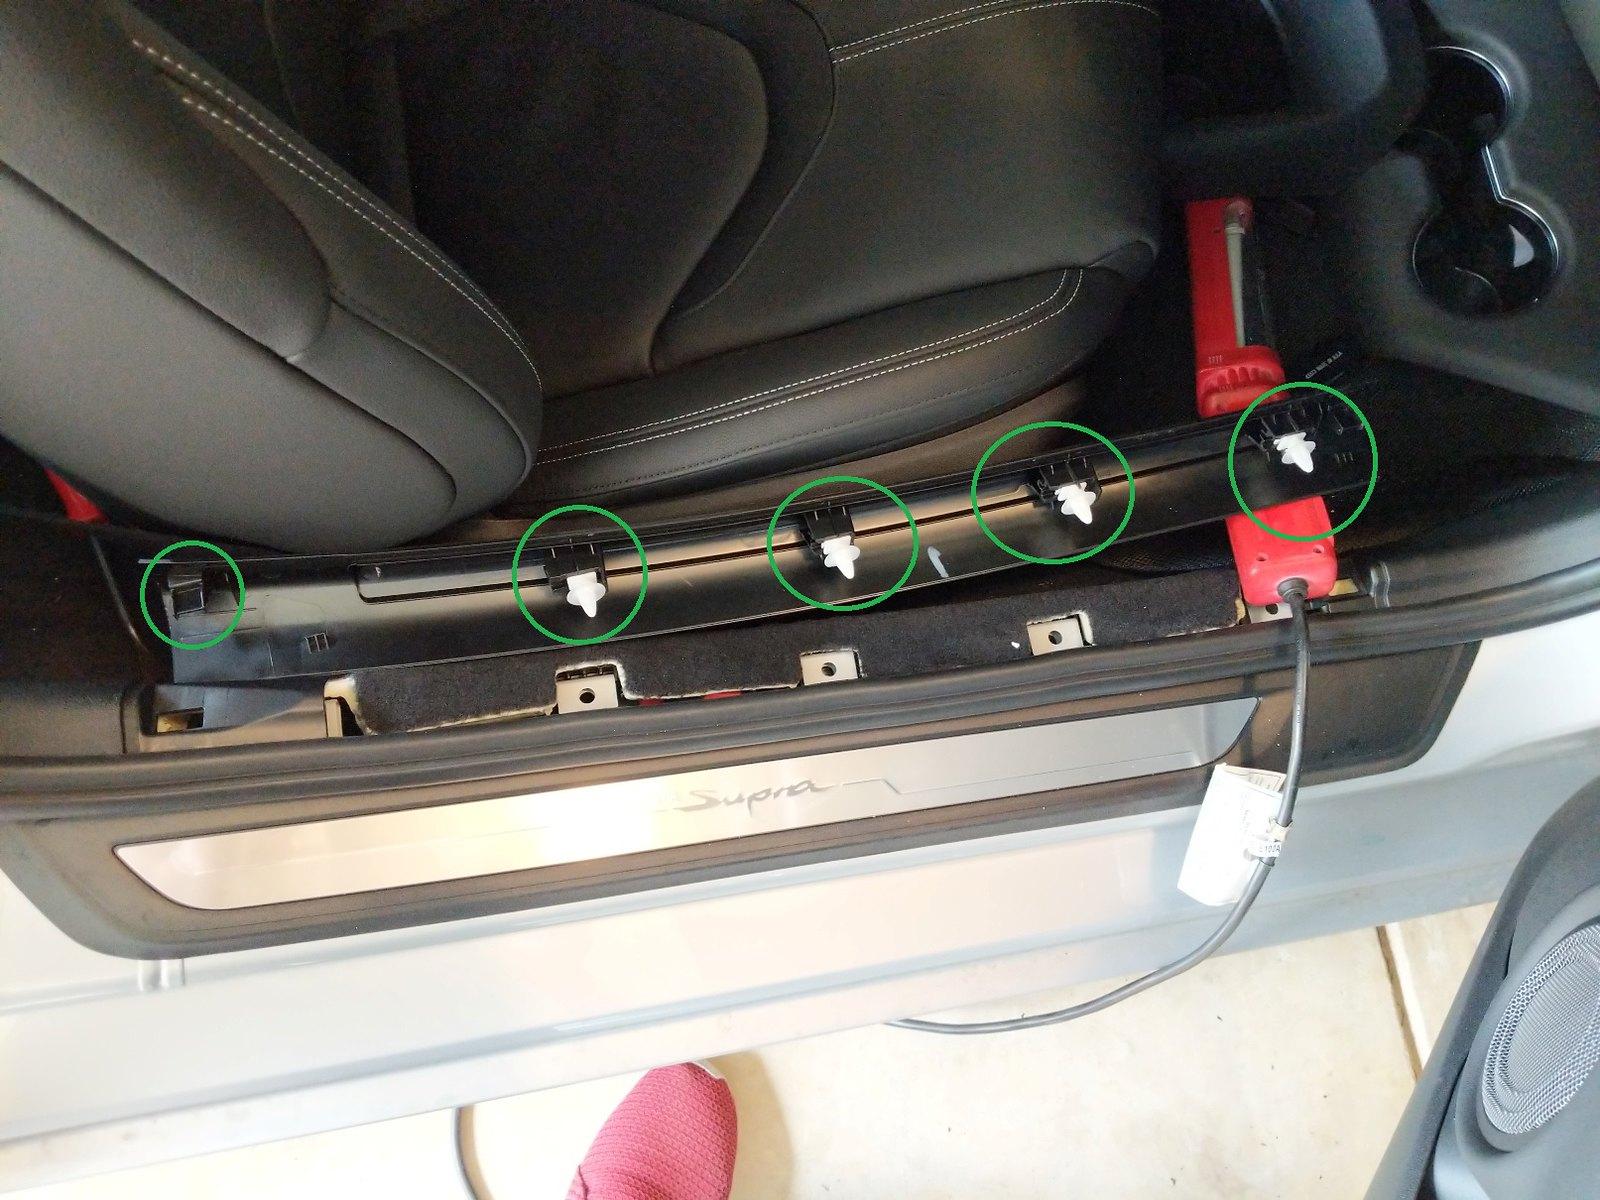
Remove the door sill cover by pulling straight up towards the roof of the car. There are 4 plastic white clips and one peg at the end that locks into piece -6-
-----------------------------------
Piece -5-
This one is tricky! You have to maneuver this piece in two different directions.
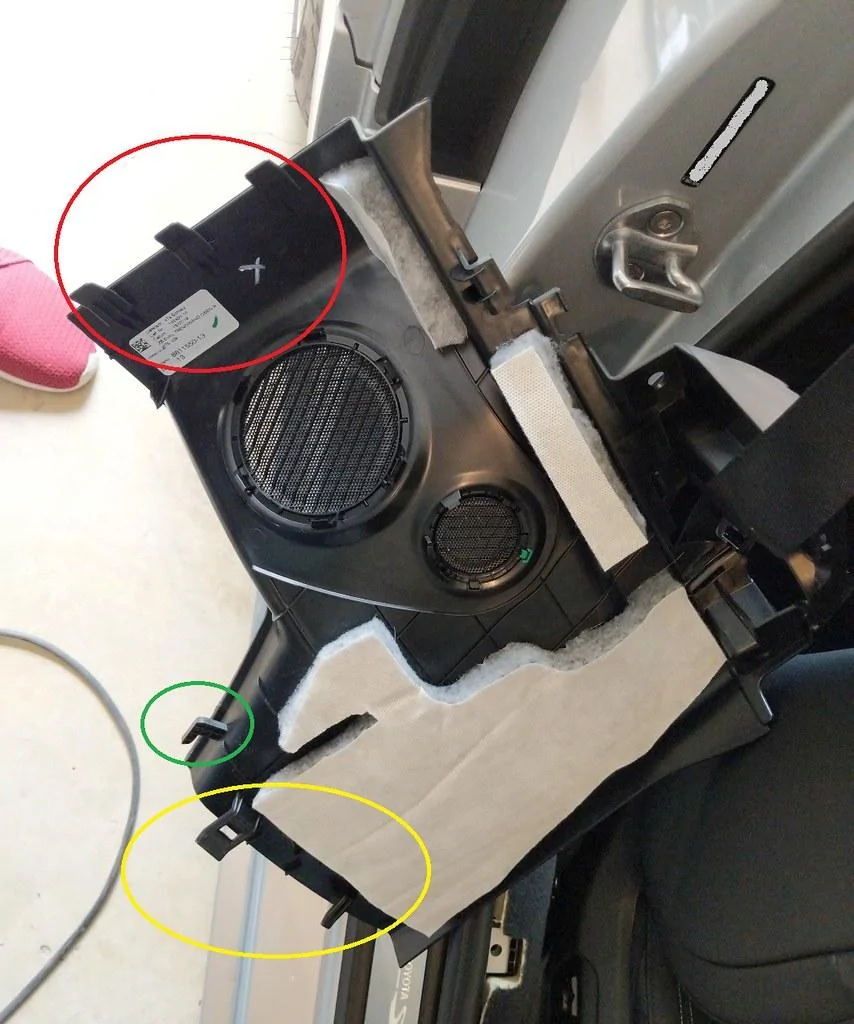
But first you will need to unbolt the transverse bar and seatbelt (red circles). These should have already been done in Piece -3- removal. There are also two T-20 screws that will need to be undone (green circles).

There are 3 large clips located behind the speakers (red circle). This part of the trim will need to be pulled towards the front of the car.
The lower part of the trim is attached in two sections. One section has right angle clips and attach to the sub baffle board (green circle). This will need to be pulled straight up about an inch and then towards the front of the car.
The very bottom has several clips (yellow circle) that attach to piece -6-. These clips are all inserted vertically and will just pull straight up towards the roof of the car.

More pictures to help....................
-------------------------------------
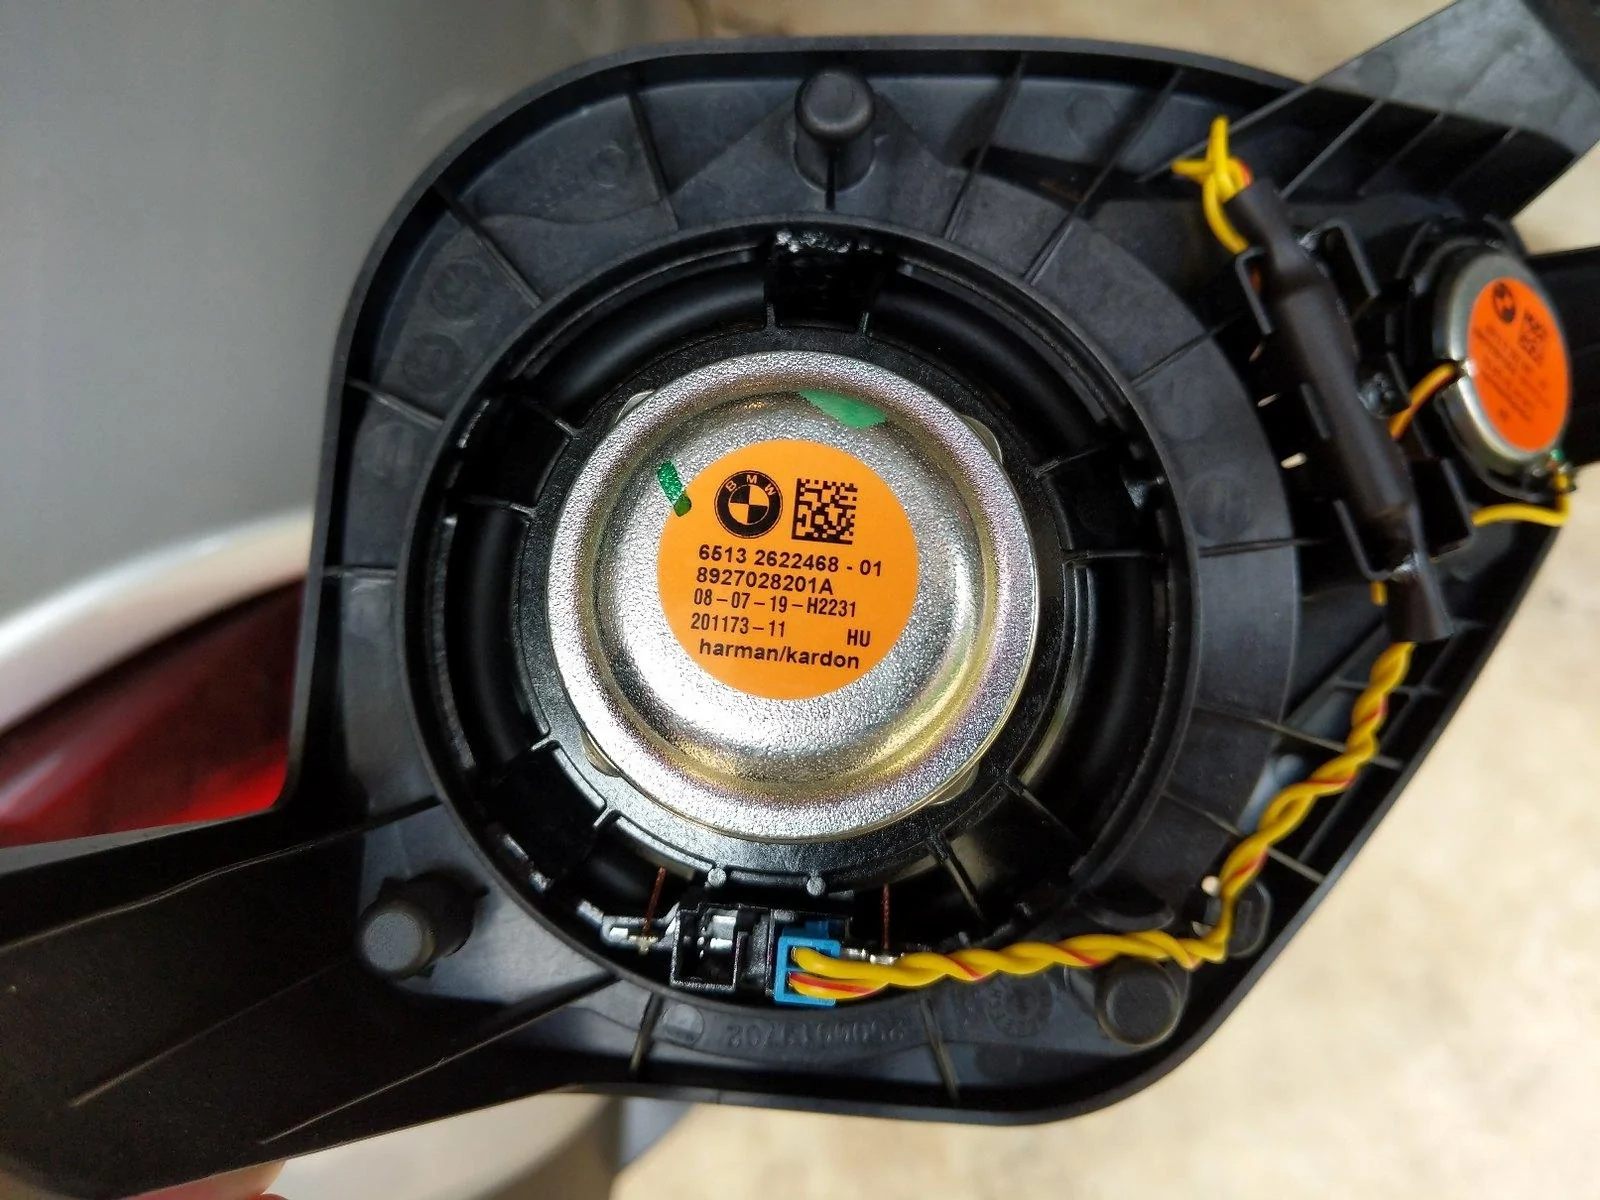
Rear Tower Speaker Removal
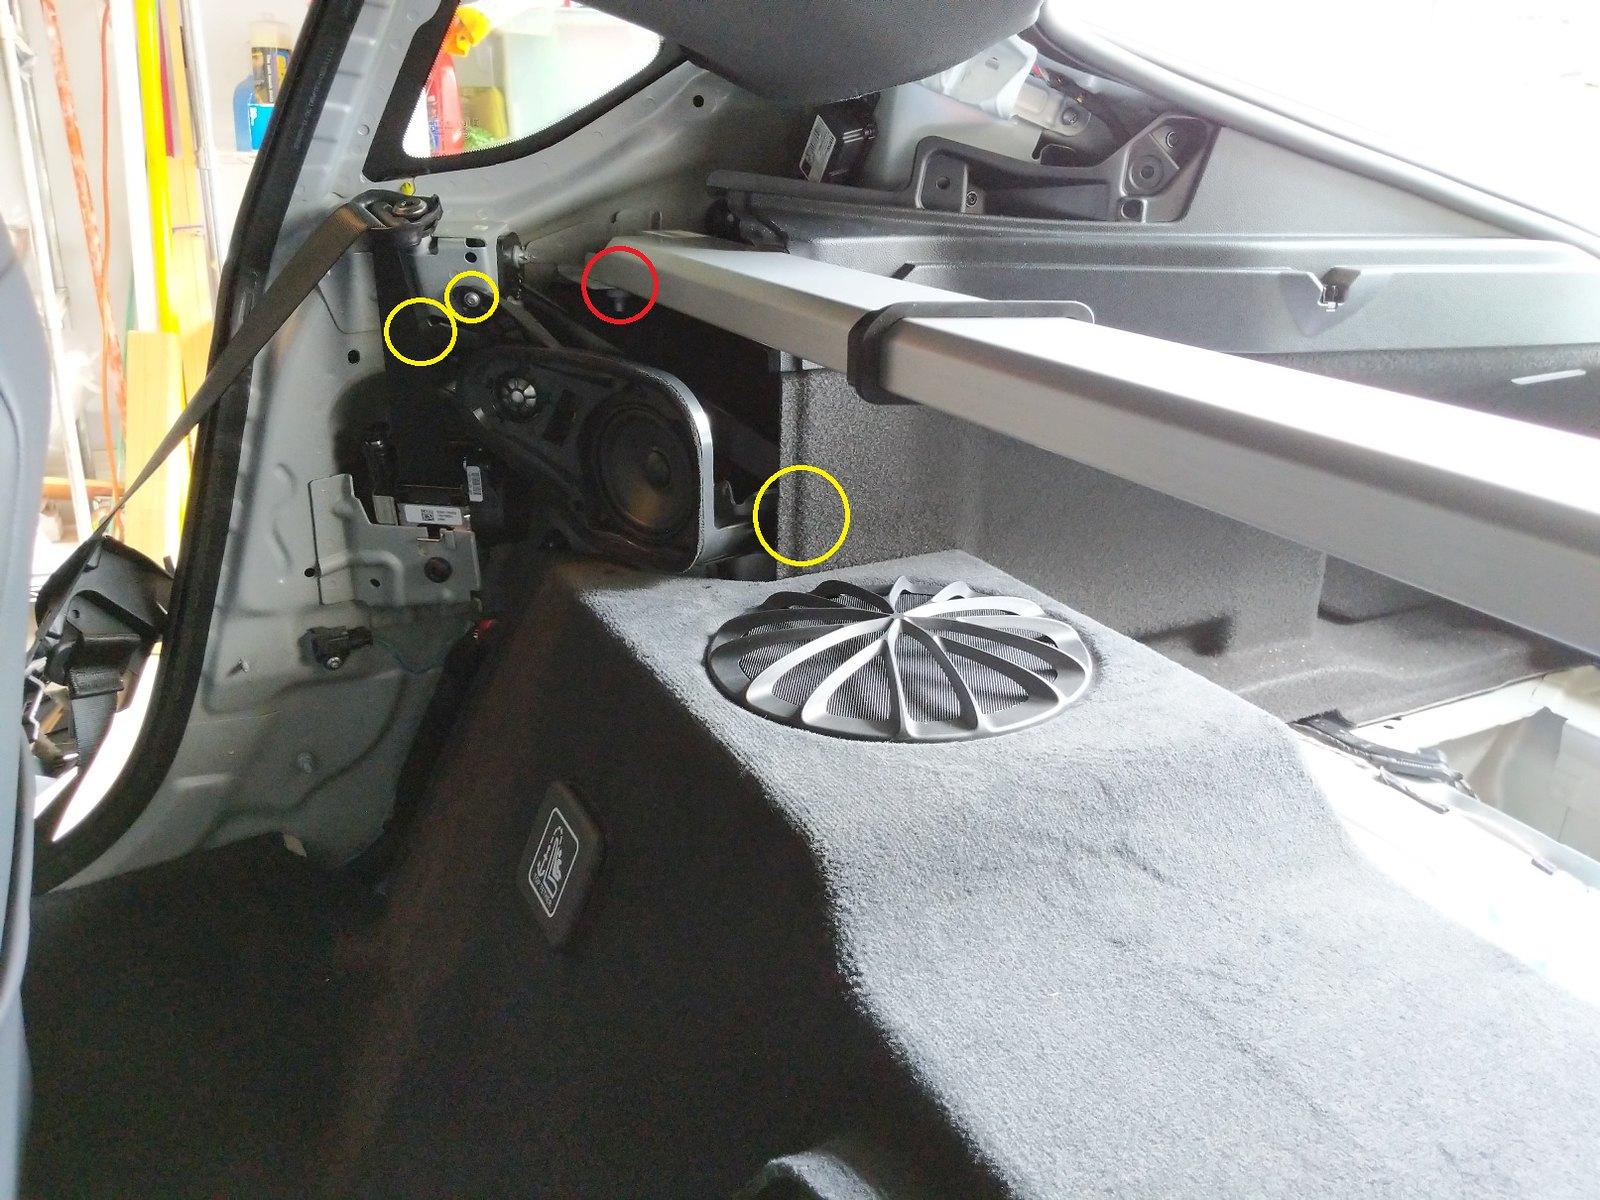
You now have access to the rear tower speakers. The are held in the by three T-20 screws (yellow circles). You can unplug the speaker (yellow arrow) by pulling straight out. You do not need to disconnect the other wire.
- BTW, the speakers are Harman Kardon. The door speaker grill is stamped JBL and the sound system is advertised as JBL but all of the rear speakers are HK. However, both JBL and Harman Kardon are owned by Harman International which is owned by Samsung.
-----------------------------------
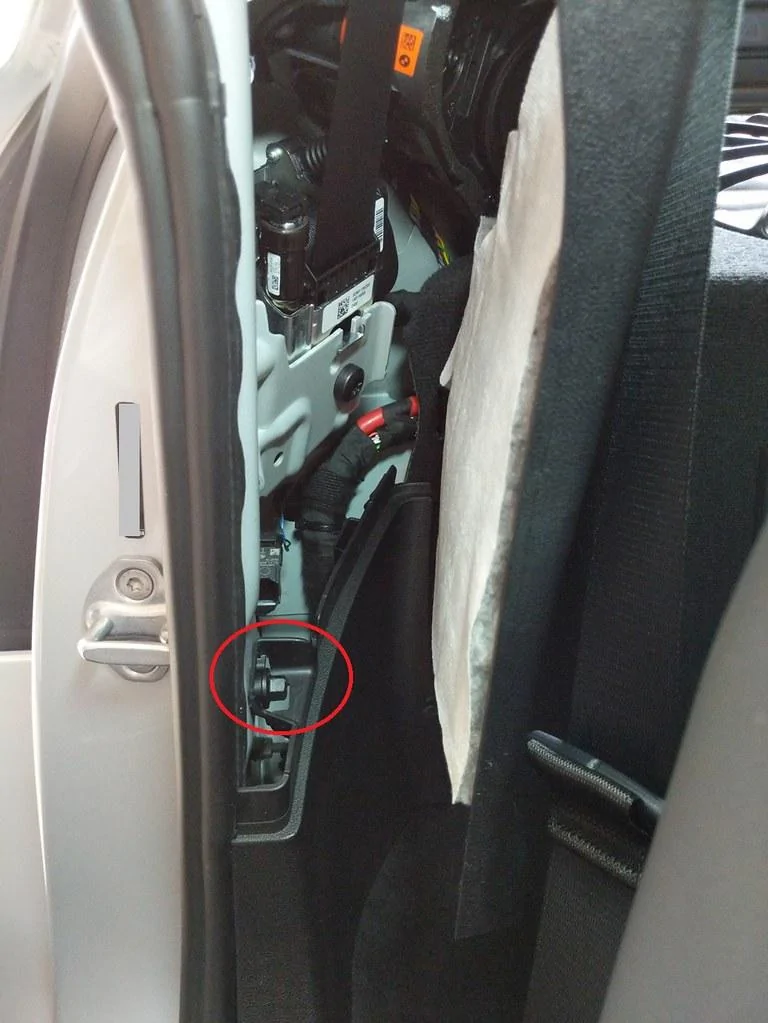
Piece -6-
This has a 10mm plastic nut (red circle) that will need to be removed. You will also need to remove one white plastic clip from the door sill area (green circle). There are also three right angle clips (yellow circles) that attach it to the baffle board. To remove you will need to pull up about an inch and then out towards the front of the car.

--------------------------------
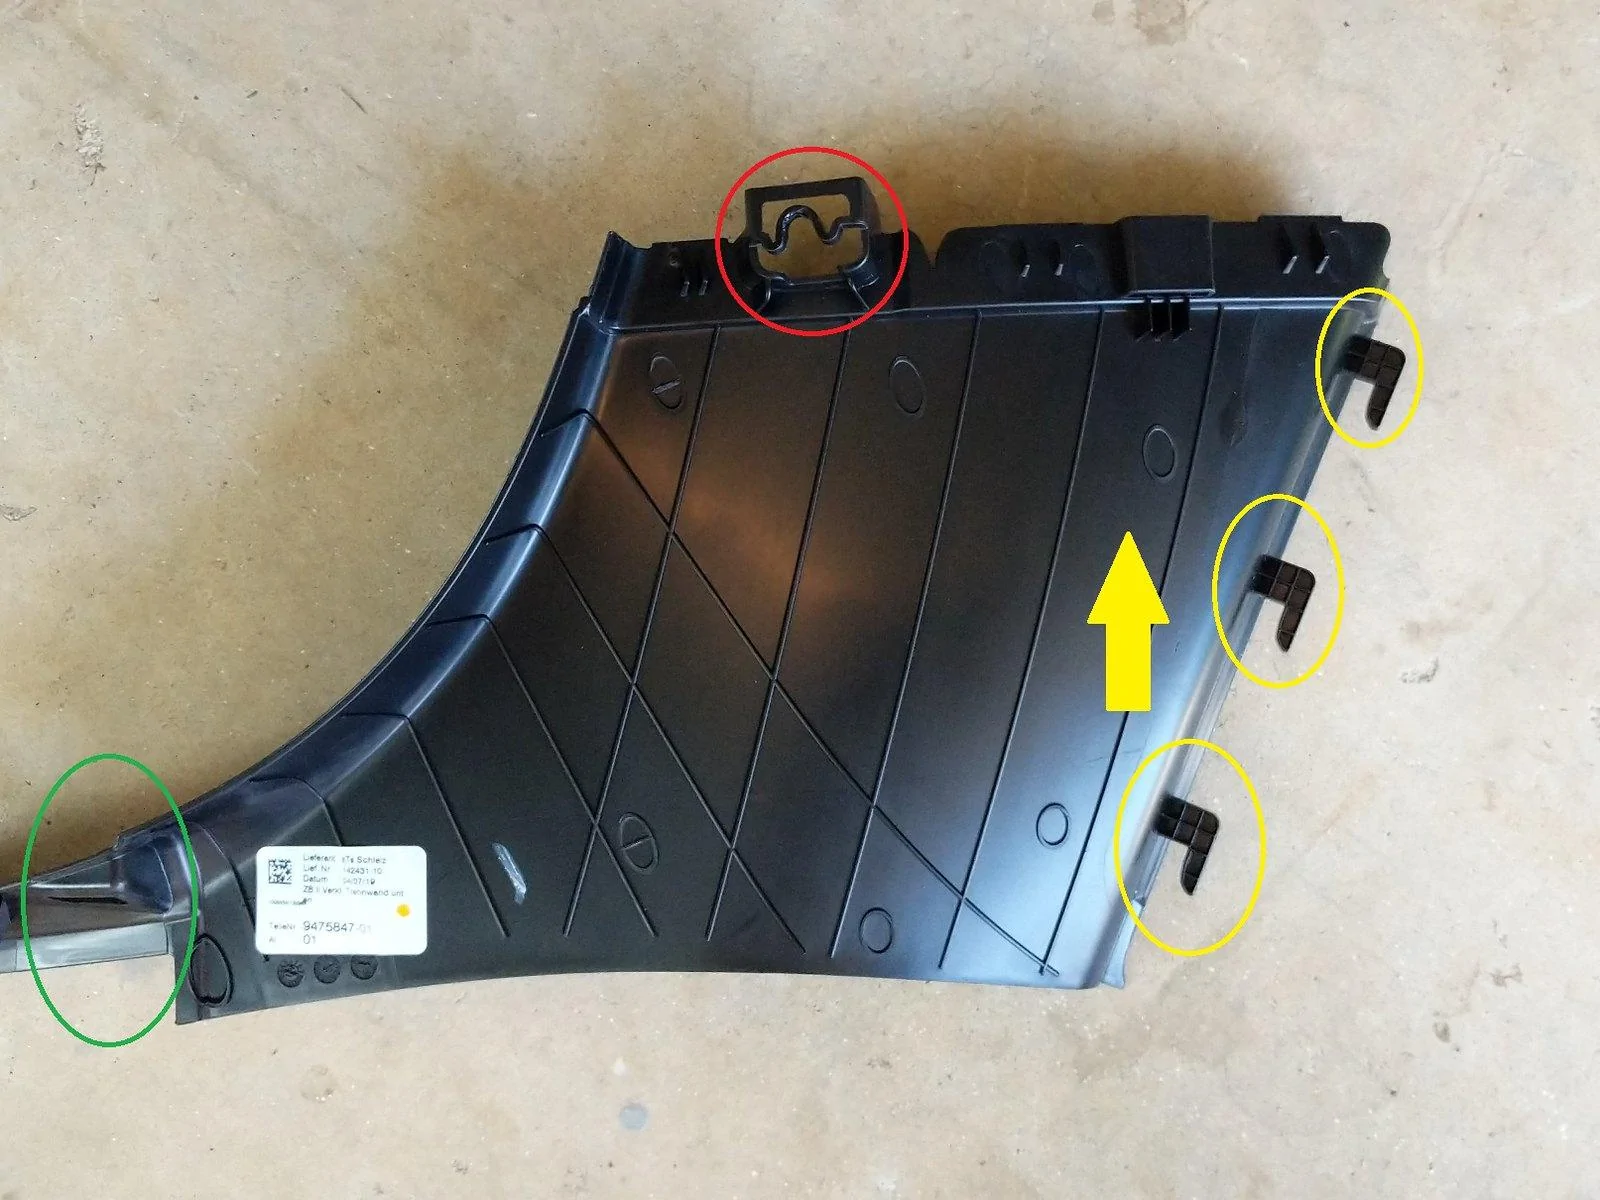
Piece -7- Subwoofer Baffle
I tried prying at the very bottom section below the baby seat attachment. I ended up snapping a clip as I found out that the clips actually slide down to lock in place instead of pulling out towards the front of the car. The sliding locks are similar to sliding a gun into a holster.
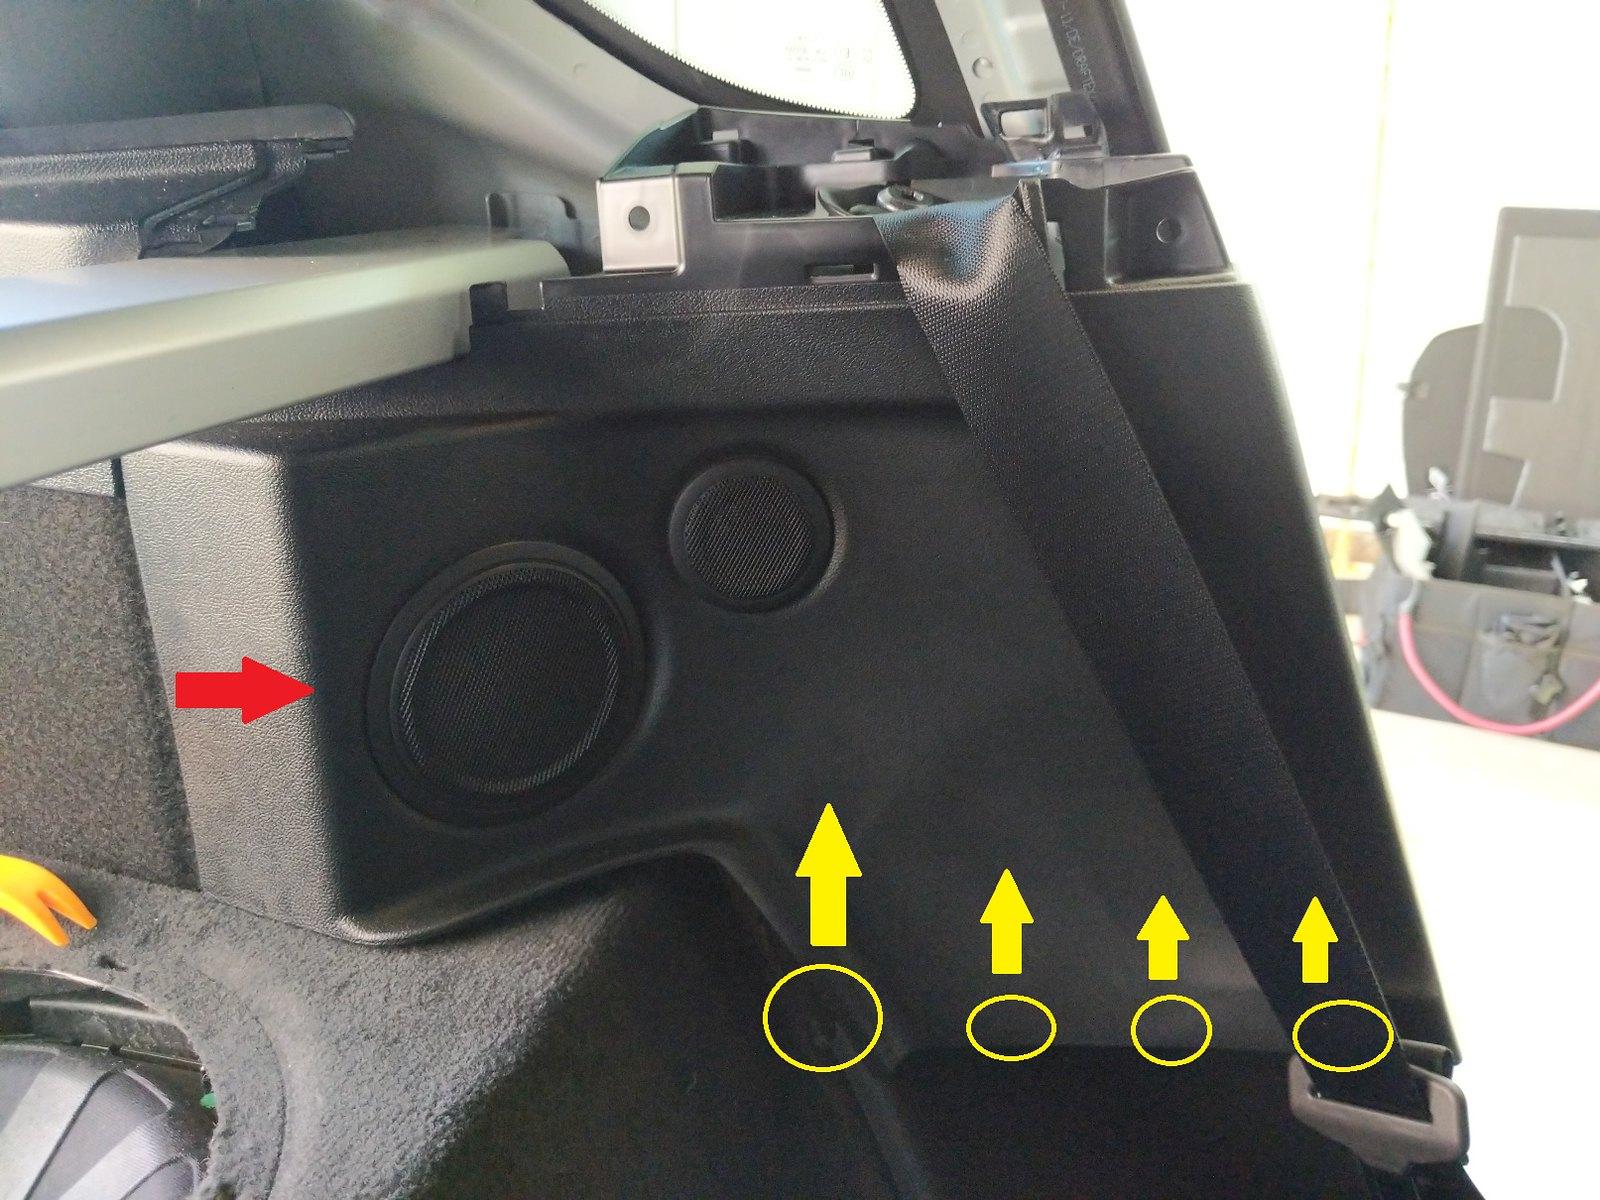
First step was to pry straight up on the flat deck around the subwoofer grills. There are several clips (yellow arrows) that will pop right off if you pull straight up towards the roof.
Next step was to slide the entire baffle straight up towards the roof. Do not pull towards the front of the car. The entire baffle will slide up towards the transverse bar (red arrow). When you slide the baffle back down the clips will slide into the locks.
If you look by the center console, you will see that the baffle also slides straight up in this area too (green arrow).
------------------------------------
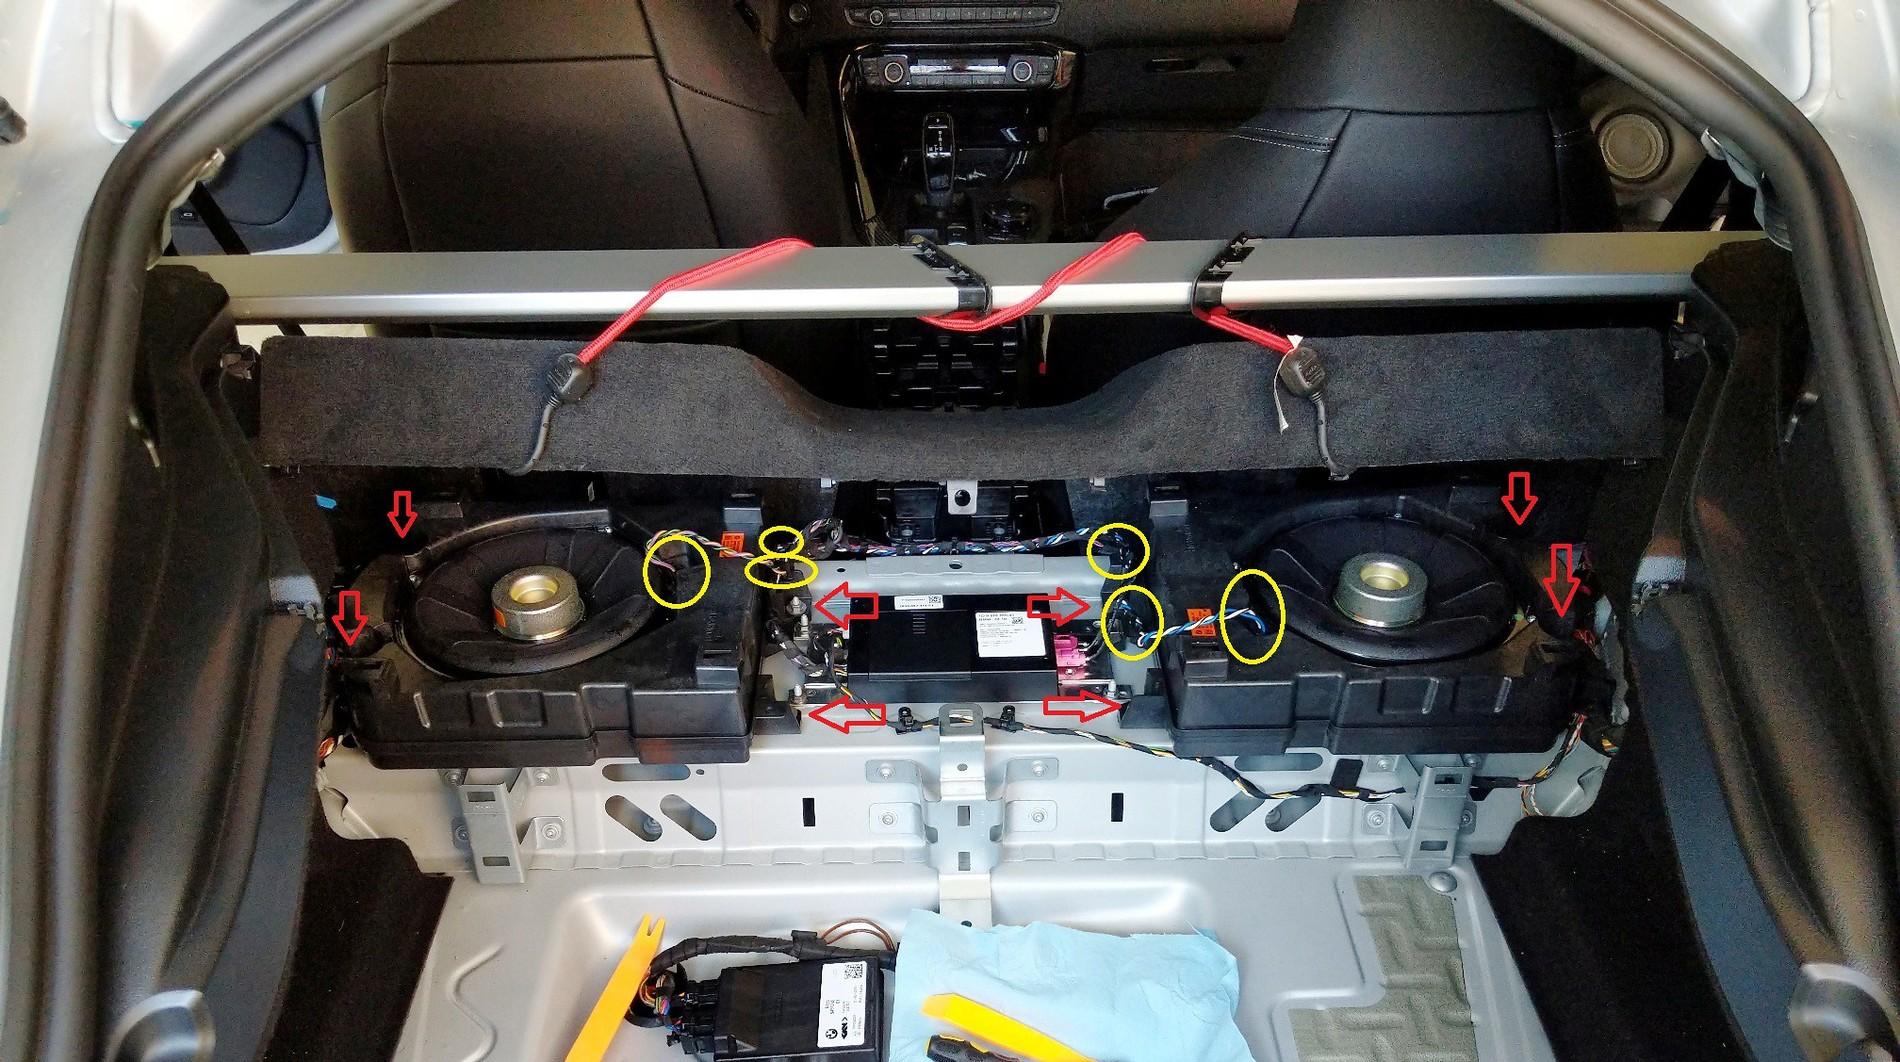
Sub Removal
I did not remove the entire baffle, I simply slid it high enough to give me access to the subs. I used a bungie cord to hold it up while I worked on the subs.
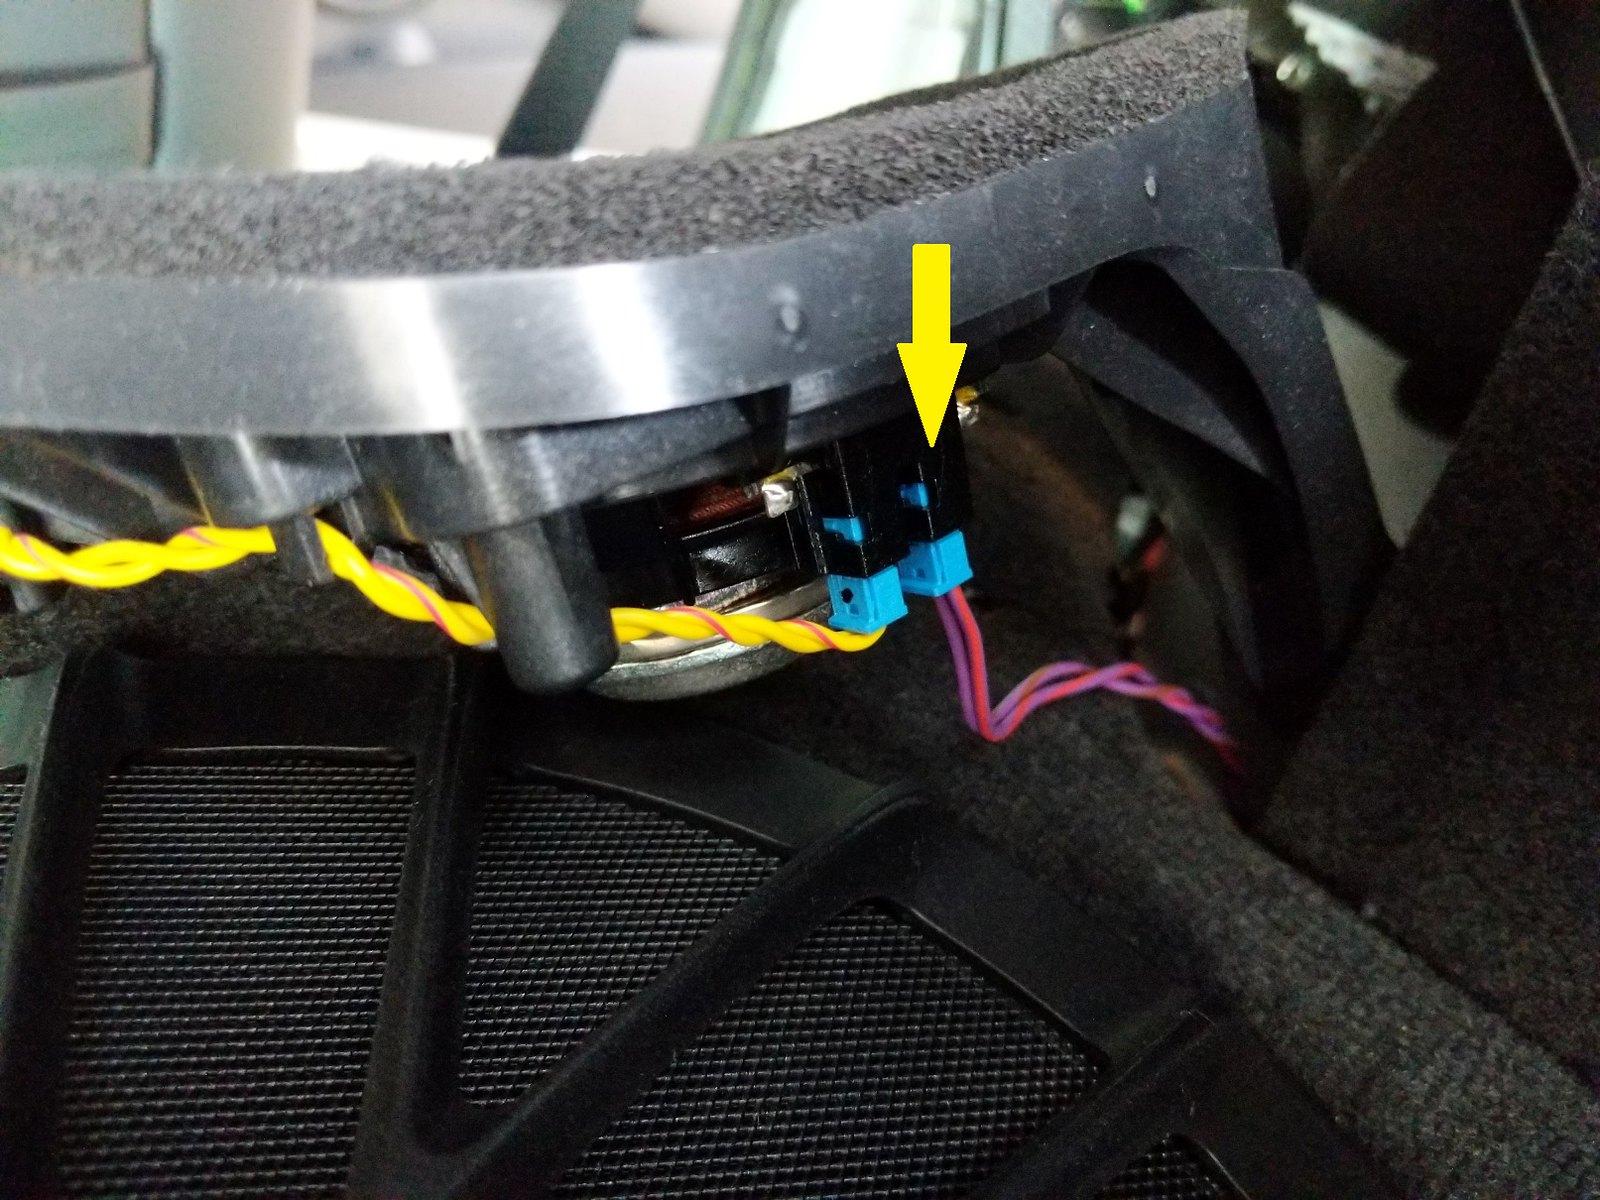
First you need to unplug the speaker connection (yellow circle). Then there are two clips (yellow circles) holding the speaker wire down that will need to be pried off too.
Now you can unbolt the four nuts (red arrows) that lock the subwoofer in place. They are located on all four corners. At this point you are done with the sub removal.

Quoting the whole op not needed. Also what box are you referring too? Sub box no, AMP yes (silent codes).I was curious if any codes will get thrown if u pull out the old box and replace it with a new after market one?
I’m referring to a custom sub box, we’re making a custom box this weekend and removing the old subs and disconnecting the amp and connecting a single 12” with an after market amp. Also sorry what’s a silent code?Quoting the whole op not needed. Also what box are you referring too? Sub box no, AMP yes (silent codes).
sorry for quoting the whole thing, new to using this site.Quoting the whole op not needed. Also what box are you referring too? Sub box no, AMP yes (silent codes).