Rocksandblues
Well-Known Member
Same design. It’s just kinda meh
Not a big deal to me. Definitely not even in the top 30 reasons to buy or not buy.
Not a big deal to me. Definitely not even in the top 30 reasons to buy or not buy.
Sponsored
Finished thank you to the op who created this brilliant idea. I tried your settings for equalizer, however, bass seems overpowering. Or how do I say the frequency of bass likes to hit and hit hard. Is there changes between 2020 and 2021? Maybe I have to turn off the Active Sound Design.

Try this track called Seventh wonder by Tonny Nesse it's orchestral trance with some sweet drops in it, and btw thanks for the effort of putting this DIY guide together, can't wait to crack on with it.My musical tastes are very broad from rock, pop, EDM, alternative, classic, jazz etc.....that said, the Techno and EDM tracks really tests the subs limits and is what I enjoy listening to the most....
This latest album (below) I've been using to setup and test the sound system and particularly the subwoofers has allowed me to isolate all the vibrations, distortions, and rattles....I spent nearly 2 hrs in my Supra yesterday enjoying the entire album at 2/3 max volume and it sounded amazing...And damn the bass is tight and deep now....
Ethereal Techno #008 - favorite tracks are 1,3,5,6,9,19,20
As I've mentioned a few times already, to my surprise and delight the HK Subs are actually very good once you remove all the other physical design warts in the system! Lining the sub enclosure walls with speaker wadding and adding the exhaust port made a huge difference in overall sound quality...The rattles and vibrations also contributed quite a bit to poor sound quality which are gone now...
Next up are the doors and yes I'll definitely keep you posted and please do the same....
I spent a fair amount of time over the past few weeks thinking about how to improve the Supra's subwoofers, which we all know by now, were not designed properly and as a result have issues when it comes to both vibrational noise and lower bass quality...What I discovered after implementing the improvements outlined below is that surprisingly, the OE Harmon Kardon 8" Subwoofers in the Supra are actually very good speakers once you correct some very basic design issues that were overlooked by Toyota...
---------------------------------------------------------------
To start with, some incremental improvements to bass response can be made by first removing the Active Sound Design (faux engine / exhaust noise) which is electrically overlayed onto the audio channels when sport mode is selected ...I found that the ASD feature actually "muddies" the bass and audio response and increases distortion and noise...
In addition, many of us have played with EQ settings in an attempt to optimize sound quality but the OE system still fell somewhat short...I also found that selecting the "Surround" enhancement feature added to the phase distortion which resulted in reduced sound clarity...This is one of the first things I turned off and the system clarity was noticeably improved...Also note that "Speed Volume" is turned all the way down as this will change the EQ curve as speed increases resulting in an undesirable response at hwy speeds...
Here are my current audio settings:
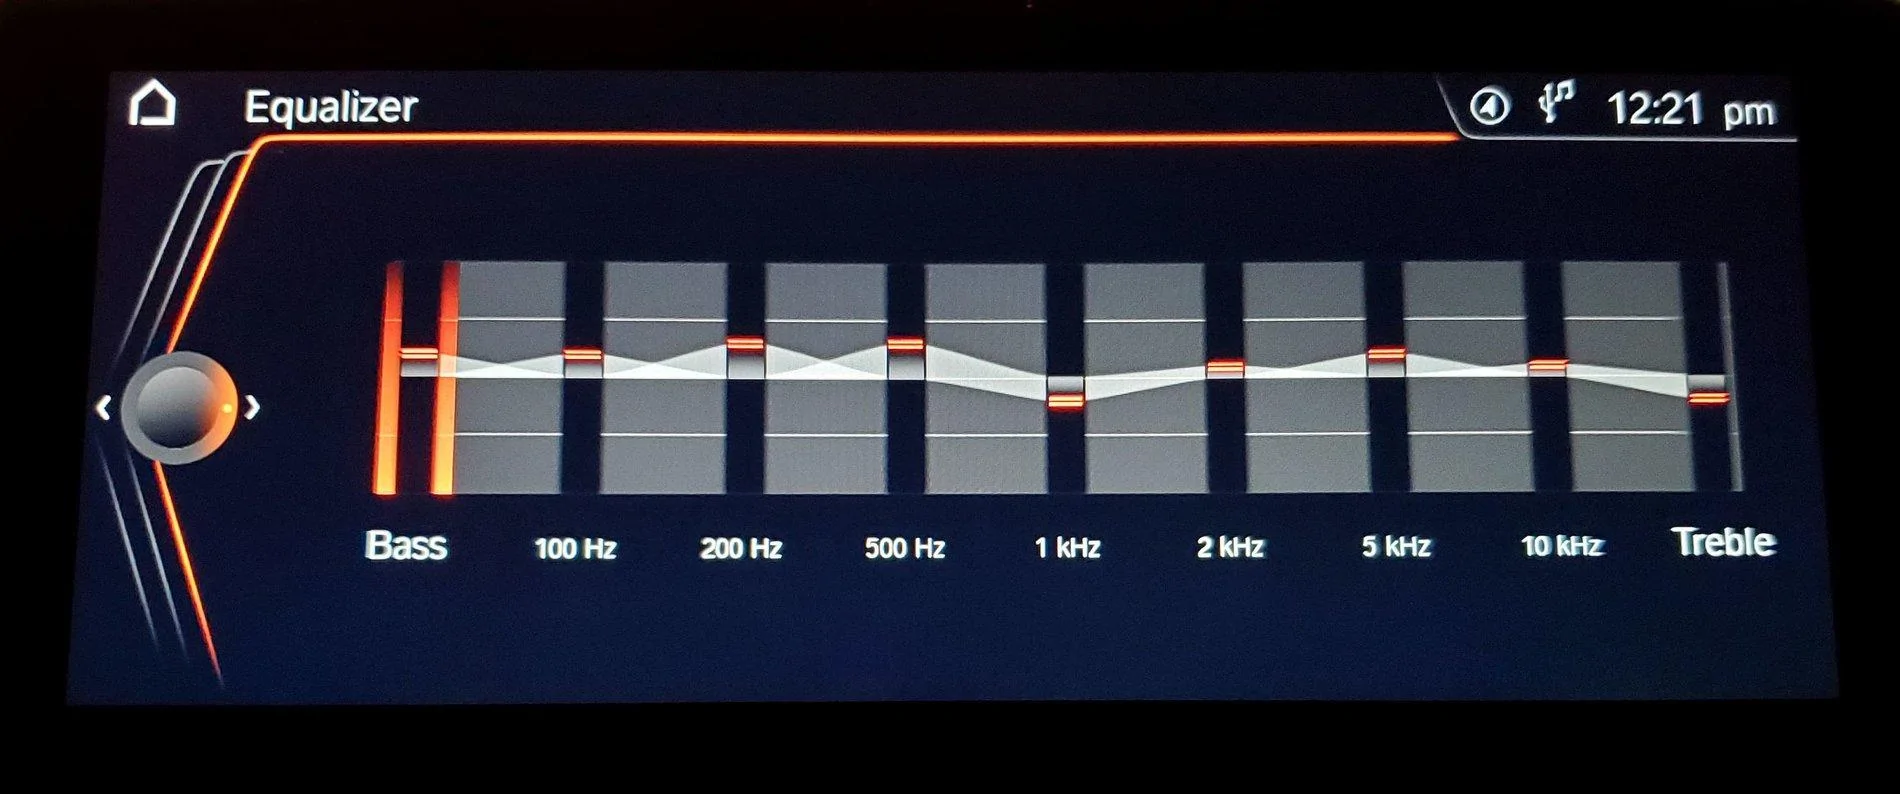
These are my new EQ settings (below) after improvements made to current OE Subwoofer system...I can now raise the volume to 2/3 of max with no low bass distortions or vibrational noise...
- ASD / Active Sound Design (off - using Bimmercode)
- Surround (off)
- Speed Volume (0)
- Balance: (0)
- Fade: (front +2)
- Broad Bass (+2)
- Broad Treble (-2)
- Equalizer (shown below)
How to Setup and Optimize Sound Quality using OE Equalizer

=============================
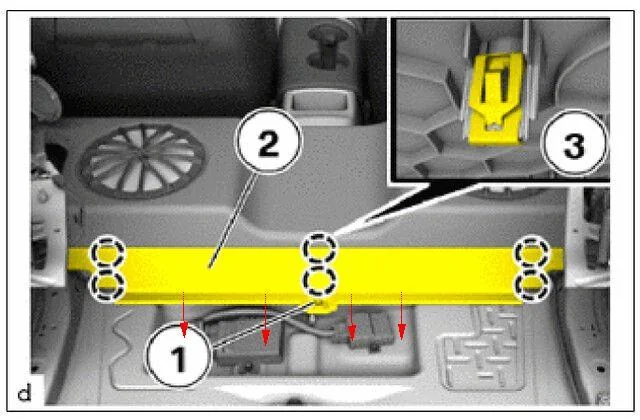
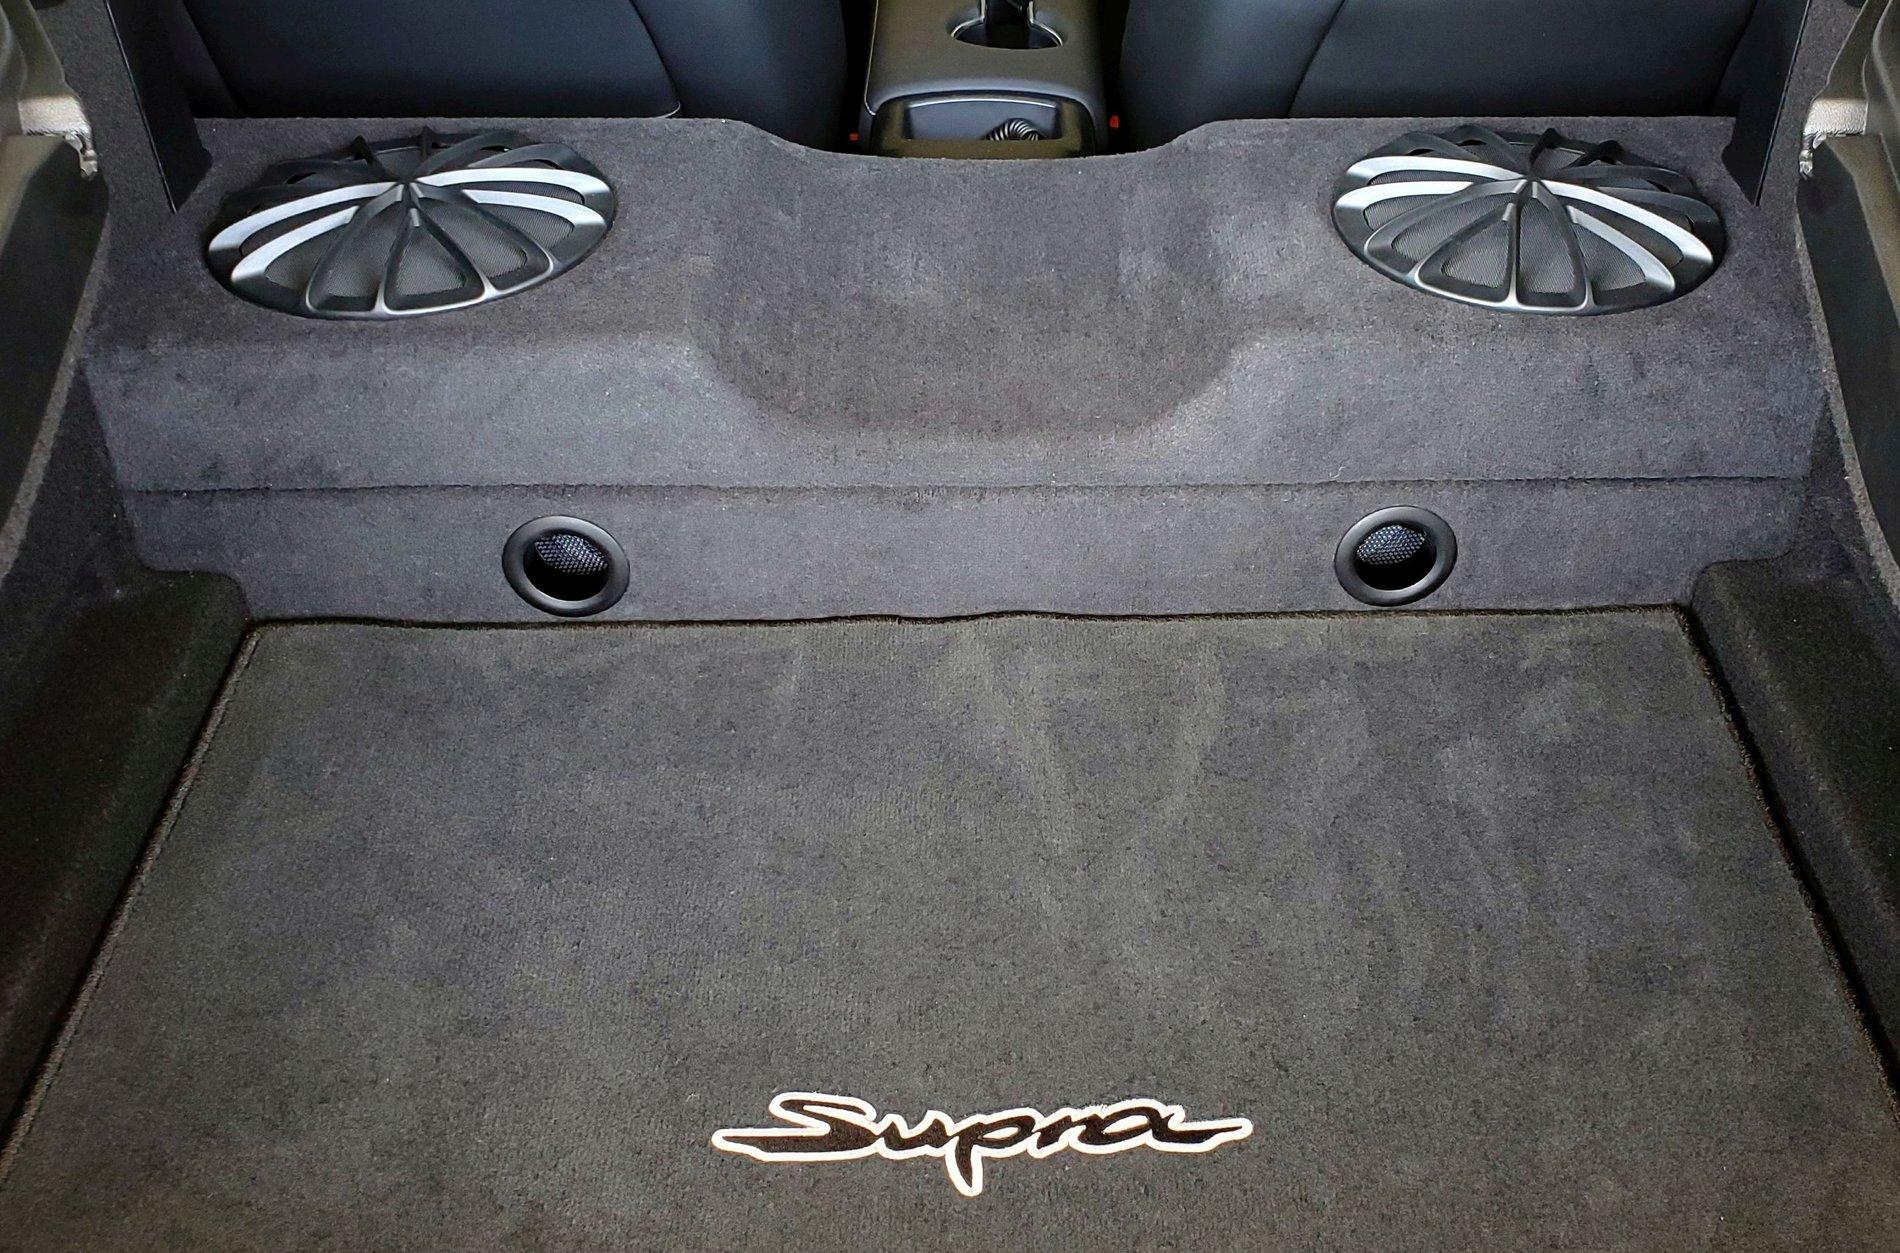
Now with respect to the OE subwoofer enclosure itself what I outline below is where most of the major improvements to bass response and elimination of vibrations were made... I've identified a few notable areas for improvement after observing a few pics posted of the cargo area stripped down and began to get to work...It should be noted that the only panel that needs to be removed in order to make the following changes is the narrow rear subwoofer panel (shown below)...

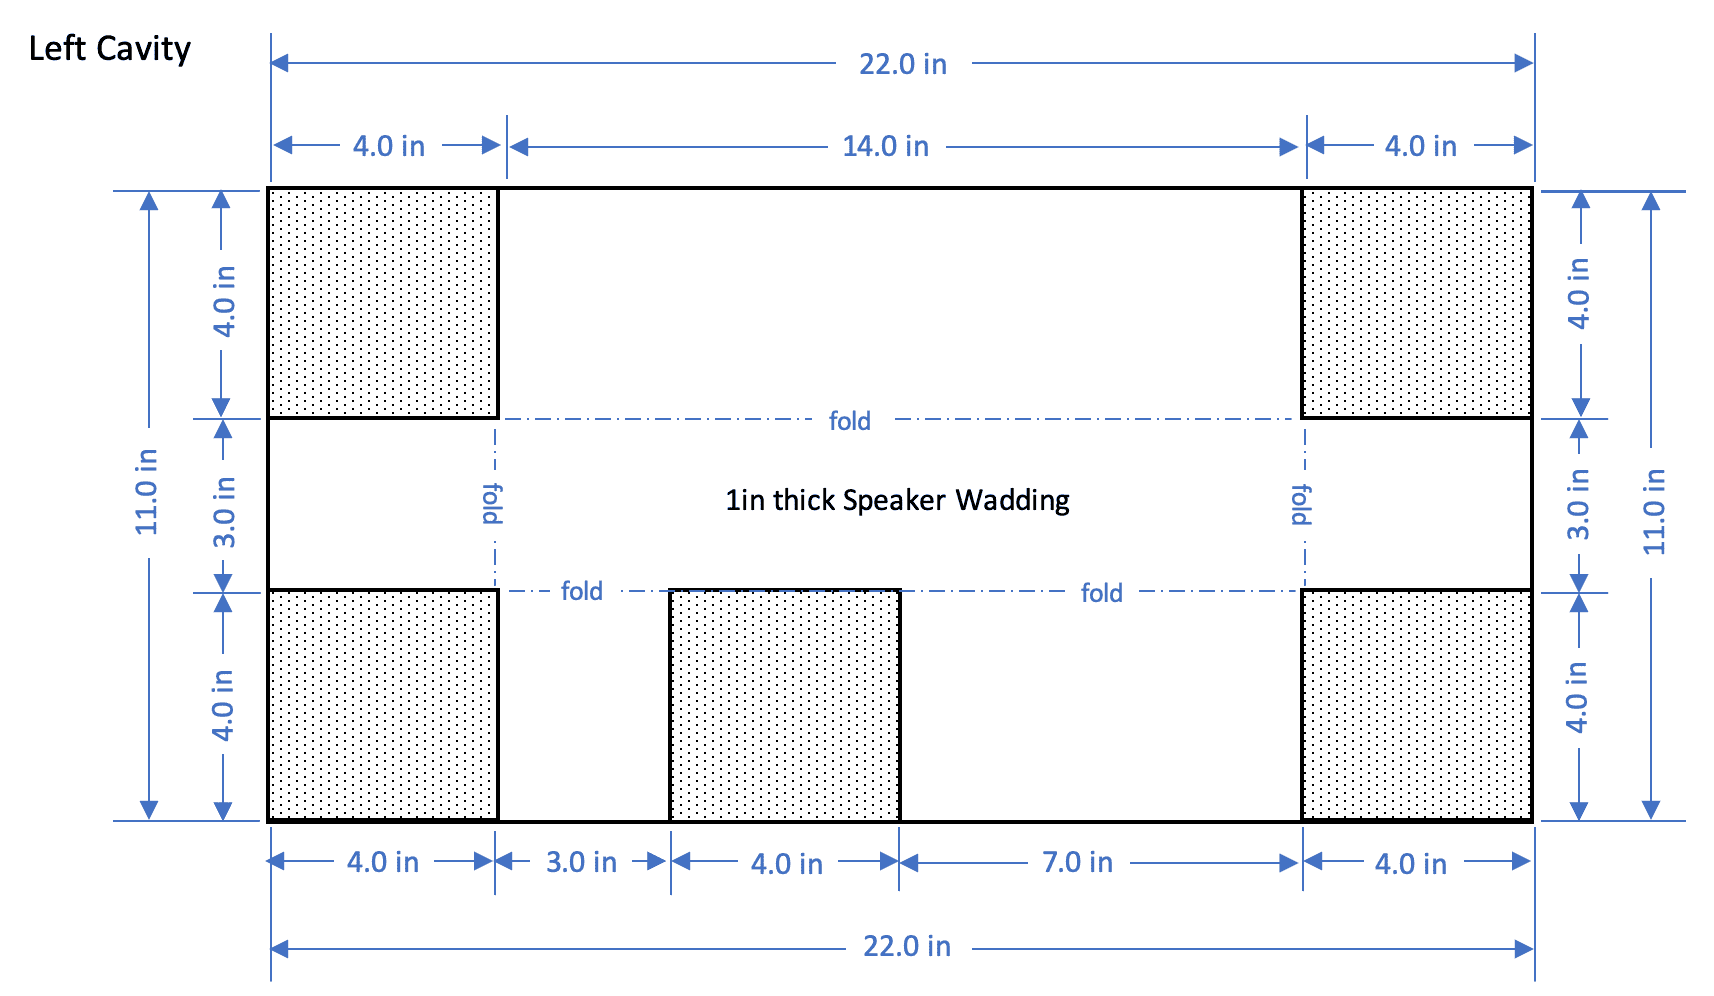
First, lining the walls of both metal sub enclosures (which are indeed separated) with 1" speaker wadding improved lower bass response and bass quality by reducing distortions created by destructive waves within the metal enclosure..The wadding also serves to increase it's "effective" volume...
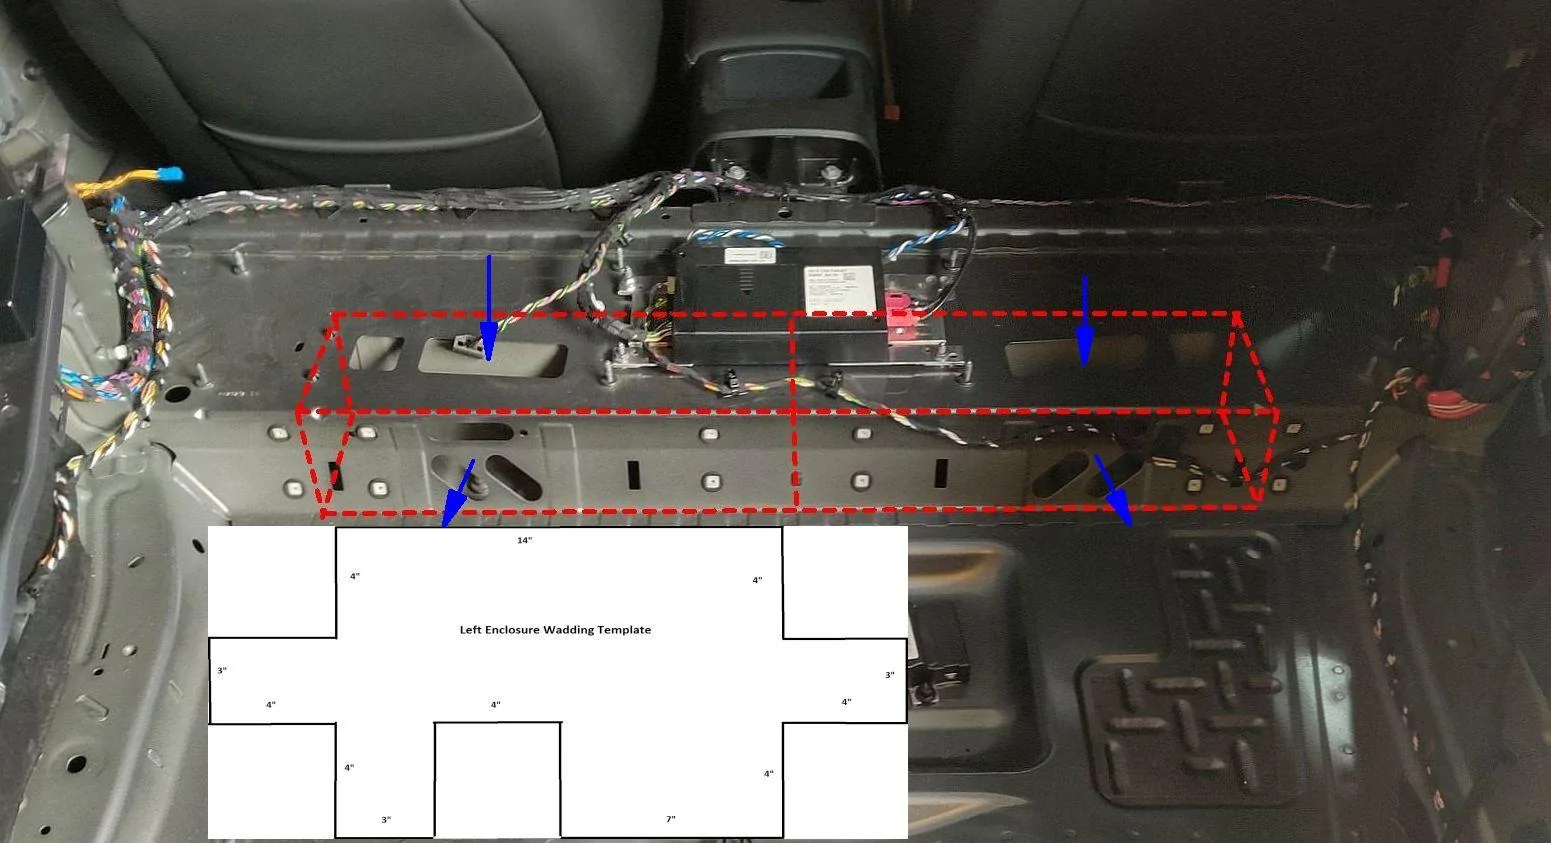
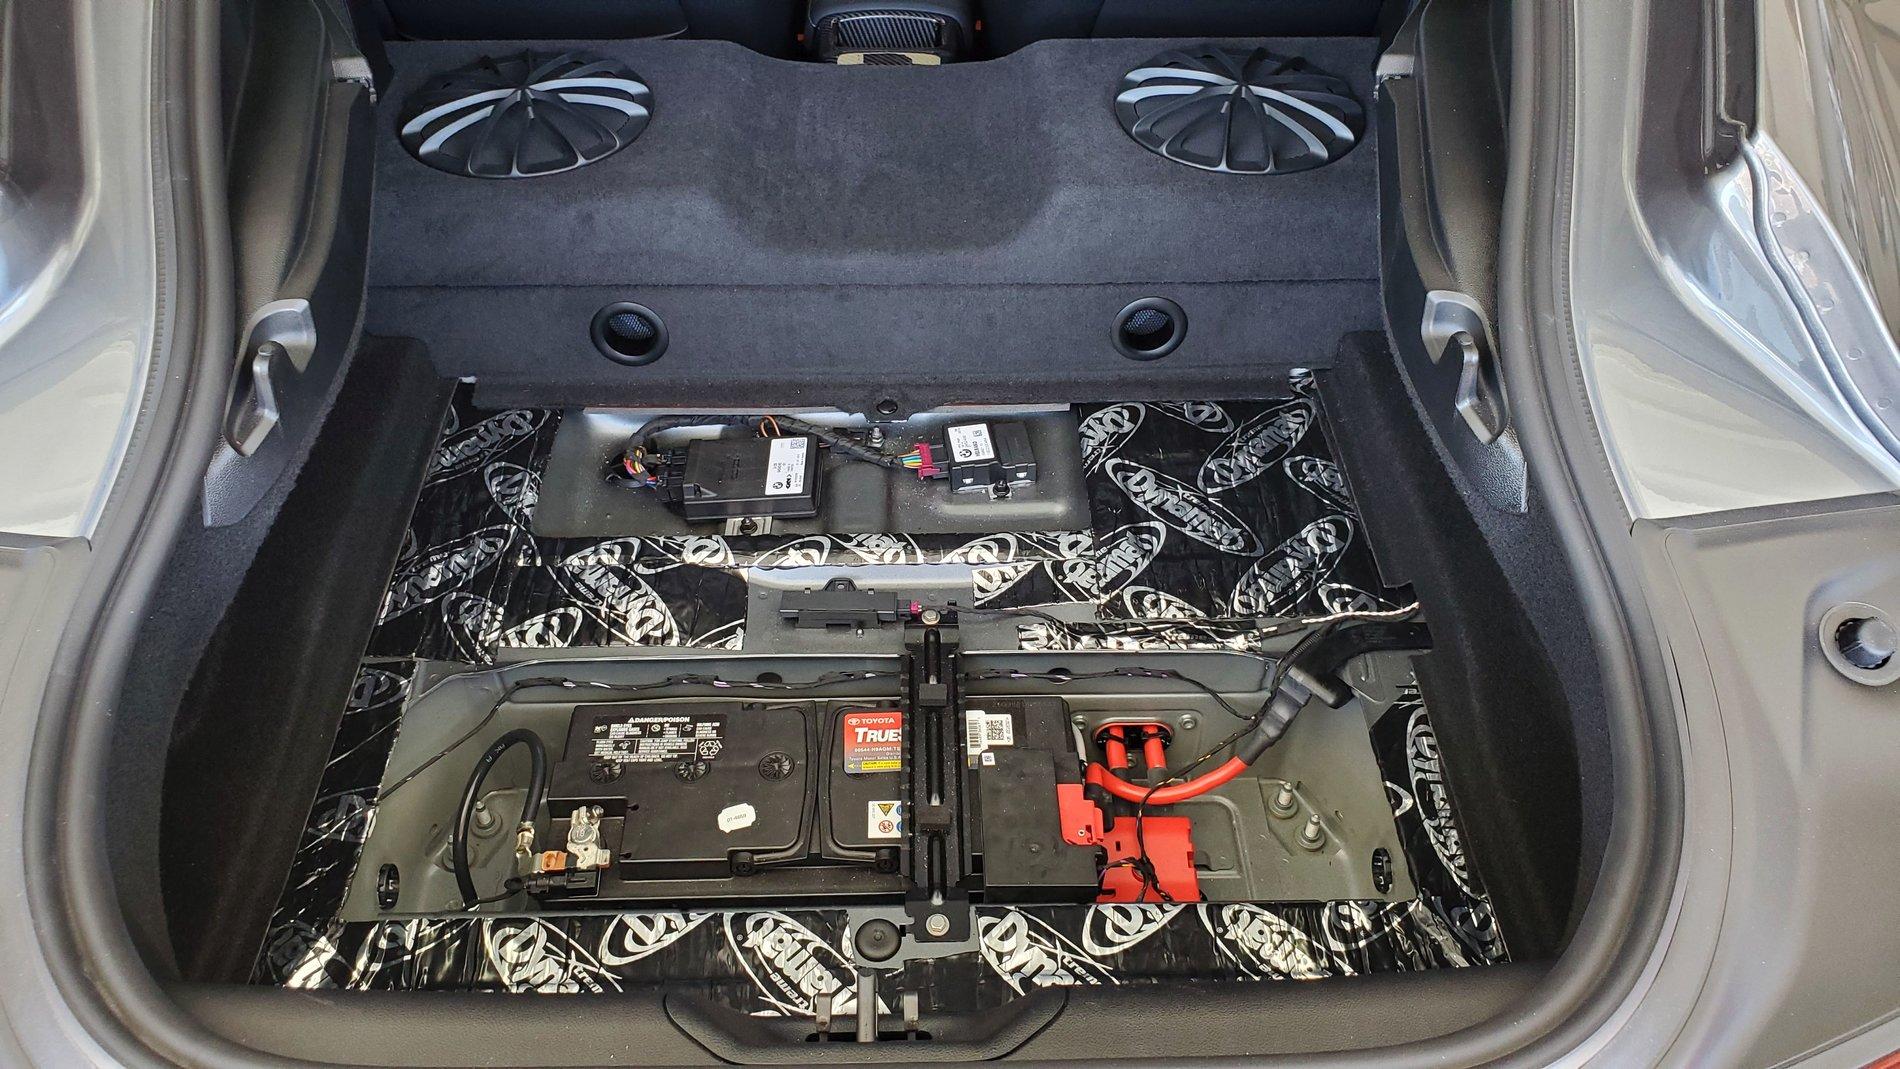
Pic below is posted just to show what enclosure looks like totally exposed....Again, the only panel you need to remove to line the walls with wadding is the narrow rear panel

Enclosure Lining / Wadding Template: I was actually able to roll up the speaker batting cut from a template (shown below) and slip it through one of the elongated exhaust ports and then use a long screw driver to manipulate the cut batting to line the walls of the metal enclosure shown below:


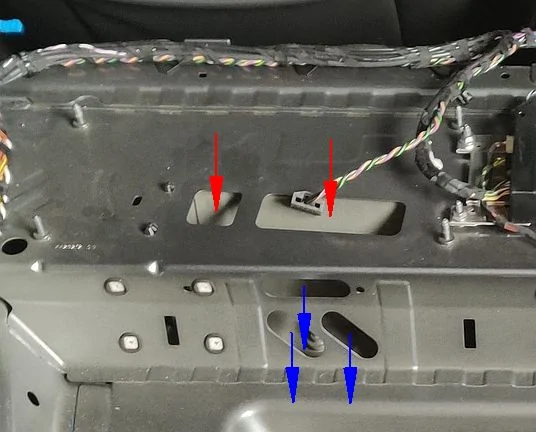
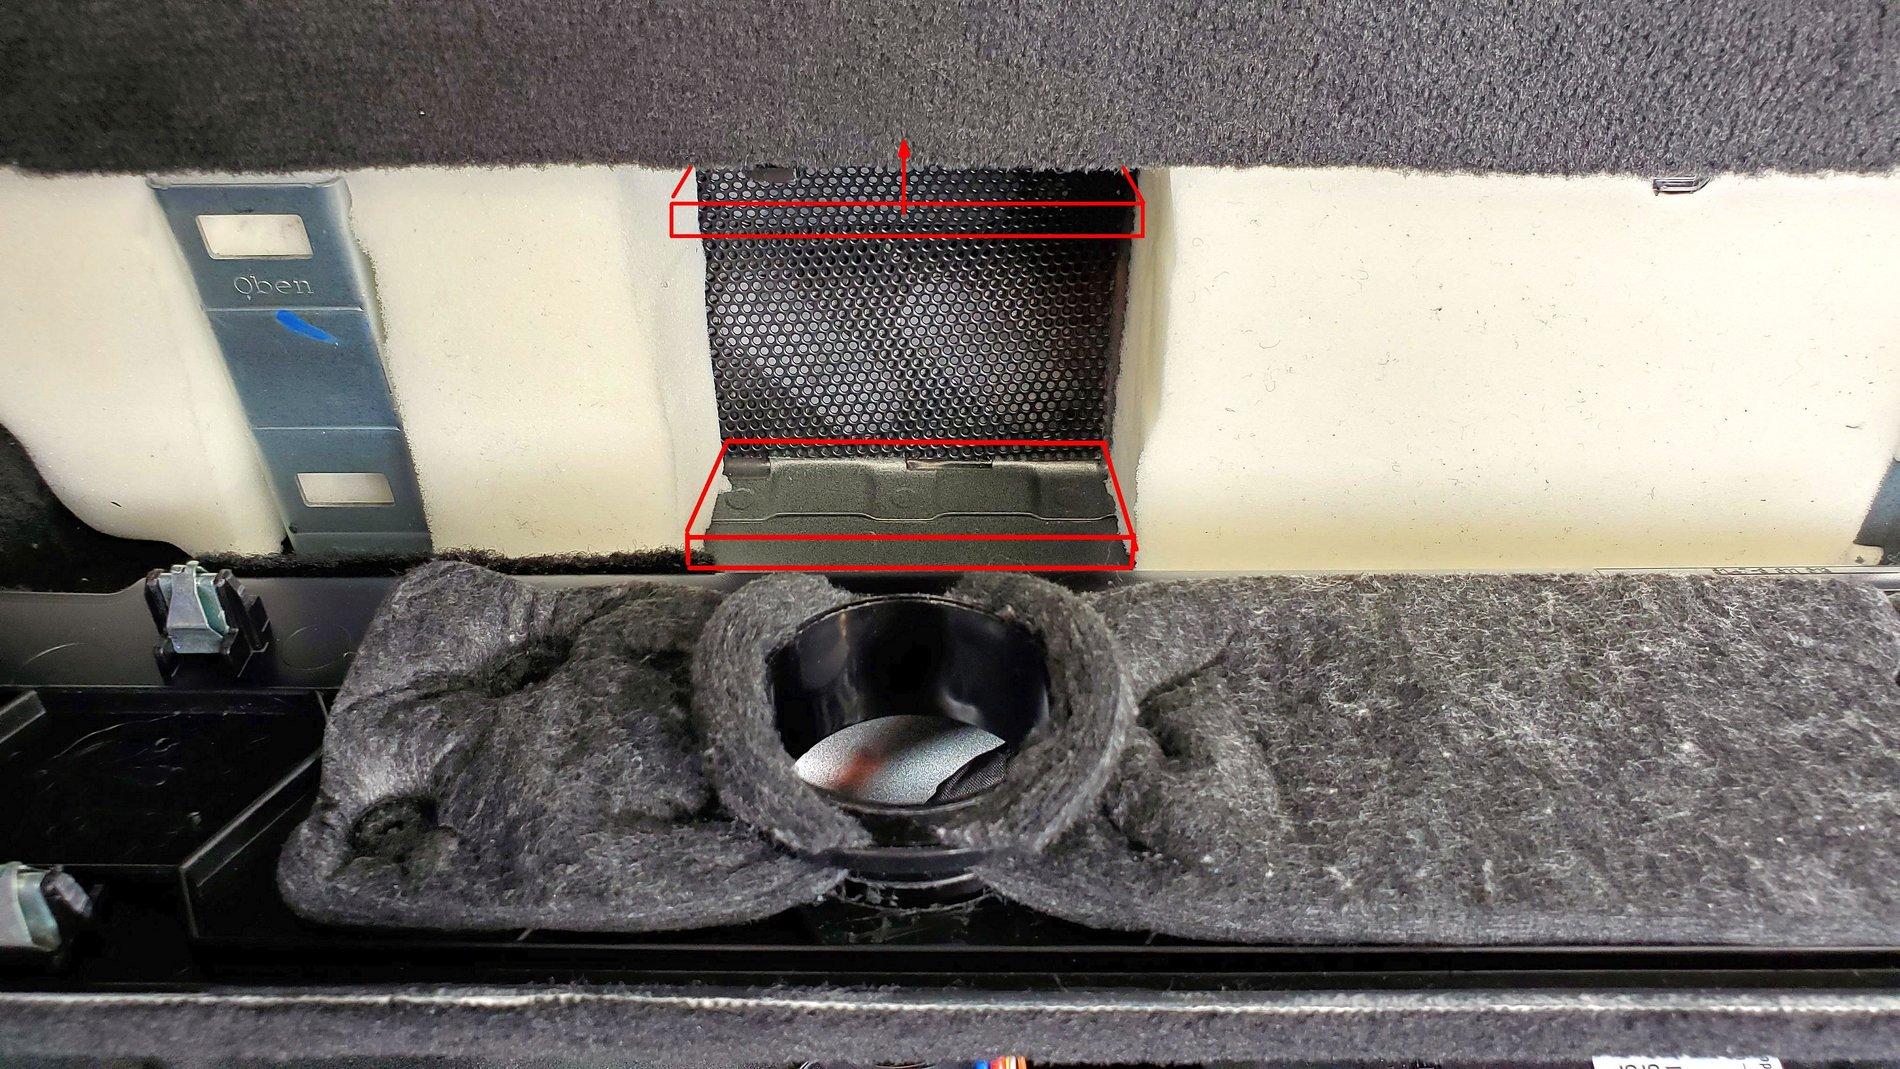
Secondly, and most importantly is that the majority of the lower bass vibrational noise and bass distortion is actually caused by the narrow rear cover panel blocking the subwoofer exhaust energy...The solution here was to 1) Insulate the area within the narrow rear panel with 2" foam leaving the exhaust port open and 2) Adding 2" exhaust ports to the narrow rear panel...

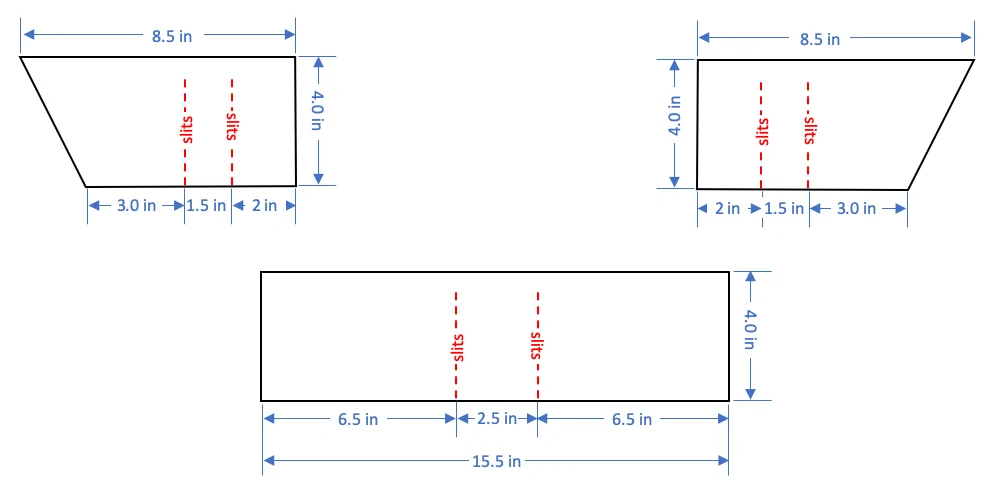
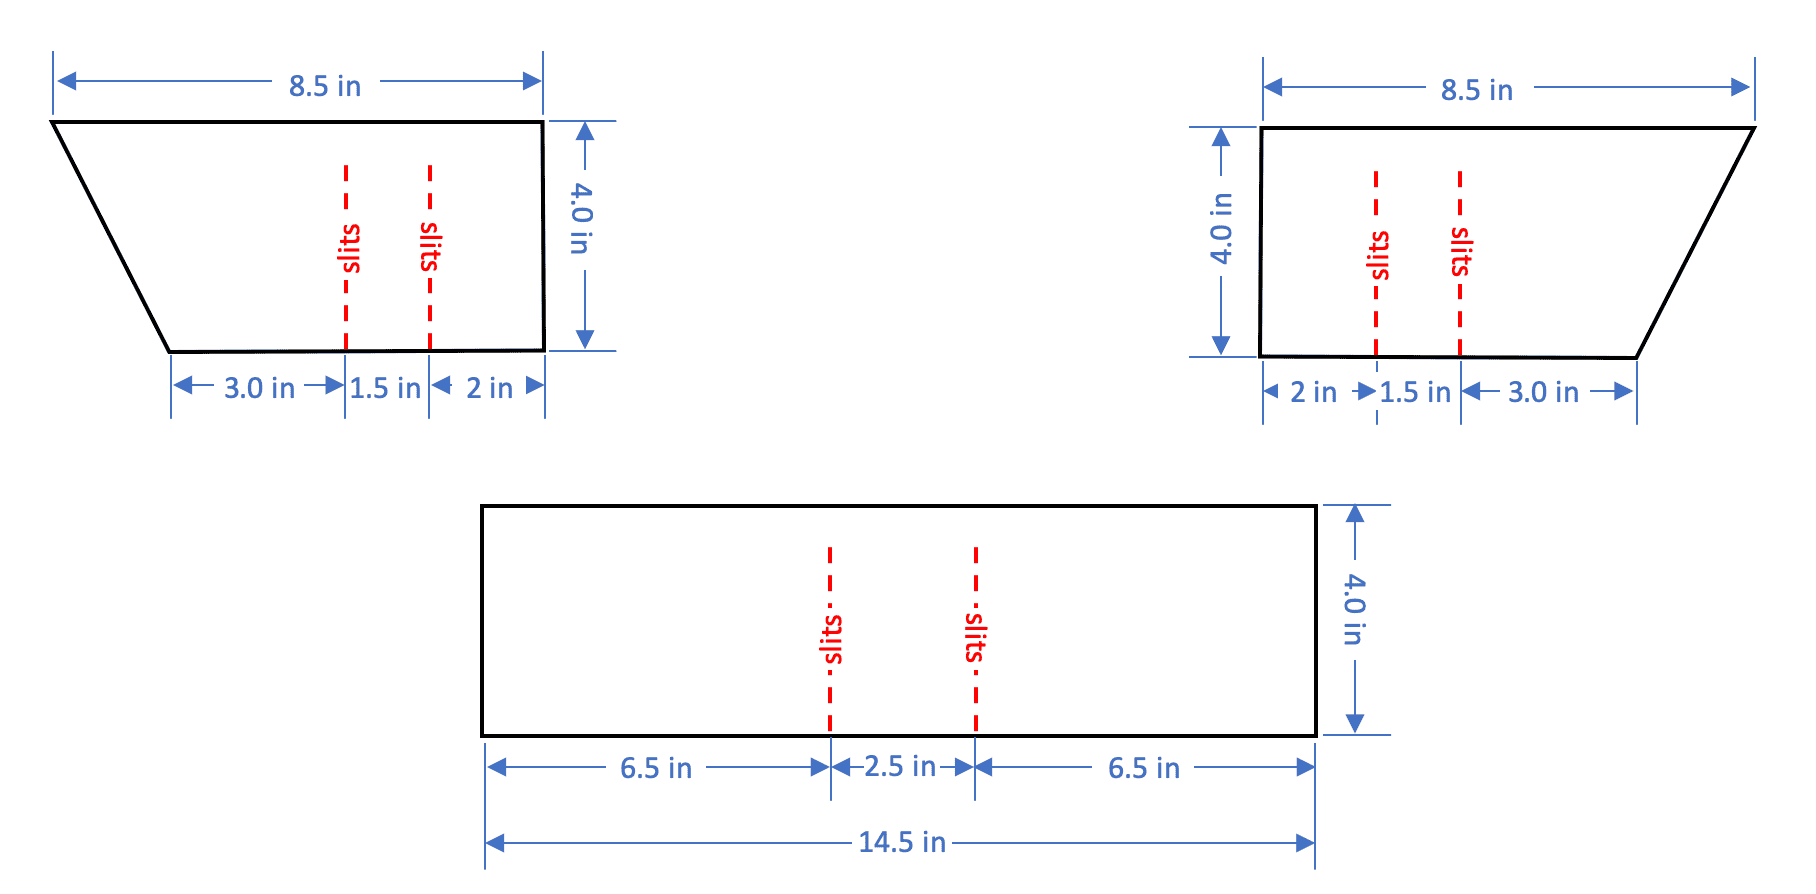
Foam Cutout Dimensions (below):
Note: I didn't need to remove the narrow rear panel mounting brackets...I actually used a 4"h length of 2" foam and cut slits into the foam such that the foam could be worked in from the top behind each of the brackets...


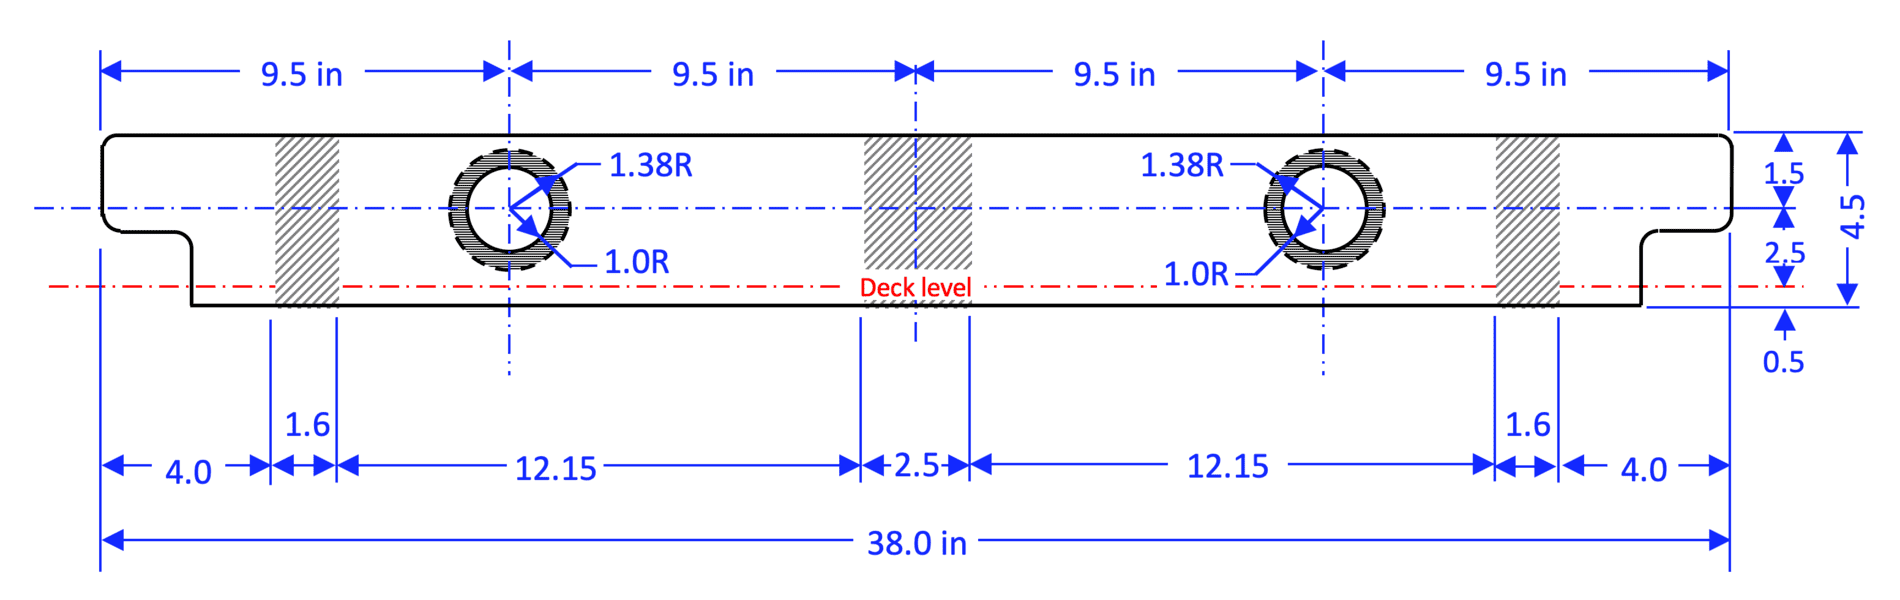
Installing Rear Panel Exhaust Ports...
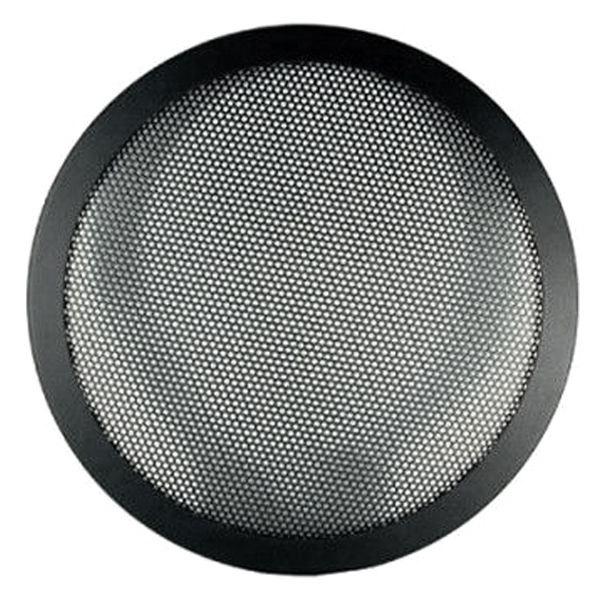
I also placed black metal speaker mesh (4" x 4") over the three elongated holes and secured in place with 3m tape...
- Cover the front carpeted area of narrow rear panel to be cut with blue tape and mark a 2" diameter circle
- Use either a 2" hole saw or a dremel tool with disk to cut out the marked circle
- Use a small dremel grinding drum to finish the edges of the port hole
- Cut the black OE panel insulation in the the center of hole and fold back on either side
- Insert 2" exhaust port
- Use tie wrap to hold thin black OE panel insulation along side walls of exhaust port
- Secure port to rear panel with drops of epoxy or superglue at edges touching rear panel and port walls


I've also identified another area that needed to be addressed...I discovered this after implementing all these other improvements, thus allowing me to significantly increase volume along with raising bass EQ settings...What I found was that there was some exhaust port energy escaping from under the long narrow rear panel (which as I show in a few pics below) causing the rear floor panel to vibrate...Keep in mind that this is yet another design problem which causes the floor panel to vibrate where in-turn this vibrational energy is transferred to the cargo areas' side and back panels causing them to vibrate as well...
The solution here was to apply some adhesive back foam to the areas show below which eliminated any energy transfer under the rear cargo floor panel...
Shown below, I first applied 1.5"d x 4" L x 0.25" h adhesive backed foam strips above and below both exhaust ports to isolate them further from the top cover and floor....
Next, the image below shows where some exhaust energy from the 3 elongated ports was also being released under the large rear floor panel causing it to vibrate greatly...With the floor panel removed simply place your hand under the narrow panel and you'll see / feel the exposed gap ...
Shown below are the locations where 2 adhesive back foam strips were applied to underside of exposed narrow rear panel ...The left adhesive backed foam strip was 1.5"D x 11" L x 0.25" H and the right foam strip is 1.5"D x 6" L x 0.25" H...This essentially sealed off the gap where the exhaust energy was also being channeled...
As a result the large rear floor panel vibration has pretty much been eliminated and side and rear trunk panels no longer vibrate during low bass / high volume music passages....
As far as materials, I used Noico RED 315 mil Sound Insulation , which I already had available for beginning my next project of eliminating front door speaker vibrations ....
Here is yet another area that required attention for eliminating subwoofer grill rattle / vibrations...I did this awhile ago and thought it might be helpful to post while we're on this topic....
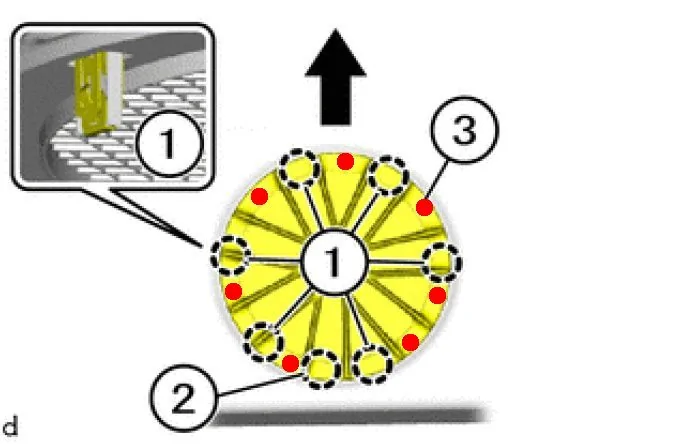
Remove the woofer grill assembly by prying up to free clips around the grill and then separate the 12 spoke grill cover from the flat grill plate and apply small dollops of flexible silicone adhesive around the underside of the 12 spoke cover (shown below)....Now reassemble and press firmly around the edge of the flat grill insert plate to secure it to the 12 spoke grill cover...

And finally, I applied some Dynamat to cargo area floor to eliminate any further vibrations and reduce road noise...
There is one more area that I would recommend applying some insulation where some vibrations occurred during low bass tracks...Behind the cargo panel there is quite a bit of open dead space and the plastic panel does not have any insulation between that and the body...
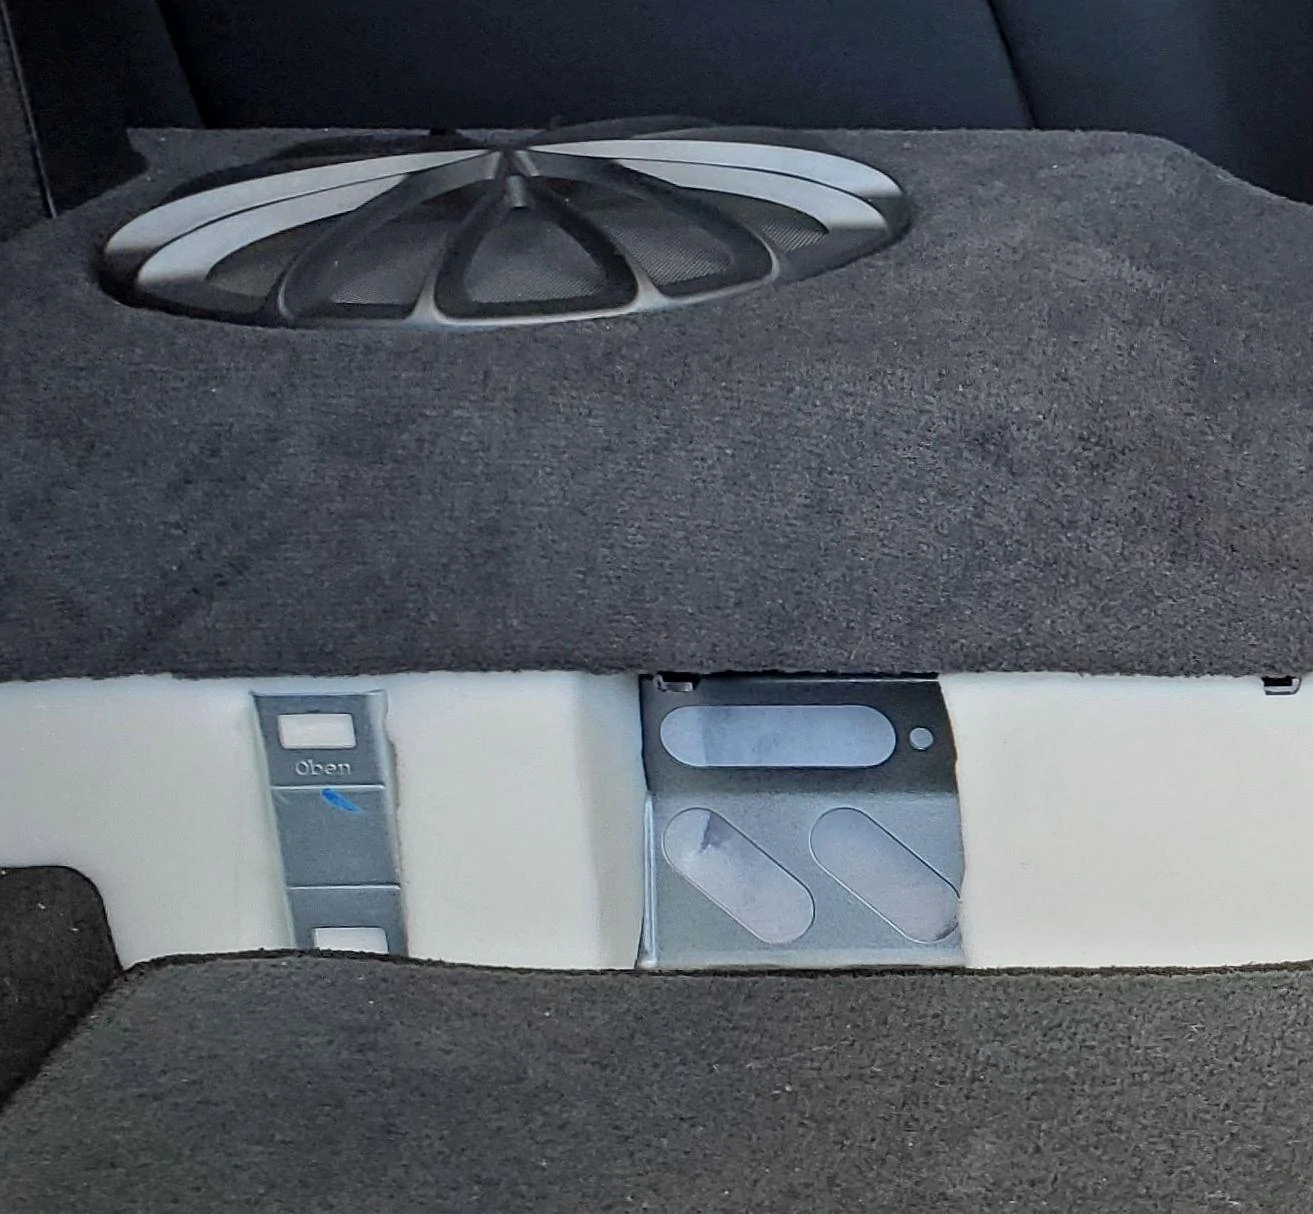
I used the 2" foam padding I had already purchased for the narrow rear sub cover panel and applied foam to the following areas shown below...The rear cargo panel is easily removed..I also opened the empty compartment that is used to store the roadside triangle that US Supra's don't have and inserted a 2" foam strip...
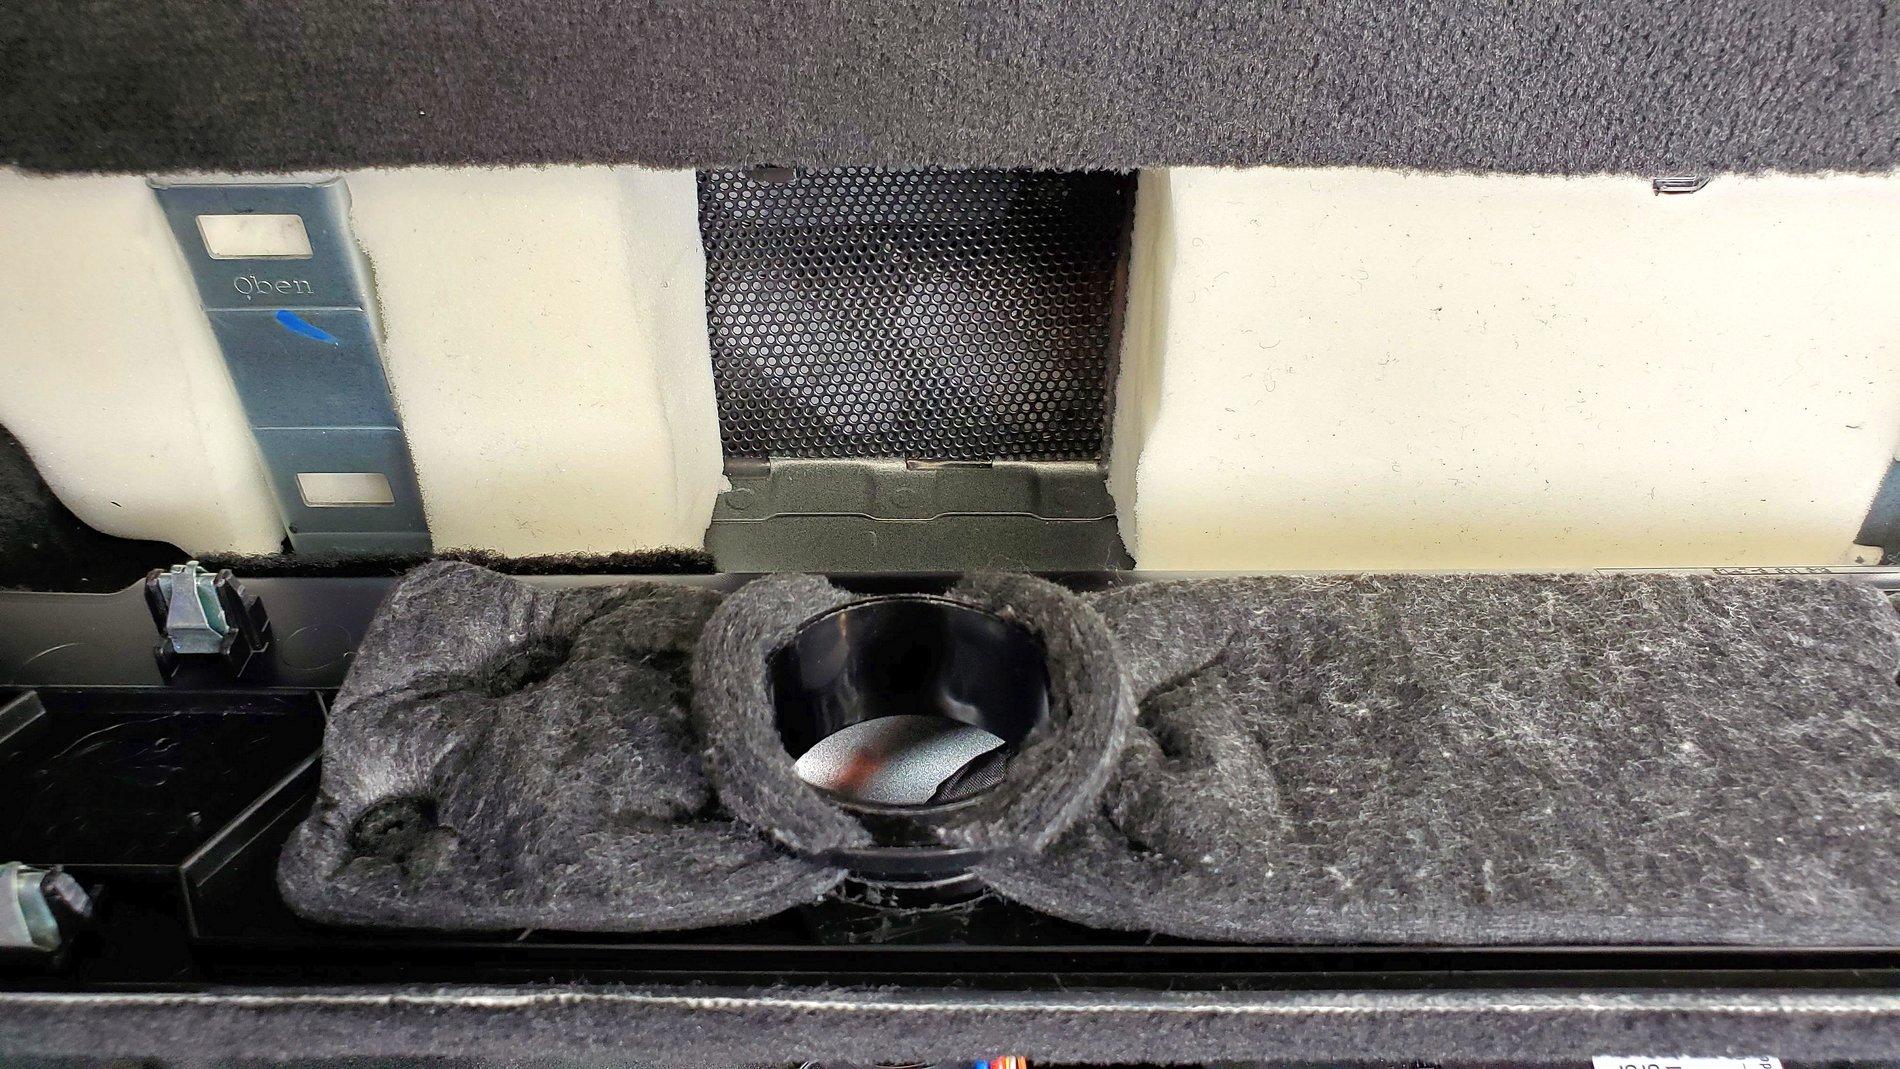
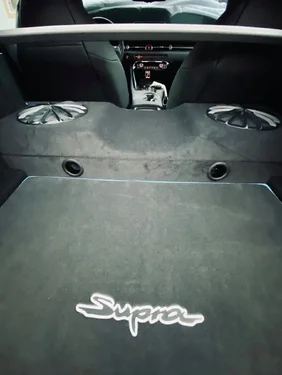
Shown below is a pic of the finished project:

---------------------------------------------------------------------------------------------------------------------------------------------------------------
Here is a list of materials I used:
2" Foam Pad
1" Speaker Wadding
2" Exhaust Port
Dynamat Extreme
Noico Adhesive Backed Foam Panels
--------------------------------------------------------------------------
Summary and Final Thoughts:
Surprisingly, the Harmon Kardon 8" Subs in the Supra are actually very good speakers once you correct some very basic design issues that were overlooked by Toyota... Without ports added, the bass exhaust energy was literally trapped behind the rear panel which created quite of bit of vibrational noise and also muddied bass response...
Adding exhaust ports to the rear panel along with lining the enclosure walls with wadding and insulating the space behind the narrow rear panel, essentially lowered the Q (damping effects) and resulted in a flatter / clearer bass response...The Bass is now deeper, punchier, and far less distorted and eliminated much of the vibrational noise heard...
For anyone considering installing direct replacement subwoofers as a knee-jerk reaction to improving sound distortions, vibrations, and rattles, these basic improvements should be seriously considered before replacing them...
Can you link the silicone adhesives used?Personally, I don't mind the grill appearance and they seem to blend into the rest of the trim...
Some of the music I enjoy is Ethereal Techno and EDM that has some very low bass notes and I like to listen to it played at 2/3 volume...This really tests the systems bass response!
At those low frequencies I did notice some minor vibrations that do occur between the grill cover and grill...Silicon adhesive between the two grill pieces fixed that issue for me...
You could possibly find another grill design of similar diameter and attach it to the main cover using industrial velcro...

Where is the 1” speaker wadding template even used? I only see people using the 2” foamtadda ... love the added details.
here are some contrabutions for your first post ... I've attached template drawings I made for your wadding and foam. I did these to make sure I had the right dimensions ... Lol.
Food for thought: You may consider using foam weather stripping to fix vibration issues caused by excessive bass. it comes in inexpensive rolls with adhesive already installed and it is readily available at most hardware stores which are open during the shelter in place.

What kind of foam are you talking about?Video is good but in the video above the aluminum crossbeam (tranvserse pipe) that goes across the back of the car is missing. This will need to be removed and reinstalled too in order to get the upper quarter panel reinstalled. There is no way that you will get the upper rear quarter panel reinstalled with the pipe still in place. You can take the upper quarter panel off with the beam installed but in order to get it back on you will need to remove the pipe, reinstall the quarter panel, and then reinstall the pipe again.
Having the rear sub deck only an inch or two above the woofer enclosure makes for some really awkward angles. Installation can get tedious and frustrating. They didn't use one but I would recommend a ratcheting bar clamp to help. Use the clamp in reverse to help spread and hold the sub deck away from the sub. You can pick one up form Harbor Freight for $4.
However you will still be limited on clearance because they didn't remove the two lower rear quarter panels and the sub deck will still be locked in place behind the seats and putting alot of pressure on the top. The sub deck housing is L shaped and has locks in place behind the seats. This makes it extremely aggravating to hold the deck up and work if you don't relieve the pressure. I slid the deck up off of the hooks and was able to pry the deck up pretty high with the ratcheting bar.
In the end, I would say that the only two pieces not removed in the video are the (lower rear quarter panels & lower door trim). The lower rear quarter panels are located behind the seats next to the doors. And the lower door trim is right next to the seat when you get in/out of the car. At this stage of removing panels, both of these pieces pop out easily when compared to the upper rear quarter panel.
My recommendation would be to go ahead and take those pieces off too. If you're going to remove that many body panels go ahead and install sound dampening and foam back there. I would dampen the black plastic sub housing and also all metal ports that the woofers fire into. Also don't forget to do the foam install. It will dramatically make a difference.
I would be curious to hear a sound difference between two sound systems (1) car that only had the subs replaced and (2) a car that had factory subs but has been properly dampened with matting and foam.
Overall, a good video but I see alot of aggravation and frustration by not removing the two other panels. They removed 6 panels plus the pipe. Yes you can do it that way but in the end, you will encounter some issues. If you're gonna replace the subs you will most likely want to dampen & foam the sub area too. A harder hitting or tuned sub will just create more vibration issues anyway. Just do the job completely and correctly the first time you go in there.
I politely suggest you go right back to the start of the thread & read it right throughWhere is the 1” speaker wadding template even used? I only see people using the 2” foam
")
There are several posters here that posted about the confusion of the 1” speaker wadding template. Many of them even questioned the use of sheets vs pull-apart wadding.I politely suggest you go right back to the start of the thread & read it right through
This modification of Tadda's makes a massive difference & is well worth doing